Giglad Documentation
Official guide to the Professional Software Arranger
Introduction
Giglad is a professional software arranger for PC and MAC. It comes with a high quality sounds library, native effects (reverb, delay, chorus, EQ, compressor, guitar amp simulator) and styles which will allow you to instantly start playing. Additionally, it allows you to use your own plug-ins (Instruments and Effects) and embeds a midi editor which will help you easily create new styles from scratch or tweak the existing ones (e.g. re-voicing). It can also read and play Yamaha SFF2 and SFF3 styles by automatically applying sounds from the native sound library, or by using soundfonts. It supports midi output and such as it can send midi information to hardware sound modules or external DAWs.
Giglad has been evolved a lot since its first release and has now become a very flexible but complex software in order to support many different user workflows and habits. It is highly recommended to read this guide in order to get familiar with the basic concepts of the software. This documentation has been structure in a way so you can jump to different sections and learn what most interests you.
Please mind that this documentation has been written and its up to date with version 5.0 of Giglad. If you are using a newer version the document may not be up to date as we do not update it with every release. If you are using an older version some features may not be available but the concepts have not changed much. The keyboard shortcuts exist on both platforms, Mac OS and Windows. However, the shortcuts mentioned in the document are for Windows. MAC users should use the proprietary Mac keys, for example Ctrl+C on Windows will be Command + C on Mac, also holding CTRL + left drag in Style Editor will copy the note on Windows, while the same function is done by holding the OPTION key + left drag on Mac.
Quick Start
A picture worth a thousand words which means that a video must worth a million words. Watch the quick start guide below to get familiar with the basic functionality of the software.
Preperations
Before downloading, purchasing or even installing Giglad you should prepare your environment (i.e. your PC or MAC and your external hardware). The following describes what you need to take under consideration in order to use the software efficiently.
Sound Card
Giglad can work with the internal soundcard which is available on every computer, however it is recommended to have an external USB or Thunderbolt sound card to be able to get the lowest latency on your system and also to be able to connect your rig to a PA system with a professional grade cable. For Windows, Giglad supports the default Windows Audio Driver but for better results, it is recommended to use ASIO Interface Technology by Steinberg Media Technologies GmbH. For MAC O/S, core audio is of course supported.
Midi Controller
Midi controllers come in many different forms, however they are mostly separated in two categories as they usually control two different things: played notes, and other midi messages. For controlling the notes we use the piano keys, while controlling the midi messages (setting the tempo, activating fill in, changing the volume of the drums) we use buttons and faders. Some midi controllers have only piano keys (old workstation keyboards from the eighties and nineties which usually have a high quality keyboard), while others have only buttons and faders (like some DAW controllers). There are some midi controllers that have both, keys together with buttons and faders integrated into one box. If your midi controller comes with encoders, this can be proven very handy especially for the tempo functionality.
In theory, you can use your PC keyboard to play the notes, however that would be quite inefficient. Any keyboard with the midi interface will be able to connect with your system and play Giglad; also modern midi controllers with added buttons and faders will be even better for controlling the software fully without the need to use the mouse. With a dedicated midi controller not only you will be able to play your music (i.e. switching chords with your left hand, and playing the melody with your right hand) but also controlling Giglad by starting/stopping the style, changing the tempo, navigating through panels, choosing styles, presets, and programs while playing, just as you would do with your hardware arranger.
Touch Screen
Although not required and not as important as the sound card and the midi controller, it can significantly improve you live performance experience. You can use your midi controller and your PC/MAC keyboard to control giglad but a touch screen will make the navigation much easier, and straight forward.
Overview
Giglad has 4 primary windows which can be accessed via the top most tab bar of the main window:
- The Arranger which is the core of Giglad and the tool to perform live.
- The Style Editor which embeds a midi editor and all the necessary tools to create a style from scratch or tweak existing ones.
- The Song Editor which can be used to create Giglad songs. Songs in Giglad are considered a set of instructions(such as chord change, section change, tempo change, etc) which can be set to the arranger in order for the software to perform on its own.
- The Memory Pool which can be used to keep virtual instruments in memory in order for these to quickly be loaded when needed and significantly improve the loading time of styles or melody parts.
Additionally secondary windows such as the Settings and the Auxiliary Window can be accessed via the menu.
Apart from the binaries which are needed to run the software and installed in "Program Files" for Windows or within the bundle for MAC, Giglad will create more files at runtime and these files can be found at:
- Windows: C:\ProgramData\giglad\
- MAC: ~/Library/Application Support/giglad
Giglad will also at runtime create the resources directories which are needed. It is very important to get yourself familiar with Giglad Resources. These are explained in detail in this document but you should have a quick overview.
- A style is a midi file which uses the midi protocol but also contain additional information on how the midi events should be played depending on the chord. Styles are essential for the arranger to be able to play. Midi files which are not in fact styles (such as midi songs) are also considered styles in Giglad and can be viewed along with other styles and be played by the Arranger.
- A Program is a basic structure in Giglad as it contains the voice/drum kit along with insert and send effects. Instead of selecting a virtual instrument manually every time you need to use it and modify it according to your needs, a program is created once and later used on a melody part or on a style track. Just as with any major brand keyboard: PROGRAM (Korg), VOICES (Yamaha), TONE (Roland).
- A Preset is like a snapshot of the The Arranger. You can save arranger's state (such as the style it is using, the virtual instruments (or programs) in the melody part, the tempo, the transposition etc) at any time and recall it later at your convenience. Presets are a very powerful feature of Giglad as they allow the users to save them only with what they need to recall, for example if a complete song setup is saved as a preset then a preset will contain the melody parts, style, tempo, transpose, octave, and many other settings. However if the next preset should have only a different melody part, then this preset will be saved in such a way that after activating it nothing else will change except the melody programs or virtual instruments.
- A Song as described above is a set of instructions which can be set to the arranger and can be created using the Song Editor or any Text Editor software.
- Audio is an audio file. Giglad can play audio files and this is mostly there for your recordings to easy listen back what you have recorded within the software.
- Audio Loops is again audio files but these kind of resources can be used in the Style Editor in order to create a partial or complete audio style.
- Lyrics are meant to be used for your lyrics and can be whatever format the native O/S browser component supports (such as txt, pdf, html, etc). Because of this fact and the flexibility of the viewer you may wish to use different type of files such as scores or just notes.
- A Pattern is like a map which can be used to switch chords with one note only. It is meant to be used with a foot midi controller where by giving the proper rules, the software can play the correct chords using only one midi note event. It is a handy tool for those who wish to use their hands to play another instrument (e.g solo guitar) and having Giglad playing for them while being able to switch chords using their foot.
- A Bank is a combination of 16 of the items above. Each time you select a bank, 16 different items that have been pre-assigned are available for quick selection via the Arranger user interface or your midi controller. A bank can contain presets, styles, programs, or any other items in the list, mixed together.
- A pad can be either a midi file or an audio file which can be played on top of the main Arranger. When a midi file, it is in fact a style which should contain 1 track only and 1 section.
Settings
Software settings can be accessed via the menu Tools→Settings... and they are separated into different categories as shown below. Modifying the settings is one of the first steps someone needs to undertake the first time Giglad is about to be used. Some of these have default values but others need to be set otherwise you will be unable to progress. Because there are many different workflows and Giglad users come from different hardware arrangers, a lot of options exist which will help you customize the arranger to your alikeness.
Resources Manager
Giglad resources are in fact files which live and can be found in your system using Explorer (Windows) or Finder (MAC). Every resource has its own working directory and by default this will exist in your Documents but it is possible for you to change this. The working directory as shown in the image, is the parent directory which Giglad will use to create the corresponding resources and find existing ones. You may not type directly into the edit box. Use the button on the right side of the edit box and select the directory from there. Mind that if you change it, Giglad will not automatically move your resources to the new directory. You will have to do this manually. Consider this as a hint to Giglad of where it should look for your named resource.

Usually resources depend on each other. For example presets are using styles and banks are using presets. Giglad is using relative paths to the working directory. So if for example all styles are moved into a different directory nothing will break and the presets will keep finding the styles as they will search for them using the relative path and not the absolute which obviously has changed. Hence, it is safe to move your resources around as long as you keep the same hierarchy. But if you move a style within its working directory then you may break the preset that is using it. Depending on the resource this may can be fixed manually (e.g. preset files can be edited via a notepad) but in some cases it will not be that easy. So you should avoid moving resource within the working directories.
You are advised to keep back ups of your resources as Giglad does not do this for you.
Resources Manager - Styles
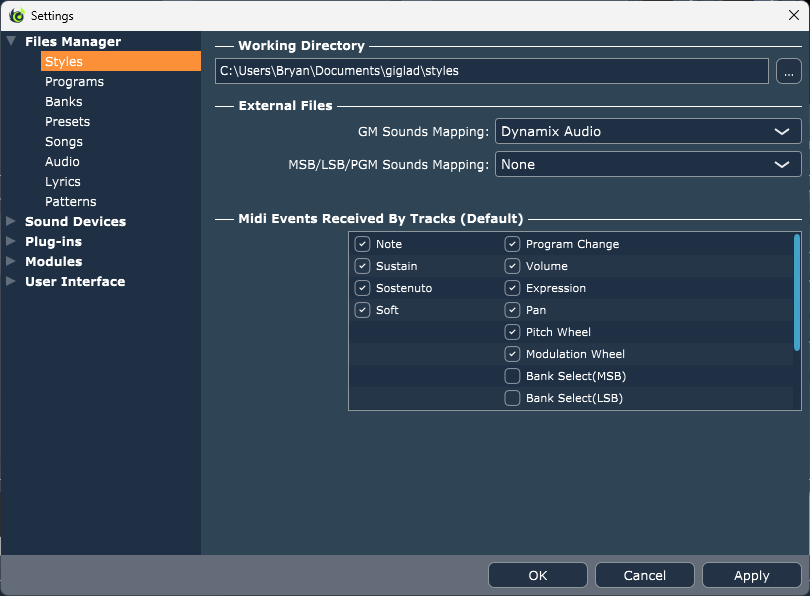
Working Directory may changed here consistently with all resources and as described in Resources Manager but there are additional options to be considered.
When applying an external midi file to the arranger, i.e. a style that has not been created by Giglad (e.g. a Yamaha style or a midi song file that has been downloaded from the internet), the software will map the instruments using the External Files Sounds Mapping options. Initially and by default, this would be the native sound library (i.e. Dynamix Audio) for GM instruments and none for MSB/LSB/PGM. You can change this to use a soundfont and the default soundfont can change from the settings but must be a GM soundfont. Alteratively, you may map virtual instruments to external styles by mapping appropriately. After creating one or more GM or Generic maps, these combos will be populated respectively and you can change this option to apply one of the maps that you have created the next time an external style is applied to Giglad.
You may also choose what midi messages will be received by the style tracks when loading external files. This is quite important because if for example you choose to receive volume midi messages and the style has these type of messages then any changes you do manually to the volume using the mixer it maybe reverted by these messages. Note that when the style is loaded all its messages will be read and be applied. But while playing you may wish for example to suppress volume messages and only drive it from the mixer. Finally, remember that this is only for external files. After a style is saved via the Style editor, is not longer an external file. And each Giglad style can have different settings for this.
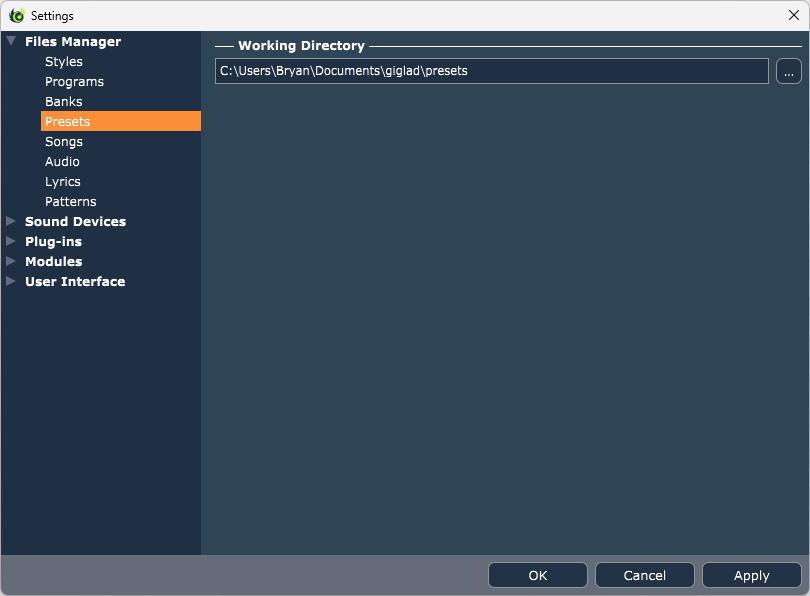
Resources Manager - Presets
Working Directory may changed here consistently with all resources and as described in Resources Manager but there are additional options to be considered.
- Allow preset to continue loading if missing resources error occur: Checking this option, will result a preset to be applied even if something goes bad. For example if a preset contains a style and the style cannot be found (because it has been deleted or moved) the preset will continue loading and be applied to the arranger. If this option is not checked and preset contains resources that cannot be found then it will not be loaded at all.
- Do not apply to master tracks: When saving a preset, you have the option to also save the state of a master track. For example if you have set the volume of your style to -12db this will be saved within the preset if you have chosen so. Checking this option will result this to be ignored when the preset is loaded and instead of applying the volume of your preset, the last set value that the mixer has will prevail.
Resources Manager - Audio
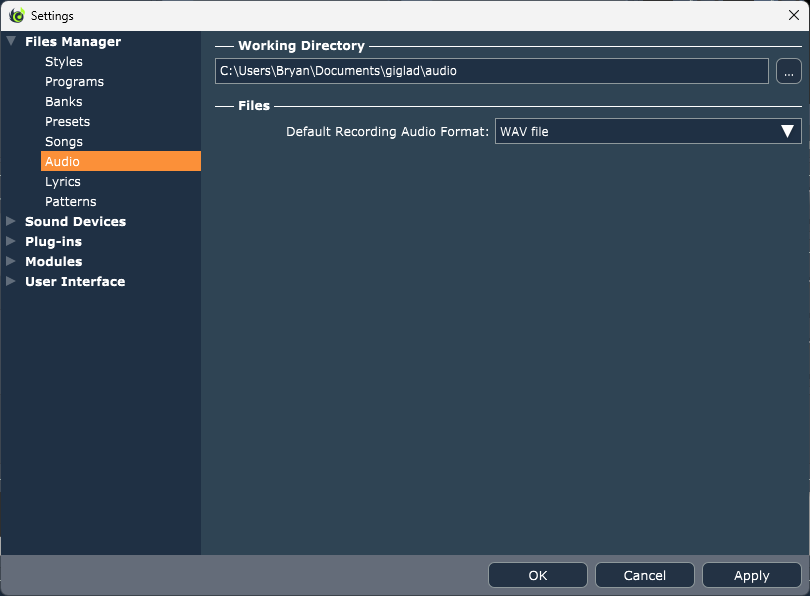
Working Directory may changed here consistently with all resources and as described in Resources Manager but you can also set the default audio format for your recordings. If you press the record button directly in the Arranger, recoding will start by using the default audio format specified here and the file will be created with a unique name in the audio working directory.
Resources Manager - A.Loops
Working Directory may changed here consistently with all resources and as described in Resources Manager but there are additional options to be considered.
- Load Audio In Memory: This option will load the whole audio of all audio loops in memory. It is not recommended as not only will take the resources from your system but also make style's loading slower. Its only there is you have a really slow hard drive and there is no time to read the audio from it. If you hear glitches try turning this option on.
- Tempo Reset Delay: When you change the tempo there is going to be a delay (240ms in this image) before this will be applied to the audio loop. This is to avoid constant changes as usually when you change the tempo, you do not directly go to the desired tempo but via the fader you move to it. So all values between will be ignored.
- Fade Out/In duration: Audio loops algorithm performs fade out - fade in and in cases cross fade to eliminate audio clicks. These are the values in milliseconds here and unless you are expert audio user, you should leave the default values.
Audio Device
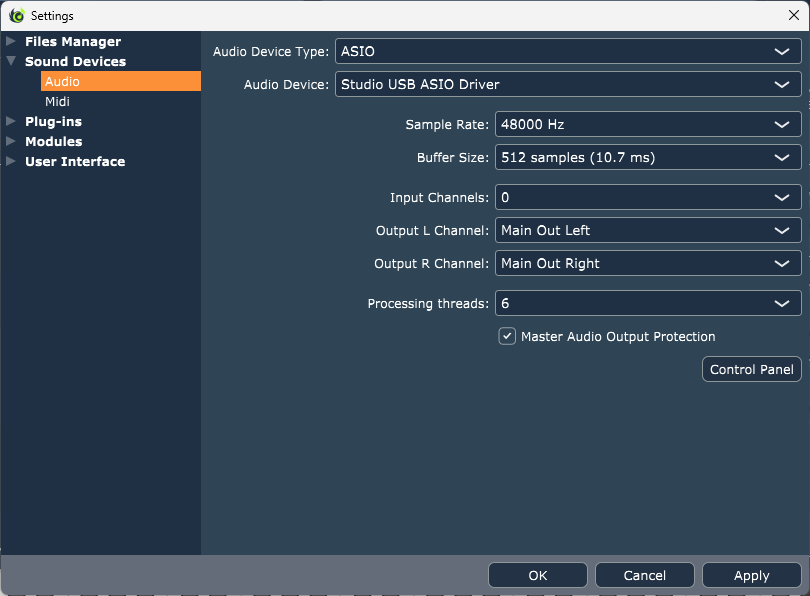
Here you must select the audio device which will be used to produce audio. In Windows by default, the Windows Audio type will be selected. It is advised to switch to ASIO if you have a sound card which supports it. In MAC the Core Audio will be selected. Additionally, if the driver of the card allows it, you can change the Sample Rate and the Buffer Size. The smaller the buffer size the lower the latency but also higher processing power requirements. You can also specify the Output channels in which the audio will be sent. Giglad only supports Stereo output at the moment, so you may choose only two channels.
If you wish to use external input devices such as a microphone or an electric guitar, you must also specify the number of input channels which you are going to use. Do no create more input channels than what you need as this impacts the performance. If you are not using any input devices, set this to 0.
The Processing Threads is the number of threads that the audio engine will use. Spreading the audio process to multiple system cores, can surely help to improve your system performance. If you hear sound glitches or notice in the Performance Window that your system works on its limits, you should consider increasing the number of these threads.
The Master Output Protection inserts a limiter DSP in the signal chain after the Master fader which limits the audio signal before entering the sound card converters to ensure that the output level never goes above 0dbFS thus protecting the audio from distortion, and also avoids the damage of speakers, monitors, and headphones. Even if active, Master Output Protection will not process, nor change the audio in any way unless the signal level on the Master out exceeds -0.1dbFS. Master Output Protection is enabled by default but you may disable this at your own risk.
The Control Panel button will display your sound's card configuration window (if available by your sound driver) and it is obviously different for different sound cards.
Midi Device
Here you must enable the midi input devices (i.e. keyboard controllers) you wish to use to play and control Giglad. Your midi controllers should be preferably connected to your system via USB. Before using a device, you need to enable it by clicking on the corresponding check box button. After enabling one device, you can verify that Giglad properly recognizes it by sending a midi event(note or control) using your midi controller and see if the "Signal" column reacts to it. If everything works as expected you will see the Signal column green highlighted as seen in the picture and the relative information of the event you have sent.
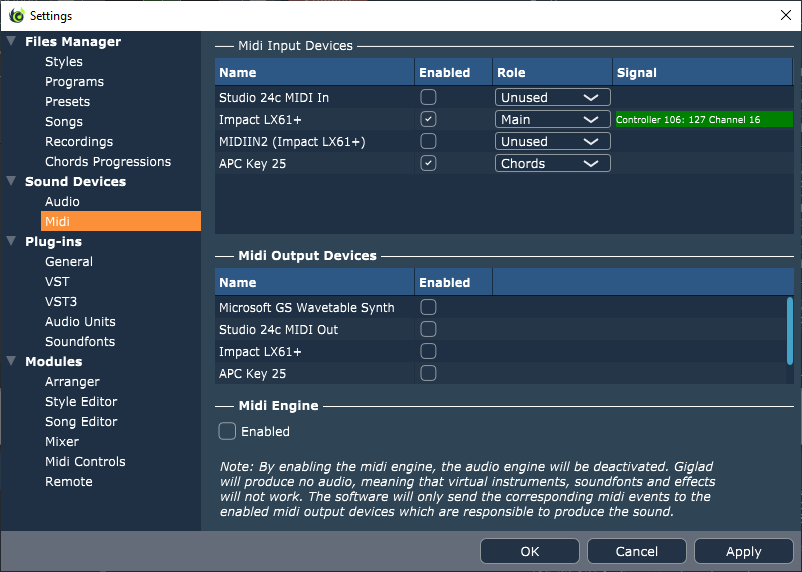
You should also select a "role" for your midi controller. If you have only one midi controller then the role should always be "Default". Even if you have more than one controller, you may select only one of them to have the "Default" role. "Default" is the device that will be used in melody tracks to receive the notes unless explicitly has been set to this track to use an "Aux" device. See Tracks on how you can do this. It is not allowed for a track to receive note events from more than one device as this can lead to note hanging and force midi panic. "Default" device is also the device that is used in the Style Editor to play and record events and the Memory Pool to test the input. If you have more than one devices, you can assign one of them to have the role "Chords". A midi device with this role will be used only to identify chords. In that case, you will want to move the splitter of the main keyboard in such a way to have the whole keyboard as melody because the chords will be received from a separate device (The one with the role "Chords"). All other devices should have the role "Aux". All enabled midi devices, no matter their role, can send control messages to Giglad in order to start, stop, switch sections etc.
Here is where you can also enable your midi output devices and you may wish to do so for four reasons:
- To send midi information to an external hardware synth (e.g. physical arranger keyboards or sound modules) which will produce the audio. It is highly recommended to not use software synths. Software synthesizers such as "Microsoft GS Wavetable Synth" should be avoided as the latency they introduce will not allow you to play live with.
- To send midi information to another DAW.
- To send midi information to your midi controller which you also use for input in order for this to give you leds feedback.
- To send midi clock information.
Mind that many midi controllers although a single hardware module they can report more than one input and output devices. My Novation midi controller as shown in the picture is identified with 3 midi input devices and 4 output devices. Its up to you to enable the proper one.
If you have enabled a midi device for the purpose of sending midi to an external hardware synth or another DAW the next step would be to select the appropriate instrument. You should read the Instruments Browser section for how this can be achieved.
Plug-ins General
- Scan for plug-ins when the applications starts: If this is checked, then Giglad will always check for newly installed plug-ins when the applications starts. Generally, it is not suggested to have this option on and better scan manually when needed in order to avoid additional start-up time.
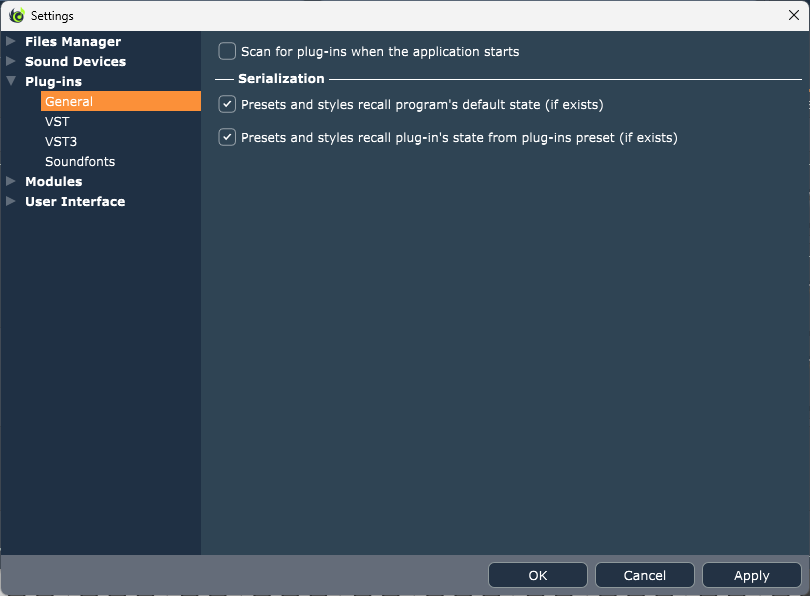
- Presets and styles recall programs's default state: If you use a program to apply an instrument in your style tracks or your melody tracks, Giglad saves this information (i.e. the relative path of the program you have used) in the style or preset file. This information is always saved (no matter if this option is checked or not) and the state of the plug-in is also always saved. When loading a style which has a program in each track, what will actually be loaded is the state of the plug-in. However, if this option is on then instead of loading the state of the plug-in, Giglad will try and find the program in your hard drive and apply this one. What is the benefit of doing that? Well imagine you have created your piano as a program and you have used it in 500 styles. If at that point you decide to tweak your piano program or even use a different plug-in for your piano program, instead of revisiting 500 styles and apply the new program, you can easily check this option (or having this option always on) which will cause your styles (and presets) to load the new program.
- Presets and styles recal plug-in's state from plug-ins preset: This is the same as the program but it applies for the plug-ins presets. This surely works with our native effects (reverb, delay, EQ, etc) but it is not that reliable for other plug-ins because even if some plug-ins have presets, they do not let the hosts know about it. So if Giglad does not know anything about the plug-ins presets, this is not something that can work.
- Convert to Native Sampler: Prior to version 5 of Giglad, the sound library was based on the DMXSampler.vst3 plug-in. This has now been replaced by an in-house implemented sampler. Resources (such as styles, presets, programs) which contain DMXSampler will automatically be converted to use the native sampler. Mind that DMXSampler is no longer distributed so if you choose not to convert, you may end up with no sound.
- Replace with Giglad programs: Again for the same reason and the redundancy of DMXSampler, this option will convert to native sampler but indirectly by just applying the current program to your resource. If for example you have a style that has been created in the past and you back then drag&drop the Grand Piano instrument on a track, loading this style will result the new Grand Piano instrument to be applied which is using already the native sampler.
VST3 Plug-ins
(Windows & MAC)
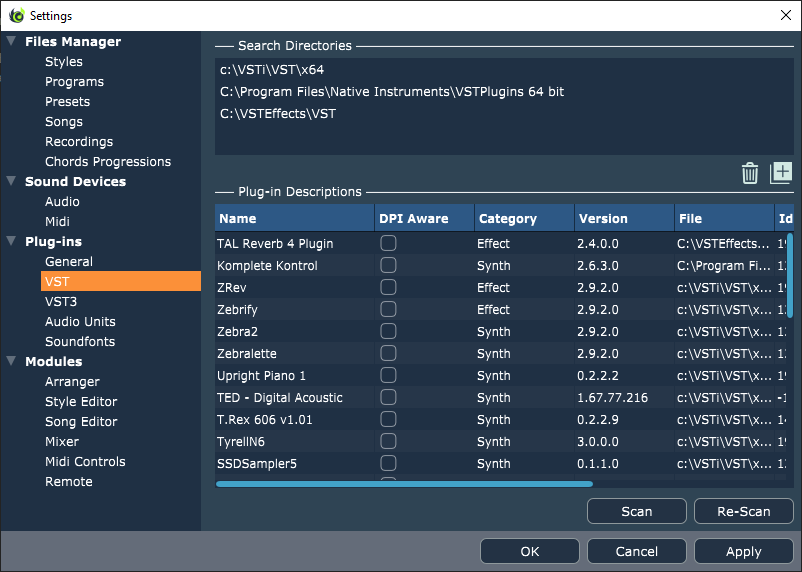
Here you need to select one or more directories where your VST3 plug-ins can be found. To add a directory, click on the Add button and select a directory which contains one or more VST3 plug-ins. To remove a directory, select it from the list and click on the Remove button. Please mind that no default directory is provided and the list is by default initially empty. After defining the directories, you need to press the scan button in order for the scan process to start. When completed, you will see the list of all the VST3 plug-ins which have been found and can be used.
Giglad does not monitor your VST3 directories. If you add or remove a plug-in from your system you need to perform a manual scan for the list to be updated. If you add a new plug-in to an existing directory then only scan is required. If you remove a plug-in then you will have to re-scan to see this removed from the list. Windows Only: Many plug-ins do not have DPI awareness. In your PC display settings, if your "Change the size of text, apps and other items" is something different than 100% then you might be interested in this setting. This concerns the plug-in window and if at any time you notice that a plug-in's window is either too small or either too big, you may try switch the corresponding option on.
You can perform a scan or a re-scan without visiting the settings window from the menu Tools→Plugins→Scan
Audio Units Plug-ins
(MAC Only)
Please refer to the section of VST Plug-ins. The functionality is quite the same but you may not select search directories for the audio units. Giglad only searches for them where the MAC O/S defines they should be.
Soundfonts
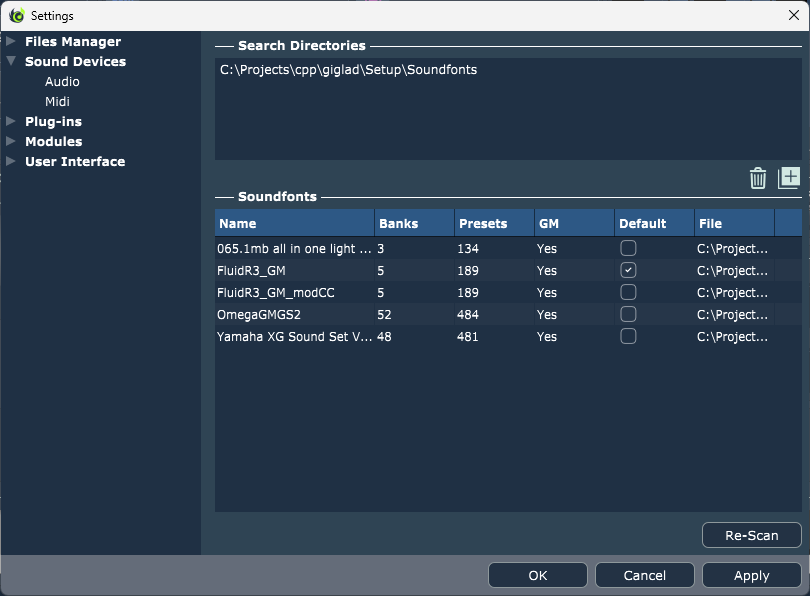
Here you need to select one or more directories where your soundfonts can be found. To add a directory, click on the Add button and select a directory which contains one or more soundfonts. To remove a directory, select it from the list and click on the Remove button. Giglad comes by default with the soundfont "FluidR3 GM" which is installed in \ProgramData\Giglad\Soundfonts and this is the default search directory. After defining the directories, you need to press the Re-scan button in order for the scan process to start. When completed, you will see the list of all the soundfonts which have been found and can be used along with information regarding these soundfonts.
You can choose only one of your soundfonts to be the "Default" and this would be the soundfont that will be used to populate instruments with external files when the corresponding option is "Soundfonts". See Settings. Only GM soundfonts can be set as "Default".
Giglad does not monitor your soundfonts directories. If you add or remove a soundfont file from your system you need to perform a manual Re-scan for the list to be updated.
You can perform a re-scan without visiting the settings window from the menu Tools→Soundfonts→Re-scan
Arranger
The General settings in the Arranger currently have the following options:
- When program starts: - Initialise everything: Giglad will start on its default state (no style loaded, no instruments, etc). - Recall last state: Giglad will save the state of the arranger (such as the selected style, the selected instruments in your right hand, the mixer state etc) when it exits and will reinstate it when the program restarts. - Set other preset...: Giglad will start by loading a preset of your choice
- Double Click Time Frame: Some Arranger buttons can behave differently when double clicking. This option defines the time on which the second click must occur in order for this to be considered "Double clicked". Double click behavior is optional and must explicitly be set on these buttons. Although maybe convenient to some users, others may find this annoying because if for example a button should do action A on single click and action B on double click, the arranger will wait this period to ensure that no second click has been occurred before executing action A. So this feature may introduce additional delay.
- Default Recording Format: Defines the type of recording that will be performed when pressing the record button in the "Player" panel in the Arranger. If audio is selected then audio recording will be started. If midi recording is selected then midi recording will be started. It should be noted that while the audio recording starts immediately after the recording buttons is pressed, the midi recording only starts after a style starts playing.
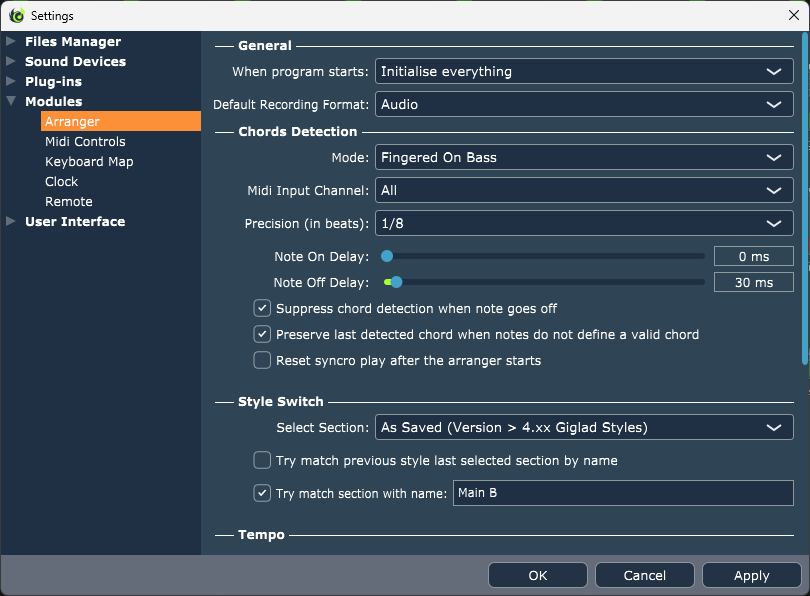
The Chords Detection settings in the Arranger affect the way the software detects the chords while playing live. You can experiment with these settings if you are an advanced user, otherwise it is recommended to leave the default values as they are.
- Mode: The different chord detection modes are described in in detail at the end of this section. From the advanced button, you may define your default mode and modes that can be easily set from the Arranger main user interface or from the midi controllers.
- Midi Input Channel: This is set to "All" by default which means that the arranger will detect chords which come from the corresponding midi device by any channel. You may restrict that by selecting only the midi channel that you wish to be used to detect the chords.
- Precision (in beats): The arranger clock is using midi ticks. A style for example with PPQ=768 has 768 ticks in a quarter note. And to that extend a measure with time signature 4/4 has 768x4 = 3072 ticks. The default value of precision 1/2 means that if you switch a chord at lets say 99 ticks this will actually be applied at 768/2 = 384 ticks. Do not think for a second that the higher the precision the better. It depends on your current latency and how good you are with the tempo.
- Note on delay: This is the time in milliseconds that the chord detector waits before identifying a chord when a note goes down in the midi controller.
- Note off delay: This is the time in milliseconds that the chord detector waits before identifying a chord when a note goes up in the midi controller. This value is ignored if the Suppress chord detection when note goes off is ticked.
- Suppress chord detection when note goes off: If this is ticked there will be no chord detection when notes go off in the midi controller. With simple words if you play the chord Am for example and then you move your hand away from the midi controller, the arranger will still be playing the Am chord.
- Preserve last detected chord when notes "on" do not define a valid chord: If for example you play C-E-G (Cmaj) and then you play only C, because C does not define a valid chord the arranger will keep playing Cmaj if this options is on.
- Detect 1+8 with single key and Major or Minor with two keys Self explanatory, it will detect these special cases.
- Reset syncro play after the arranger starts: If this option is on, the syncro play button will be set off once the arranger starts playing.
The Style Switch currently define the section of the style that will be set when loading a style.
- As Saved: In styles which have been created with Giglad version >= 4.0, the information of the initial section is saved within the file. This will be the section that was set when the file was saved. If this option is selected and the style contains this information (>= 4.xx) then the saved section will be set when a style changes.
- First: As the name suggests, with this option the first section will be set. As "first", is considered the first section in the style's timeline.
- Try match previous style last selected section by name: A very handy option for those who are using Yamaha styles or tend to name the sections of their own styles with consistent names. If while playing a style at section "Main C" you switch style and the style you load also contains a section named "Main C" then this section will be set. Otherwise, it will fall back to "As Saved" or "First".
- Try match section with name: If this options is selected and the style contains a section with the given name then this section will be set. Otherwise, it will fall back to "As Saved" or "First".
The Section Switch defines some options when you switch sections while playing live.
- Precision: Same as Chords Precision (see above), this determines how fast a section will switch. Mind that this only applies to sections that has been set to "Any Beat". Or if easier to understand, the fill sections.
- Auto Fill: If None, then selecting a main section will simply set the main section in the arranger. If Yes (Instant) selecting a main section will in fact trigger the corresponding fill section. This comes handy if you wish to have less buttons in your controller. Yes (Delayed) enables double click behavior. If you single click it will set the fill and if you double click it will set the main. As described above, the single click will delay its action by the double click time frame.
Tempo can be locked or unlocked using the corresponding button in the Arranger Tempo Toolbar. When the tempo is locked, tempo midi messages that exist in style will be ignored depending on if the arranger is playing or not and the corresponding options.
The Transposition options give you some additional flexibility on the way the transposition will behave in your arranger.
- Apply transposition on input: In this case the transposition is applied directly to your midi keyboard controller. if you play for example the note C4 in your midi keyboard controller with transposition +2, the note D4 will be highlighted in the Arranger's Virtual Keyboard and you will be hearing the note D4 coming out. Respectively if you play a chord like Cmaj7 in you your midi keyboard controller with transposition +2 you will see a chord Dmaj7 highlighted in your Arranger's Virtual Keyboard and you will be hearing the chord Dmaj7 by your style.
- Apply transposition on output: In this case the transposition is applied only to the output. if you play for example the note C4 in your midi keyboard controller with transposition +2, the note C4 will also be highlighted in the Arranger's Virtual Keyboard but you will be hearing the note D4 coming out. Respectively if you play a chord like Cmaj7 in you your midi keyboard controller with transposition +2 you will see a chord Cmaj7 highlighted in your Arranger's Virtual Keyboard but you will be hearing the chord Dmaj7 by your style.
- Apply octave to Melody Range only: Octave will only affect the melody range which is in most cases what every user wants.
The Pads options give you some additional flexibility on the way the pads will behave in your arranger.
- Stop syncro pads when the arranger stops: Self explanatory. If a pads in syncro mode and you start playing the arranger, stopping the arranger will cause the pads to no more be in syncro mode.
- Double click should set pad to syncro state: Enables double click behavior for pads. And as already has been explained on this section, this will delay the single click action.
- Nullify pads when loading a preset which does not contain pads information: If you load a preset that contains no pads and you already have pads assigned, checking this option will remove the assigned pads. Otherwise it will keep the existing.
- Nullify pads when loading a style which does not contain pads information: As above but for styles. Pads can belong to both presets or styles.
Fade In/Out specify the duration in milliseconds that fade in/out last when pressing the corresponding button in the Arranger Playback Toolbar. When fading out, the master volume of the audio engine will reach -inf decibels for example in 7 seconds. After that, there is a reset duration (default to 3 seconds) after which the master volume will reach again at 0db (or the previous volume of the master track) instantly. The fade out reset duration should not be set to 0 because in that case you will be able to still listen the remaining audio which has been sent to the audio engine.
Miscellaneous options for the Arranger are described below
- When Arranger Off, do not move split point if active instrument in Chord Range: When you press the Arranger Off button, the software will check if there are any active instruments in the Chords range (e.g. Left with instrument and not muted). If they are not, it will move the split point in order for the full keyboard to play the melody. If you uncheck this option, it will move the split point no matter if you have instruments in the chords range or not.
The following Modes are supported by Giglad:
- Single Finger: Allows detection of the four chords major, minor, seventh and minor seventh by pressing a minimum number of key notes.


- Fingered: At least three key notes need to be pressed(with the exception of 1+5 and 1+8) in order for a chord to be detected. This is the default mode and the one being recommended for playing in Giglad. It recognizes the various chord types as listed on any hardware arranger manual or in the web.
- Fingered Incomplete: Detects all the chords in a similar way with Fingered but additionally it will detect chords with one or two key notes: - A single note key will result a major of the note key being pressed (exactly as the Single Finger). - Two key notes will result the closest corresponding major, minor or sus4 chord. For example C+E will result Cmaj, C+Eb will result Cm, C+F will result Csus4.
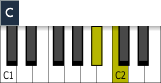
- Fingered On Bass: Detects all the chords in a similar way with Fingered but the lowest note played will be considered a bass note allowing you to play bass chords. For example G-E-C will result the C/G chord. Only tracks which have CTA Shift [Bass] will be affected by this mode. For Yamaha Styles this is set automatically to the bass track. But for custom styles you must set this CTA to the track which plays the bass.
- Multi Finger: It is using all Single Finger, Fingered and Fingered Incomplete modes in order to detect a chord.
- Full Keyboard: Detects chords in the full range of the main midi keyboard controller. At least three key notes need to be pressed and if there is an interval of more then 5 semitones between two key notes, all the notes at the right will be ignored. The "Chords" "Melody" ranges remain visible at the top of the virtual keyboard as they define the default ranges of the Left and Right hand tracks in melody.
- Full Keyboard (No Intercal): Same as Full Keyboard but this mode neglects the interval restriction of 5 semitones, meaning that even if more then 5 semitones between two key notes, these will not be ignored.
- Single Finger (Patterns): Chords are set by one note using patterns.
Midi Controls
Midi Controls allow you to map some, if not all, of your controls of your midi keyboard controllers with the Giglad functionality. While playing live, you will wish to stay away from the mouse and keyboard as much as possible. By mapping conveniently your controls, you will be able to start/stop, change the tempo, change a style and much more, directly from your midi controllers without interacting with Giglad UI at all.
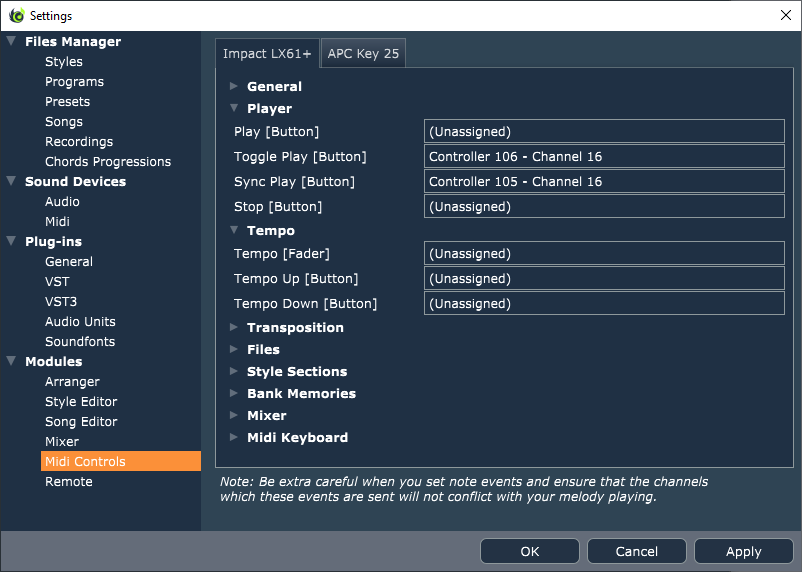
All the enabled midi controllers are placed in tabs and you can assign a cc, a note or a program change event to them. You can even assign the same action to different controllers which means for example that you may start Giglad by 2 different midi controllers. You need to be extra careful when you assign notes. An event is identified by its type(note, cc or program change), number(e.g note C3) and the channel that it is sent. If for example you assign a pad which sends a note event C3 at channel 1 and your main keyboard also sends the note events at channel 1, then when you play C3 on your keyboard instead of listening the corresponding note, a midi control will be triggered. The Midi Controls are divided into 2 main types. The buttons and the faders. A button of a midi controller will give a value of 127 (when pressed) and a value of 0 (when unpressed). A fader will give values between 0-127. Encoders are also considered faders but they send relative values and these are handled properly by Giglad. Notes are considered as buttons. The best way to assign a value is to give the focus to the corresponding control by placing the mouse cursor inside it and then press the button or move the fader from your midi keyboard controller. To de-assign a value simply delete the assigned one. You cannot assign the same control to different actions. The newest assign value will replace the old.
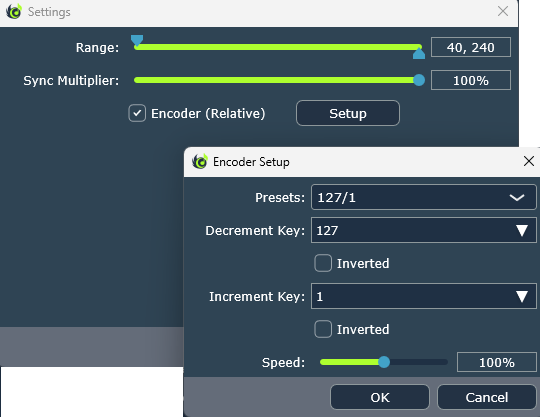
Each entry where you can define the midi event has an icon at the left which indicates if a button or a fader should be assigned and a settings button at the right from where you can access more advanced settings. Here we see the settings for a fader from where 1) You can set the range for the value (this is the tempo fader hence I restrict it to 40-240 but I could change this to smaller range). 2) Tell Giglad that this is in fact an encoder so it will receive relative changes in midi messages. From the Encoder Setup you can select a preset. Different encoders use different protocol for sending midi messages. If you do not wish to read your midi controller manual and understand this, use try and error and see which preset makes your encoder work as should. Finally, sync multiplier is there to improve the behavior for non encoder faders. The purpose of this is not apply the change until it gets close to the current value of the arranger. This is the percentage of how close it should be. For example: If your tempo in the arranger is 60 and your fader is at 127, while start moving it down it will not really apply the tempo hence you will not see a jump from 60 to 240 and it will only apply once it gets close the the actual tempo. This can improve things but at the end of the day all you need is an encoder.
Below are explained the entries where you can assign midi events to control Giglad.
- Modifiers: There are 3 modifiers and their purpose is to allow you control more with less. Better see this with an example. Lets say you have a button in your controller which sends CC100 so you assign this button (C100) to Mod1. Now you have another button which sends CC101. You can assign this CC101 to lets say fade in. What you can also do is assign CC100 + CC101 to fade out. So with the same button you can either fade in or fade out depending on if you press the Mod1 or not.
- General - Midi Panic [Button]: Will cause all the notes to be set off (or the audio engine to restart if possible). To be used when notes are hanging. There is also a menu item for this, but it is useful sometimes to have it assigned in your midi keyboard.
- Player - Fade In [Button]: This will cause the Arranger to start playing with fade in.
- Player - Fade Out [Button]: This will cause the Arranger to stop playing with fade out.
- Player - Tap Tempo [Button]: This will trigger the the Arranger tap tempo functionality.
- Player - Syncro Start [Button]: This will set the Syncro Start on/off.
- Player - Syncro Stop [Button]: This will set the Syncro Stop on/off.
- Player - Play [Button]: This will cause the Arranger to start playing. It will do nothing if the Arranger is already playing.
- Player - Toggle Play [Button]: This will cause the Arranger to start playing if not already and to stop if already playing.
- Player - Stop [Button]: This will cause the Arranger to stop playing. It will do nothing if the Arranger is not playing.
- Player - Bass On/Off [Button]: This will set the Bass on/off.
- Player - Memory On/Off [Button]: This will set the Memory on/off.
- Player - Arranger On/Off[Button]: This will set the Arranger on/off.
- Player - Chords Seek Mode [Button]: This will swap the chord detection mode as this has been predefined in the Arranger Settings.
- Player - Chords Seek Locked [Button]: This will cause the arranger to not detect new chords while this is pressed. Note that it works a bit differently than the other buttons as it will suppress chord detection only while the button is down.
- Player - Record: This will set the Arranger in recodring mode.
- Player - Semi Bar: Will trigger the semi bar.
- Tempo - Tempo [Fader]: This controls the tempo of the Arranger. Because the tempo has a range of 40-240 and the fader, if not encoder, can only send messages in the range of 0-127, there is no immediate correspondence. If the fader has a value of 0 the tempo will be 40 and if the fader has a value of 127 then the tempo will be 240. The values between are calculated accordingly. Hence, a change in the fader +1 does not mean tempo +1. It will probably mean +2 or +3. Tempo is one of the most important controls to be set and if your midi controller supports encoders then you should really assign an encoder to it, as this will work so much better.
- Tempo - Tempo Up[Button]: This will increase the tempo of the Arranger by one. Does not have the same restrictions with the tempo fader.
- Tempo - Tempo Down[Button]: This will decrease the tempo of the Arranger by one. Does not have the same restrictions with the tempo fader. By pressing both Tempo Up and Down, tempo will be set to the default tempo of the current style (if any).
- Tempo - Tempo Lock[Button]: This will lock the Arranger tempo if unlocked and will unlock it if locked.
- Transposition - Transposition [Fader]: This controls the transposition of the Arranger.
- Transposition - Transposition Up[Button]: This will increase the transposition of the Arranger by one.
- Transposition - Transposition Down[Button]: This will decrease the transposition of the Arranger by one. By pressing both Transposition Up and Down, transposition will reset to 0.
- Views - Styles [Button]: This ensures visibility to the view where styles can be selected(i.e. styles browser).
- Views - Instruments [Button]: This ensures visibility to the view where instruments can be selected(i.e. instruments browser).
- Views - Presets [Button]: This ensures visibility to the view where presets can be selected(i.e. presets browser).
- Views - Banks [Button]: This ensures visibility to the view where banks can be selected(i.e. banks browser).
- Views - Songs [Button]: This ensures visibility to the view where songs can be selected(i.e. songs browser).
- Views - Audio [Button]: This ensures visibility to the view where audio can be selected(i.e. audio browser).
- Views - Lyrics [Button]: This ensures visibility to the view where lyrics can be selected(i.e. lyrics browser).
- Views - Patterns [Button]: This ensures visibility to the view where patterns can be selected(i.e. patterns browser).
- Views - Melody [Button]: This ensures visibility to melody panel.
- Views - Physical [Button]: This ensures visibility to physical panel.
- Views - Lyrics Viewer [Button]: This ensures visibility to lyrics viewer panel.
- Views - Pads [Button]: This ensures visibility to the view where pads can be selected(i.e. pads browser).
- Views - Page 1,2 3...16[Button]: This ensures visibility of the selected page for the active browser.
- Views - Group Pages Prev [Button]: Moves to the previous group of pages of the active browser.
- Views - Pages Next [Button]: Moves to the next group of pages of the active browser.
- Views - Pages Prev [Button]: Moves to the previous page of the active browser.
- Views - Pages Next [Button]: Moves to the next page of the active browser.
- Views - Back [Button]: Goes to the parent directly of the current visible directory of the active explorer.
- Views - File 1,2 3...16[Button]: This will set to the Arranger the corresponding file as the number shows left to the item of the active explorer.
- Views - Lyrics Scroll Next[Button]: Scrolls the lyrics down.
- Views - Lyrics Scroll Prev[Button]: Scrolls the lyrics up.
- Encoders Navigation: Can be used to navigate easily to the browsers with encoders. Assign an encoder to each resource and by moving the encoder, the corresponding browser will get visible while a soft selection will show which one can be selected. Assign buttons to "Select" in order to set the soft selected resource and to "Back" to simply go back.
- Style Sections (by Index) - Prev Style Section: This will set the previous section of this currently playing in the arranger.
- Style Sections (by Index) - Next Style Section: This will set the next section of this currently playing in the arranger.
- Style Sections (by Index) - Style Section 1,2,3...16 [Button]: Each of this buttons allows you to set the corresponding style section to the Arranger. By index means 1 will select the fist section as shown in the arranger, 2 will select the section section and so on
- Style Sections (by group) - Style Intro 1,2,3...9, Style Main 1,2,3...9 etc [Button]: Each of this buttons allows you to set style section to the Arranger. Intro 1 means the first section in group intro 1 intro 2 means the second section in group intro 1 and so on.
- Bank Memories - Prev Memory: This will set the previous memory of this currently active in the arranger.
- Bank Memories - Next Memory: This will set the next memory of this currently active in the arranger.
- Bank Memories - Memory 1,2,3...16 [Button]: Each of this buttons allows you to set the corresponding memory to the Arranger.
- Style Memories - Style Memory 1,2,3,4 [Button]: Each of this buttons allows you to set corresponding style memory to the Arranger.
- Pads - Pad 1,2,3,4 [Button]: Each of this buttons allows you to set corresponding pad to the Arranger.
- Pads - Syncro Pad 1,2,3,4 [Button]: Each of this buttons allows you to set corresponding pad in syncro mode to the Arranger. Hint: User Modifiers.
- Mixer - Mixer Master Volume [Fader]: This allows you to control the master volume.
- Style Tracks - Master Volume [Fader]: This allows you to control the volume of your style.
- Style Tracks - T1, T2...T16 Volume [Fader]: This allows you to control the volumes of each track of your style.
- Melody Tracks - Master Volume [Fader]: This allows you to control the volume of your melody.
- Melody Tracks - LH1, RH1, RH2, RH3 Volume [Fader]: This allows you to control the volumes of each of your melody tracks.
- Melody Tracks - LH1, RH1, RH2, RH3 Mute [Button]: This allows you to mute each of your melody tracks.
- Physical Tracks - T1, T2, T3, T4 Volume [Fader]: This allows you to control the volumes of each of your physical tracks.
- Melody Tracks - T1, T2, T3, T4 Mute [Button]: This allows you to mute each of your physical tracks.
- Pads Tracks - Pad 1,2,3,4, Volume [Fader]: This allows you to control the volumes of each of your pads.
- Pads Tracks - Pad 1,2,3,4, Mute [Button]: This allows you to mute each of your pads.
- Midi Keyboard - Split Chords/Melody [Fader]: This allows you to define your chords and melody section in the arranger's main keyboard.
- Midi Keyboard - Octave Up [Button]: This will cause the notes to be played one or more octave(s) up.
- Midi Keyboard - Octave Down [Button]: This will cause the notes to be played one or more octave(s) down.
In most cases, you wish the assigned midi events to be handled only by the arranger in order to start, stop, select files etc. But in some cases you may wish these messages to be handled by the arranger but to also to be transferred to the plug-in. In this case you need to check the option "Allow assigned midi messages to fall through fro plug-ins processing".
Giglad takes midi messages from your midi controller in order to perform an action (e.g. start playing) but also can send messages back to your midi controller so the controller sets the right color to the corresponding button. This can significantly improve your experience while using Giglad. Bojan from Dynamix Audio has created a video when you can deeply understand this.
Below is my Novation SL MkIII midi controller where we see different leds coloring which have been set from Giglad.
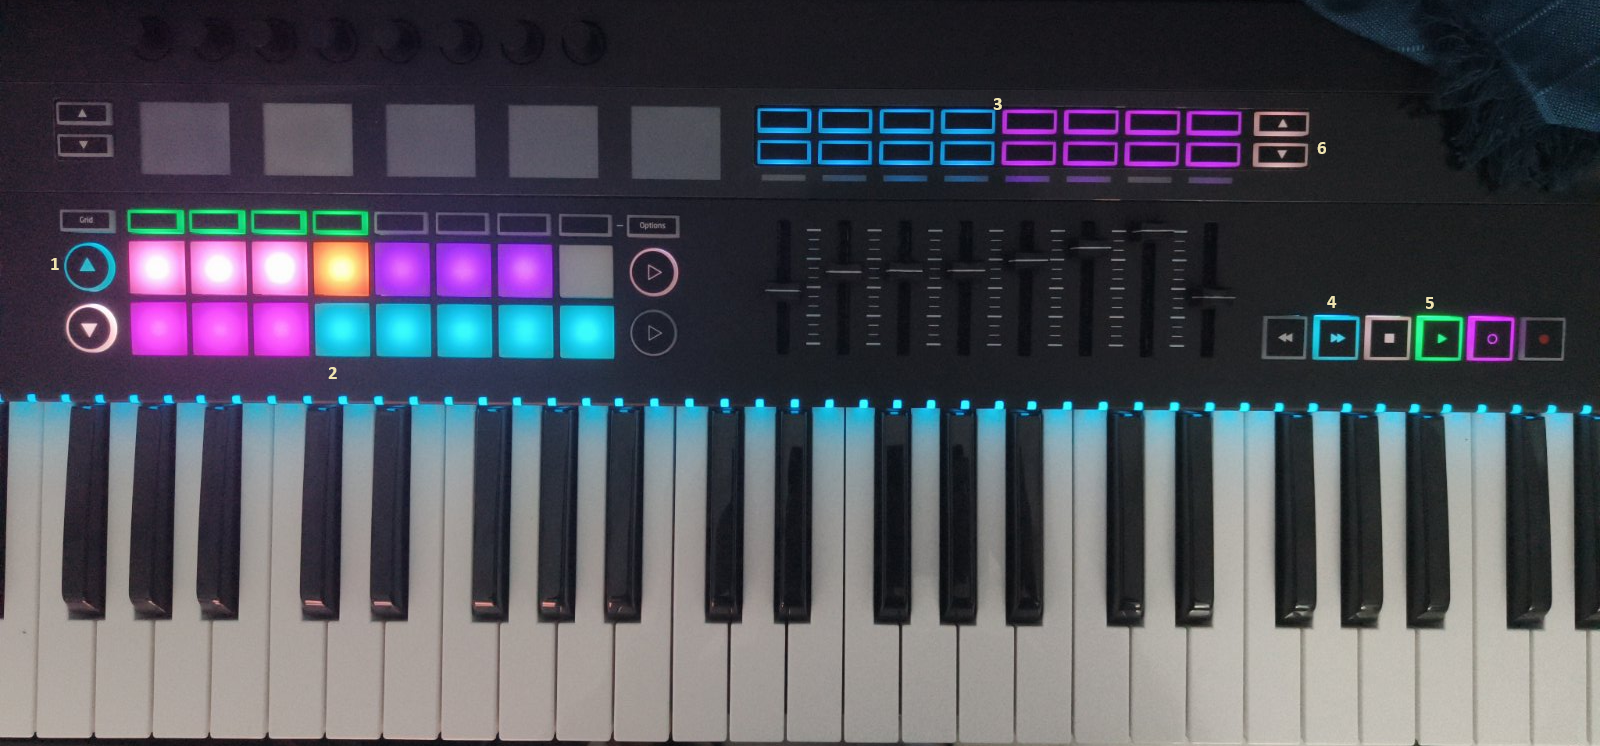
- No 1: Two arrow buttons that I have programed to indicate the transposition. The fact that the up is blue means that currently my transposition in the Arranger is > 0.
- No 2: Here are my sections. First row, 3 Pink ones for the intro, 5 purple for the main. First main is currently active so instead of purple it gets orange. I only have 4 main in my current style, hence the last button has no color. Next row is for endings and fills with different color to know if its an ending or a fill.
- No 3: Here are my bank memories. I have 16 currently assigned so they all have a color. I use blue and cyan to identify where the next 4 begin.
- No 4: Syncro. It turns blue so I know I am in syncro state. The button next to it is the syncro stop which is not active
- No 5: Toggle Play. Its not playing and not visible in the picture but it in facts blinks as we are in syncro state.
- No 6: Arranger octave. I am at +0 at the moment
So how can you do all this on your own midi controller? Well first you need to read the programming guide of your midi controller and understand what messages the controller expects in order to give colors to its buttons. Then you need to understand how you will do this in Giglad: First you must set the output device, i.e. the "Leds Feedback Midi Output Device" which I have set as shown in the very first picture to MIDIOUT2 (Novation SL MkIII). Then you must press the settings button for each of this entries that you need feedback and populate the correct values.
A button in giglad can have 3 states and depending on its current state the corresponding midi messages will be send to the midi controller which will turn defined colour on.
- Not Present: This is the case where a button will do nothing. For example, you have assigned Intro 3 to button C but your style only contains 2 intros. In this case the state of button C will be "not present". Not all buttons have this state. For example the toggle play always exists so it cannot be "Not present". In the Novation picture, Main 5 is not present but I do have a button there in case a style contains 5 mains.
- Present On: This is the case where a button will do something and currently active. In the Novation picture, this is the case for Main A
- Present Off: This is the case where a button will do something but not currently active. In the Novation picture, this is the case for all the sections but Main A.
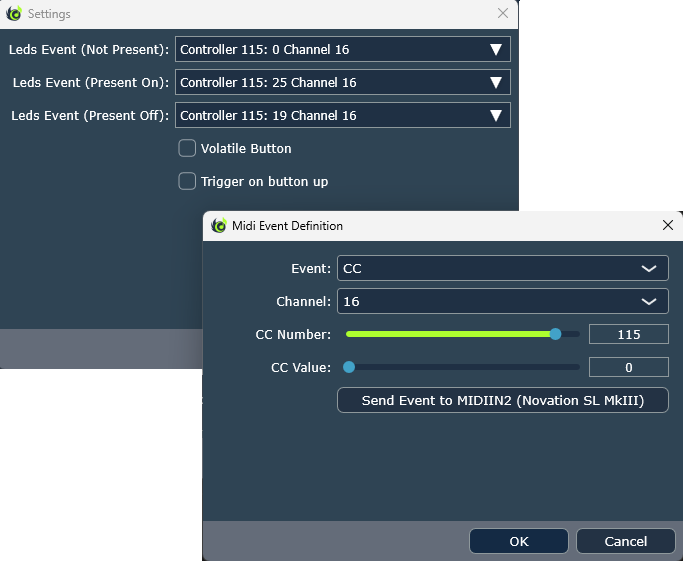
As such, and by knowing what colors your midi controller supports, you should define the correct message to be sent. In the picture we see the settings for the toggle play. I send cc115 at channel 16 with cc value 0. This makes the led go off as I know from the programming guide of my Novation but in fact this message will never be sent because the button is always present. I send cc115 at channel 16 with cc value 25. This will make the button blue as shown in the picture. And finally I send cc115 at channel 16 with value 19 which makes the colour gray just to have some coloring even when not playing.
There can be more options in button settings so lets see what they do:
- Volatile Button. Giglad remembers the last state that has send and does not send messages if something has not changed. But some controllers turn their own colors when you press a button so by checking this option you force giglad to always send messages. You should avoid it.
- Trigger on Button Up. Self explanatory. Giglad will do something when the button in the controller is up and not down.
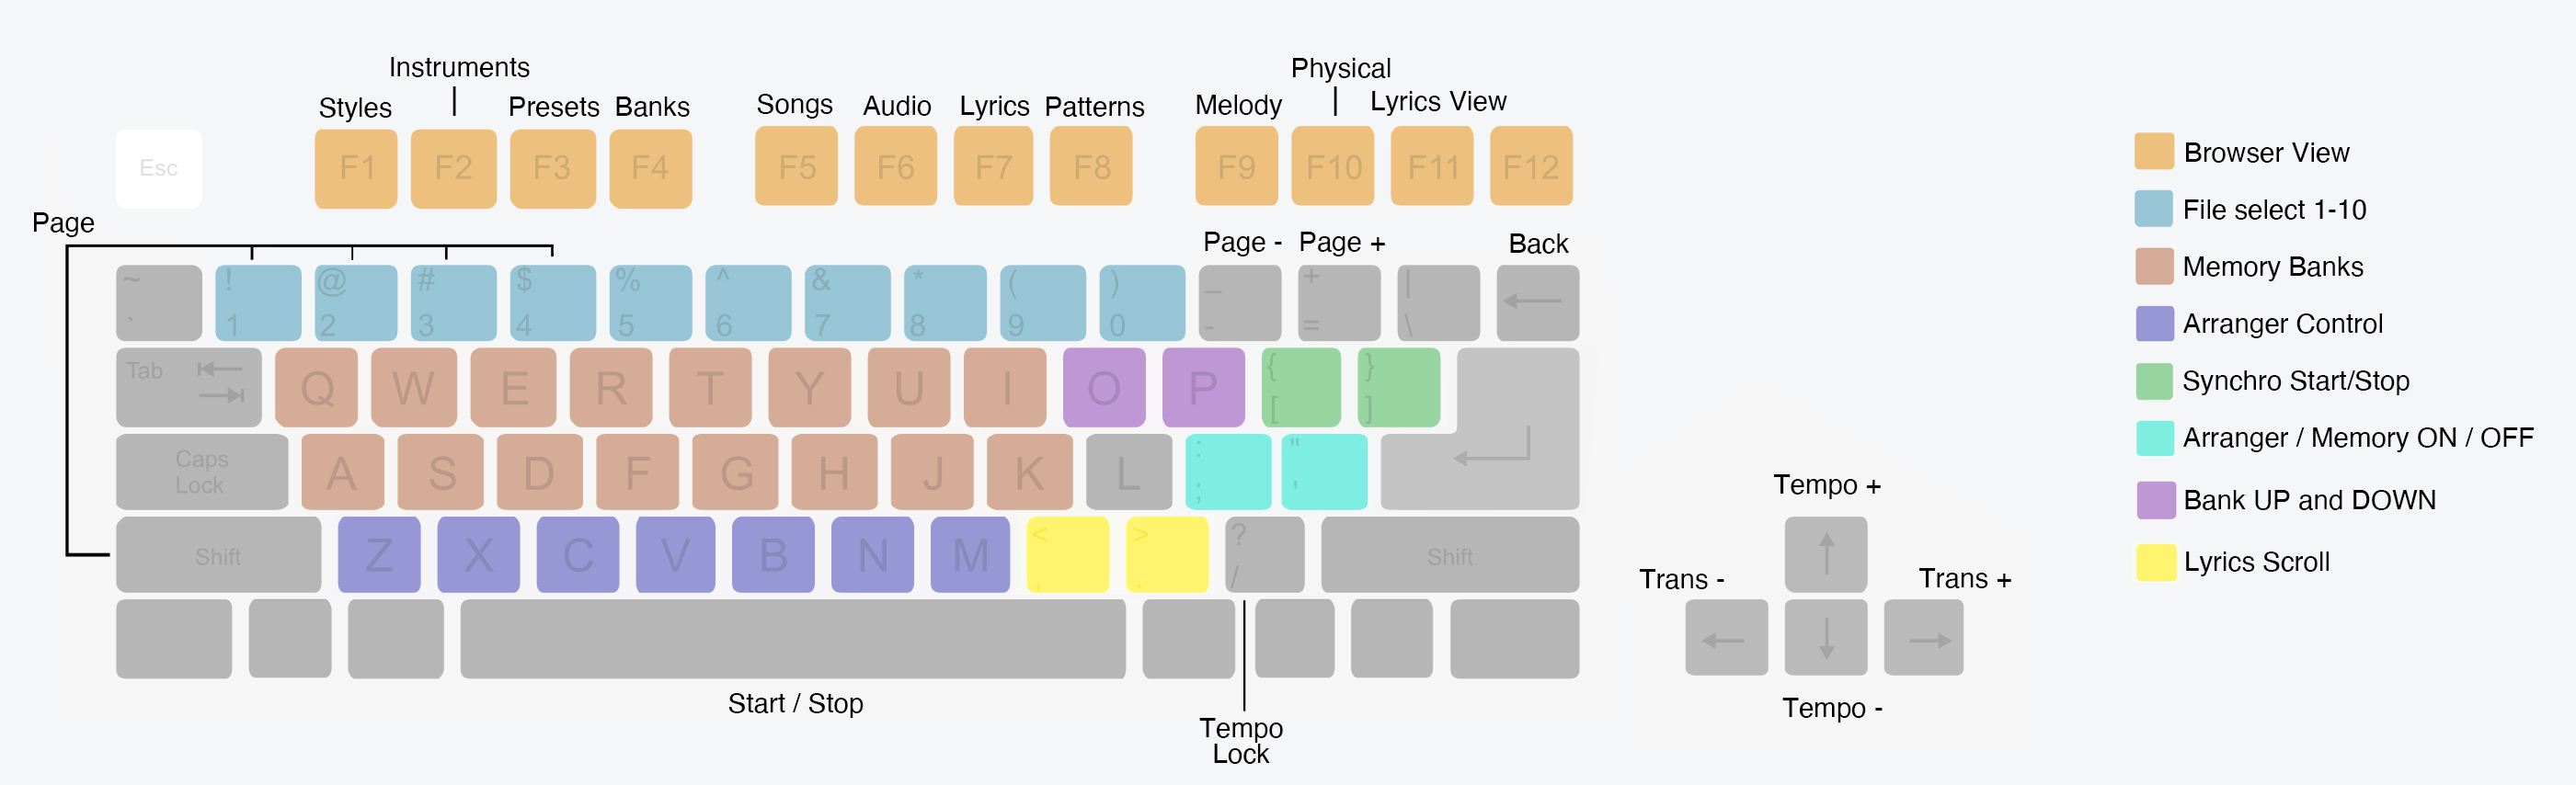
Keyboard Map
Similar for your midi controller you can assign partial or all functionality to be controlled by you PC/MAC hardware keyboard. Apparently faders are not supported so only the functionality that can be assigned to buttons is available. Furthermore, here you can map some other ui controls such as Midi Editor shortcuts. The picture below shows the default mapping.
Clock

- Audio Clock: The arranger is driven by the callback of the audio driver. This is the recommended clock to be used because it is in perfect sync with audio processing and because in general the interrupts which are generated by drivers are the most accurate.
- Midi Clock: The arranger is driven by its internal software clock which interrupts at the selected tempo according to the midi protocol i.e. 24 pulses per quarter note. This mode is not recommended unless you need to set a Master or Slave or you are using the Midi Engine of giglad where the audio clock is not available.
- Midi Clock (Master): The arranger is again driven by its internal software clock but you can also specify the midi output devices to send the clock information, in order for this to be received by other software (e.g. a DAW). You must first enable the midi output devices from the Midi settings.
- Midi Clock (Slave): The arranger is driven by the midi clock of your choice. This can be a hardware midi clock or the midi clock of another software. You must first enable the midi input devices from the Midi settings and obviously you can only have one one device selected (i.e only one midi clock).
The Enable SPP is a tricky option and must be treated with care. It is only available when the midi clock is Master or Slave and correspondingly will send or receive the song position information. Sending this information may not have the results your would expect in the receiver side (i.e. the other software). That is because Giglad keeps looping back in order to keep playing a style section and the other software may not like that. (For example it may stop all the time). Receiving this information is even trickier. For starters you won't be able to change sections using Giglad. The timeline (which is in fact the style which contains the sections) will only be changed by the SPP that is send from the other software. This is probably not what most users want but this option is there because Giglad is used by our users in many ways and there is not point to limit their imagination.
User Interface General
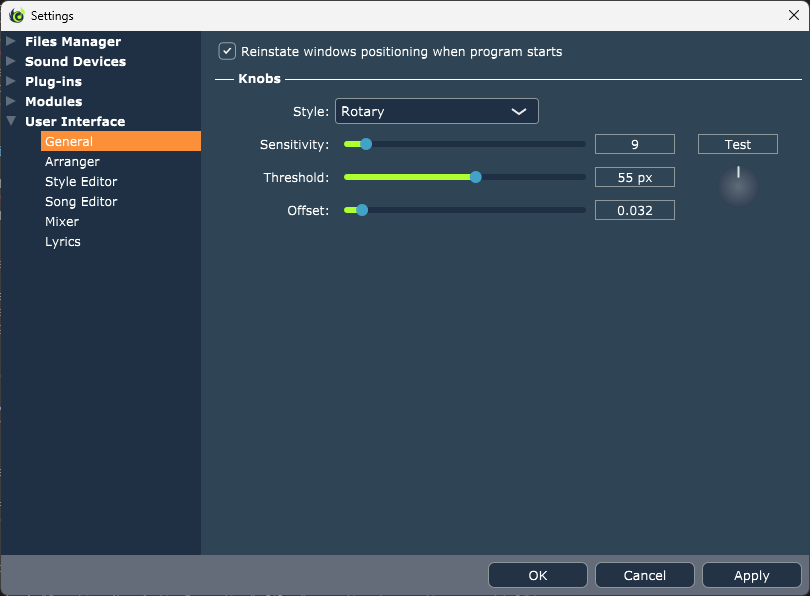
Enabling "Reinstate windows positioning", as the name suggests will cause the software to remember its previous windowing state and reinstate it when starts. This should include the main window dimensions but also the internal panels which have been resized according to each user needs.
Disable screen saver is also a good option to have "on" as you may play for sometime without moving the mouse and the system may go to sleep or turn on the screen saved which probably you do not want.
Arranger UI
- "Always place the buttons text inside" will cause all the buttons in the Arranger user interface (such as PLAY, S.PLAY, BANK MEMORIES, etc) to draw their action text inside the button even if there is enough room to draw it above.
- If transposition on output is selected in the Arranger Settings then the displayed chord will be either the transposed one (if this option is checked) or the actual one.
- When assigning a preset on a style memory by drag & drop, Giglad will ask if you wish this embedded or referenced. You may choose there to do one or the other and not be asked again. This option is here in case you selected don't ask again to reinstate the query and only gets enabled if you have in fact selected don't ask again.
- "Auto switch to the melody tab..." as the name suggests will cause the right panel in the Arranger user interface to switch back to the "Melody" tab after selecting an instrument for your track. You may wish to disable that and stay at the Instruments tab.
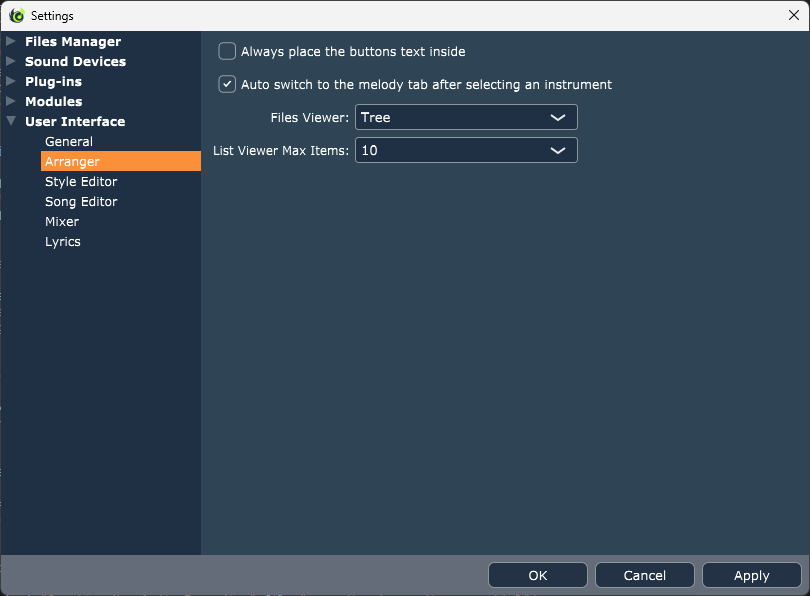
The Arranger user interface, offers 2 options to navigate into your files (styles, presets, instruments, etc). The list view and the tree view. Tree view is used by default and without the option to change this in the Style and Song Editor. But for the Arranger you may wish to choose the list view (which is also the default). This view not only feels closer to hardware arrangers but it also allows better interaction via your midi controller or your PC/MAC keyboard as you can assign View Change, Page Change, File Selection by number to your midi controllers and navigate to it without the need of your mouse. You can optionally select the max number of items that the view will display. Generally, this should not be greater that the number of items you can see in the screen (this depends on the resolution and the size of the screen) as you will not be able to scroll without a mouse. The list view has 2 sub categories for horizontal or vertical ordering. This affects the way the resources within are indexed.
Style Editor
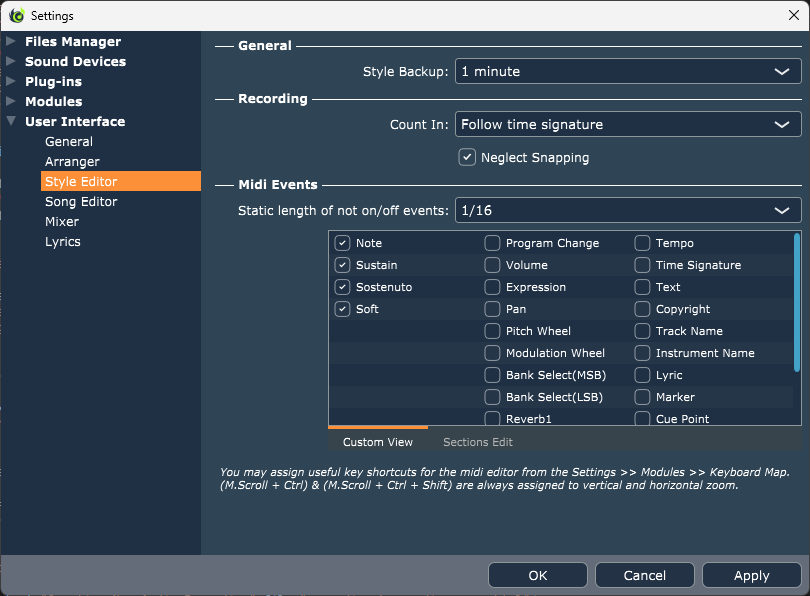
The most important option here is the style back up. If this is not set to none, the software will auto save your styles opened in the Style Editor periodically while you work on them. Please note that back up files used for this purpose are different than the original files so this will not affect the original files which you can save whenever you wish to save. However, if the software terminates unexpectedly, if you re-open it and go to the style editor, Giglad will compare the dates between the actual files and the back up files and will offer you the option to load the back up files if more recent. If at this point the style that has been loaded is not what you would like to continue working on and you wish to load the original one then: Do not save; instead load the original file by double clicking on it (or drag and drop). Also note that Giglad does not save on the backup file while the Arranger is playing to avoid delays while recording midi events for example. Finally, if you save often by yourself you may consider disabling this by choosing none.
For the Recording, you can select the counting in and if you wish to auto snap (i.e. auto quantize).
The static length defines the length of events that are not described by note on/off. For example a volume event. Here you can determine how "big" this event will be in the midi editor. You can also choose to draw the text or not over the note events.
You can also select which events to be visible in the "Custom View" in the midi editor. The existing views (Notes, Controllers, Meta) are already sufficient for anyone to work with. But you may wish to create your custom view with the events that you are using the most often.
For the midi events in the "Section edit", when moving sections in the style editor, deleting or creating new, the selected events will only be taken under consideration. it is advised to leave the defaults unless you are an advanced user. For example if a tempo change event exists in section 1 and you decide to swap section 1 with section 2, you probably want only the note events to be moved and for the tempo to stay where it is.
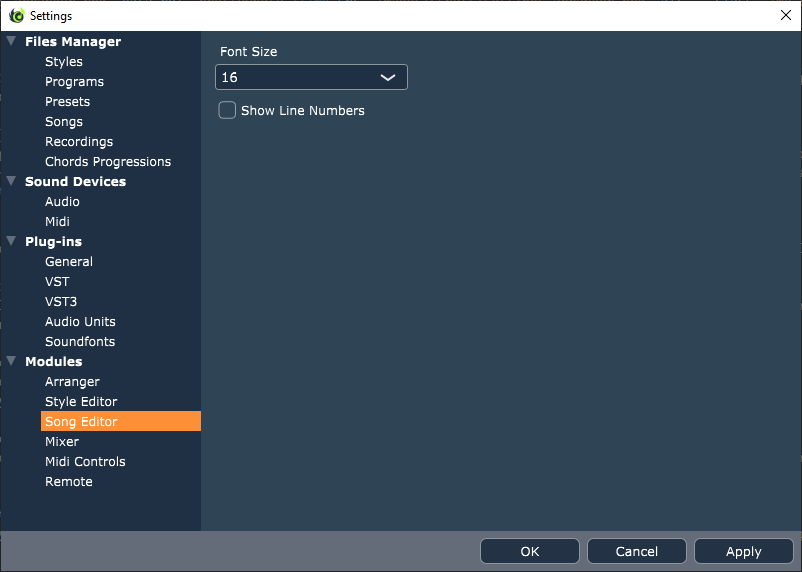
Song Editor
Here you can change the Song's Editor Font size and you have the option for the Line Numbers at the left of the editor to be visible or not.
Mixer
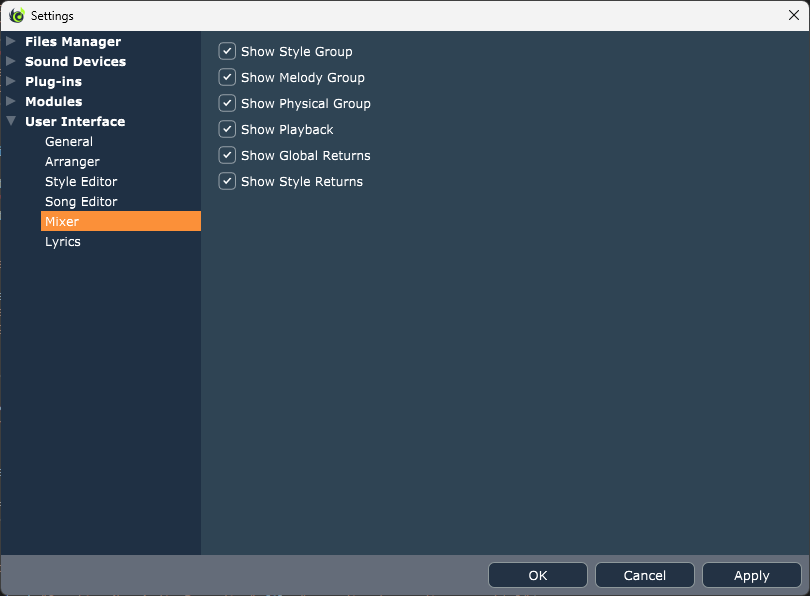
Here you can select which groups will be visible on the Arranger Mixer.
Lyrics
Here you can change the most important display parameters for your lyrics. These are only applied when the displayed lyrics file is a text file.

Resources
As it has already been mentioned in the overview section, Giglad has the following resources which are represented by files that exist in your hard drive.
Each of these resource can be set to the Arranger and this will result some kind of change. For example setting a style will result the new style to be set. The resources can be viewed, set and be edited using the Resources Browser.
Resources Browser
There are 2 ways in the software to navigate into your resources and interact with them. The Tree View (Left Picture) and the List View (Right Picture). List view is available in the Arranger only and set by default (you may change to tree view from the settings). Tree View is set and cannot be change for the Style and Song Editors. The Tree View is much more efficient when working with mouse and hence the only option in the Style and Song Editors as you are in "edit" mode. But when performing live, you probably wish to stay away from your mouse. And this is where the true power of the List View comes. Using your midi controller or even your PC/MAC keyboard you can assign encoder navigation or page change, previous, next, back and select files by their number. Hence, you can change your current style playing, the instruments in your melody, set a preset or a bank without the need of your mouse.
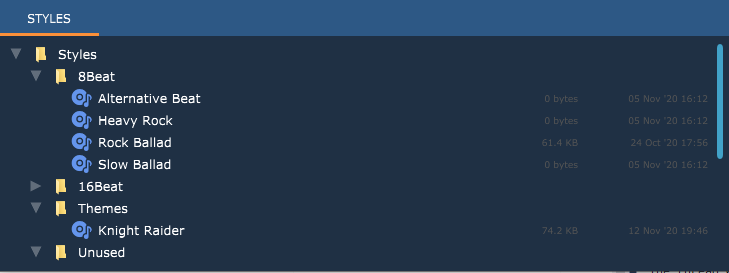

Both browsers display your files, as these exist in your O/S. The root item is the corresponding parent directory as this has been set from the settings for each file type. Changes in your O/S are monitored so these browsers ought to refresh themselves automatically if any change happens to their name, location, etc. Giglad is using the tree hierarchy for both viewers instead of a linear representation of the files as it gives great flexibility and allows you to group them anyway you wish. The browsers share common functionality and provide you with a few options but, at the moment, in no case have the power of your O/S Windows Explorer/MAC Finder. If for example you wish to copy or move files around, you need to do this outside the software.
☛ Left click on a file for the List View or Double Left Click for the Tree View will cause the file to be loaded and be set to the Arranger. ☛ >Right click on a file will pop up a menu in order to take further actions regarding your selection. Most of the files share common options but some file types may have additional options.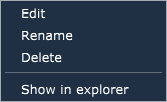
- Edit: If the file type supports it, the corresponding window will pop up in order to edit the file.
- Rename: Pops up a new window in which you can set a new name for the file.
- Delete: Deletes the file permanently from your system. This action is not undo-able so use it with caution.
- Show in explorer/finder: Opens O/S Windows Explorer/MAC Finder to show this file's location.
- Adapt style to the current mixer state (Styles Only): This only exists if the selected file is the one that is currently applied to the arranger. By clicking on it, the style will be re-saved using the arranger mixer. This feature allows you to quickly make adjustments (volumes, pan etc) to your style and permanently save them without the need of going to the Style Editor.

- New: Create a new file in the directory that has been selected.
- New Directory: Creates a new directory which will have the selected in the explorer directory as its parent.
- Delete: Deletes the directory and all the files in it. Be extra careful when using this, because the action is not undo-able
- Show in explorer/finder: Opens O/S Windows Explorer/MAC Finder to show this directory's location.
You can set a file to Giglad by dragging and dropping this into the corresponding window. For example drag & drop an instrument on a track that you wish for this to be applied or a style to the style editor window.
Instruments Browser
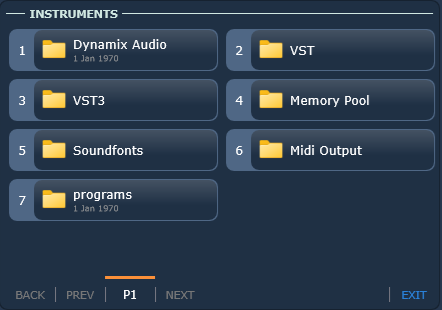
The instruments browser (which can be accessed in the Arranger UI by simply pressing "Select Instrument") is a special case of a browser. This displays a number of sub directories which are not in fact existing directories in your hard drive:
- Dynamix Audio: This will navigate you into our native sound library implemented and offered by Dynamix Audio. This library is using the native sampler of Giglad but it is in fact programs and these programs on top of the sampler may include inserts and send effects. So you should also select an instrument via here and not via the native sampler interface as this will lack the rest of the audio processing and will not sound as should.
- VST/VST3/AU: This will navigate you into your available plug-ins of the corresponding format.
- Memory Pool: This will navigate you into your Memory Pool defined instruments.
- Soundfonts: This will navigate you into all your available soundfonts.
- Midi Output: This will allow you to insert an instrument which in fact does not produce any sound but instead Giglad will use it to send midi information to an external hardware synth or another DAW. The GM list is there for your convenience but in fact all you need to do is to select the "Generic" instrument and define MSB, LSB and Program Change as well as in which midi output device to send (you can select all) and to which channel.
- Programs: This is in fact the working directory of your programs resources and will navigate you within. This is your own programs and not the the Dynamix Audio programs mentioned above which live in a special place.
Styles
If you are experienced in physical keyboard arrangers, you probably already know what a style is. But maybe you have never created a style by yourself. In any case, let's try to give a definition of what a style is. A style is a mix of instruments which are playing the same root chord in different ways repeatably. They can have one or more variations (in Giglad these are named sections) and each of this section can have one or more measures. When the end of a measure is reached, the section starts playing again from the beginning. The software (in our case Giglad) knows how to convert the root chord of the style into a different chord by applying a transposition algorithm. Hence, in order to play live, you are creating a style and then you give the chord instructions by simply using your left hand while you are using your right hand to play the main melody. Giglad is using a standardized file format to save/load your style in your hard drive, the midi file format (.mid) and adds additional information (such as the sections, the virtual instruments of your tracks, the CTA's and more). This means that the style can be read by any other software which can read midi files and Giglad can read any midi file which has been created by a different software as well. This gives great flexibility on the way you can create your styles.
You can create a new style from the menu File→New→Style... or in the Styles Browser by right clicking on the
parent directory where you wish to create your style and then select the corresponding menu command New→Style.... In both cases the Style Definition window
will pop up where you need to define the basic attributes of your style.
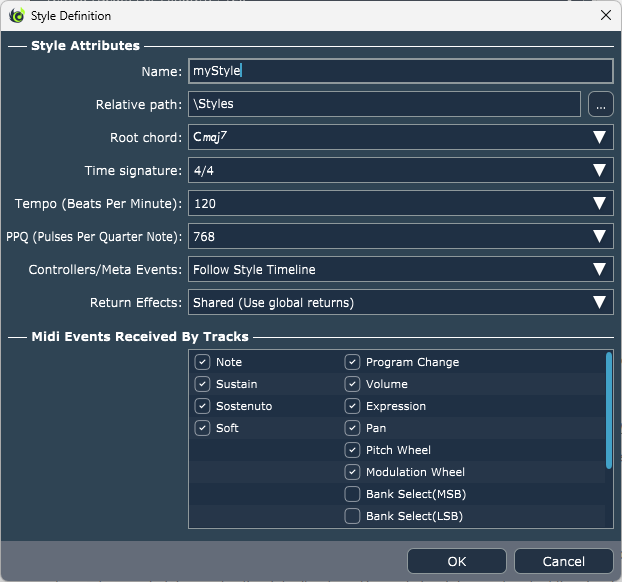
- Name: A unique in its relative path name for your style. Because the name of the style is used to save the corresponding file, only valid file names are allowed. You can easily rename a style after creating it.
- Relative Path: The relative path of the style considering the Styles Directory. You may not type directly into the edit box. You need to click on the button at the right side of the control and select the directory from there. Styles can be moved around after their creation.
- Root Chord: The chord which will be used as a reference for Giglad to be able to convert in different chords. It is recommended using a chord which is described by at least four notes. Cmaj7 (C-E-G-B) is a very good chord as it is quite simple and contains the four notes needed, hence it is the default option. The root chord does not restrict the chords that you will be able to play. A root chord of Cmaj7 does not mean by any means that you will not be able to play for example Am, E7, Bdim etc. As mentioned it is just a reference and unless you are an experienced user or style creator, best leave the default of Cmaj7 as it is. The root chord can change after creating the style but the existing events (i.e. notes) will not be converted to the new chord. It is also possible to override the root chord in one or more tracks.
- Time signature: Pretty straight forward option for a musician; this will be the time signature of your style. It is in fact described by a time signature change midi event which is placed at 0 time. Your style can have more that one time signatures and this can be achieved by creating time signature midi events in the midi editor. You may type directly into the field any valid time signature.
- Tempo (Beats per minute): The tempo of a style is defined in beats per minute. A tempo with a value of 120 means that within a minute (60s) 120 beats will be played. The beat is described by the denominator of the time signature of the style. With a time signature of 4/4 for example: 1 beat = 1 quarter note. With a time signature of 4/8 respectively: 1 beat = 1 eighth note. Tempo can easily change after creating your style and it is in fact described by a tempo change midi event which is placed at 0 time. You may add more events to change the tempo while the style is playing but you also need to take under consideration the lock tempo option.
- PPQ (Pulses per quarter note): PPQ describes the number of ticks that a quarter note has and is a standard midi file entry. Unless you are an experienced user, it is advised to leave the default value of 768 as it is. The PPQ cannot be changed after creating your style.
- Return Effects: Giglad has by default 4 global return effects: Reverb1, Reverb2, Chorus, Delay. The melody and physical tracks can use these to send instead of using insert effects on each track (in order to avoid CPU overload). These global effects can be modified and in fact completely change by the user (For example he may choose to replace native reverb with a plug-in reverb). This option here allows you to create 4 additional return effects to be used by this style only. Doing so or not doing so has advantages and disadvantages. If you choose to create 4 additional tracks you obviously requesting more CPU power usage. But after you finish with your style, you know that even if you decide to change your global effects in the future, this style will sound exactly as when you created it. Otherwise it may sound differently since the global effects are changed and the reverb for example is different. Unfortunately there is no right option for this one. If you are not using sends in your style the choice is easy. Do not create additional tracks to spare CPU usage. But if you are using send effects then do you want your style to change its sound? Do you want this global change to also applied to the style? Do you have a good PC/MAC and you do not care about the 4 additional tracks?
- Midi Events Received By Tracks: This is a global setting for the style (which can be change later) but each track can also override this in order to has its own settings. The midi events that are checked will actually be taken under consideration while the rest will be ignored. For example, you can place volume midi events in your midi editor and choose the volume to be taken under consideration and change depending on the timeline or you can choose not to, and instead having a global volume which can be described by the tracks's gain. The most interesting midi event here might be the program change. If the plug-in supports it or if you are using soundfonts then you could change the sound of your instrument in different places in the timeline.
Pads Specialization:. Please refer to the Pads section but if your wish is to create a style, leave these options as they are.
Clicking on the OK button will create a style file in you hard drive and will navigate you in the Style Editor, from where you can describe your style.
Programs
A program is a virtual instrument's preset along with the insert and send effects that it may or may not using. In order to avoid confusion over the Arranger's Presets, the word Program is used. Many VST/VST3/AU plug-ins come with a predefined number of presets and you can usually create your owns. You can save them as Programs and add effects on top in order to re-use them later to your style or melody tracks. Programs can also be used to save your soundfonts. Programs have a standardized file format when saved in your hard drive, the lightweight data-interchange JSON. But the actual program is described by a HEX string which makes it impossible to edit these files using a text editor such as Notepad.
Programs are displayed at the Instruments Browser along with your plug-ins and other type of instruments (soundfonts, memory pool, etc). It is high recommended to use programs in your workflow. First it makes it easy to later re-use a program which you are happy with. Second the information of the program (file relative path) is saved within styles. If in the feature you decide to tweak your program a bit, there is an option in Giglad that will allow you to load your styles by the program's name. And as such all of you styles will adapt the program change instantly without the need of revisiting them one by one and apply the new program/instrument.
You can create a new program from the menu File→New→Program... or in the Programs Browser by right clicking on the
parent directory where you wish to create your program and then select the corresponding menu command New→Program.... Additionally, after selecting a virtual
instrument on a track (melody track or style track) and adding effects, you can choose to save it as it is by clicking on the corresponding "program" icon which can be found at the top right corner
of a style track or by right clicking on the melody track in the corresponding mixer and select "Save as program" from the popup menu.
In all cases the Program Definition window will pop up where you need to define the basic attributes of your program.
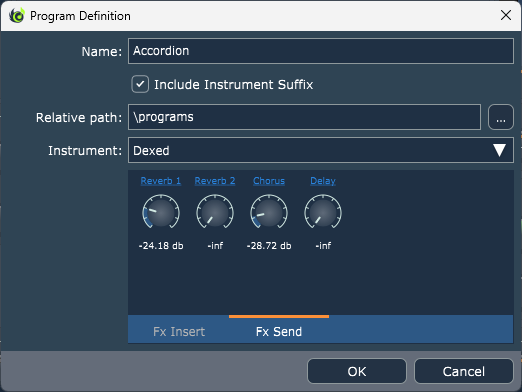
- Name: A unique in its relative path name for your program. Because the name of the program is used to save the corresponding file, only valid file names are allowed. You can easily rename a program after creating it.
- Relative Path: The relative path of the program considering the Programs Directory. You may not type directly into the edit box. You need to click on the button at the right side of the control and select the directory from there. Programs can be moved around after their creation.
- Instrument: You can select one from your installed plug-ins by clicking on the arrow down button on the corresponding field. The plug-in's window will pop up and any changes you make there will be taken under consideration when the program is saved. If you close the plug-in's window, you can continue editing it by selecting Edit... after clicking again on the arrow down button.
- Include Instrument Suffix: If this is ticked then the final name of the program will include the virtual instrument's name at the end. In the image above for example, the file name that will be saved will be Accordion - Dexed.
- Fx Insert: You can add one or more effects to your program by clicking on the Add button and remove them by selecting the proper one and press the Remove button. You can also reorder them by using the arrow buttons.
- Fx Send: You can choose to send effects to the appropriate returns. These will be the global returns for melody and physical and the style returns for style (if you have select to create the 4 additional returns for the style).
Programs Mapping
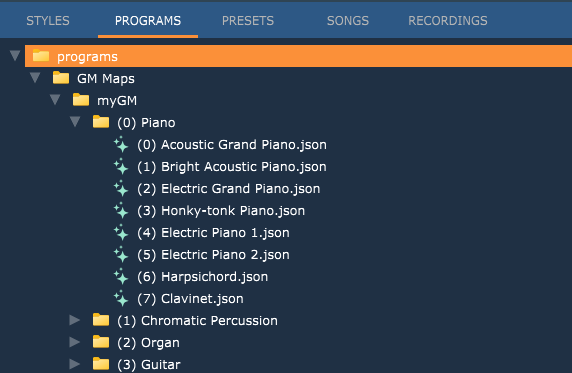
All these programs will be initially empty and you will have to double click on each one of them in order to set up a virtual instrument of your choice. The goal here is to instruct Giglad which virtual instruments you wish to apply on an external style file (e.g. a Yamaha style). This is obviously a long process but the advantage of using virtual instruments instead of soundfonts without the need of visiting the style editor for each style will probably worth the effort when it comes to GM. Please mind that you will also need to instruct Giglad which map needs to be used from the settings. It is also very important to understand that these maps will only be applied on external styles. If you save one of these styles using the Style Editor or the "Adapt style to the current mixer state", the style will then be a Giglad style and the instruments will be loaded directly from it.
For GM, it is not required to set up all the 128 instruments. If you load a file with an instrument that is not present in your map, the software will fallback to the default.
For Generic maps, this can be a very long process and it probably does not worth the effort. If an external file contains msb/lsb information then in theory the number of instruments that can be mapped are 128*128*128 = 2,097,152. In reality of course they are much less. When creating a generic map, Giglad will populate your map with the most common instruments but most probably these will not be enough. You will have to follow the pattern in order to add more.
Most likely, the volumes and maybe the pans will not be as you would expect. Some virtual instruments may sound louder than others and in general they do not have the smoothness that a soundfont file will have. To overcome this, you have two options:
- Edit the volumes of each file individually, preferably directly using the mixer and then select "Adapt style to the current mixer state". This way you won't have to go to the Style Editor at all. Mind that this process will save the style as a Giglad style at the end.
- Load a style, edit the volumes via the mixer and then select "Adapt GM Map to the current mixer state" which can be found on the directory of your GM Map (in our example myGM). This will apply a relative volume fix to the instruments that are currently used by the style. For example, if the style is using grand piano and its volume is at -6db, if you change this volume on the mixer to be -12db the next time this GM is applied the piano will have less volume. That will not be -6db because decibels are not linear but certainly a smaller value which will correspond to the relative applied volume.
Banks
A bank is a set of 16 different resources (e.g 2 styles, 5 presets, 2 songs, 3 programs, 2 audio, 2 patterns) which are represented as "BANK MEMORIES" in the Arranger user interface. You may have as many banks as you want and you can also name them as you wish. Every time you select a different bank, the 16 BANK MEMORIES are populated with the corresponding resources which have been saved and exist in the bank. Because the BANK MEMORIES are always visible in the Arranger screen and you can assign midi control messages (or use PC/MAC keyboard shortcuts) to set these, they are probably the most convenient way to switch presets, styles, instruments,etc. while performing live.
Banks have a standardized file format when saved in your hard drive, the lightweight data-interchange JSON which makes it very easy to edit these using a text editor such as Notepad if needed in case something gets broken (Due to file renaming or moving).
You can create a new bank from the menu File→New→Bank... or in the Banks Browser by right clicking on the
parent directory where you wish to create your bank and then select the corresponding menu command New→Bank....
In all cases the Bank Definition window will pop up where you need to define the basic attributes of your bank.
- Name: A unique in its relative path name for your bank. Because the name of the bank is used to save the corresponding file, only valid file names are allowed. You can easily rename a bank after creating it.
- Relative Path: The relative path of the bank considering the Banks Directory. You may not type directly into the edit box. You need to click on the button at the right side of the control and select the directory from there.
Presets
A preset is a complete or partial snapshot of the Arranger's state. You can choose to save for example the style which you have set to the Arranger along with your right hand's instrument(s) and the current tempo in order to re-use it later with a single click (or a midi controller button). It is as such a very powerful and useful feature of Giglad as it allows you to pre-make multiple Arranger setups and use them later at your convenience. Presets have a standardized file format when saved in your hard drive, the lightweight data-interchange JSON. Hence you can edit these manually by using any text editor such as Notepad. Generally you will not have to, but in some cases, if Giglad fails to read one of your presets, you may be able tweak the file a bit in order for this to be loadable again.
You can only create a preset if the Arranger module is active. This is quite obvious as it would make no sense trying saving your
Arranger's state while you are for example in the Style Editor. The easiest way to create a new preset
is to click on the Save button which can be found on the Arranger's toolbar. Alternatively, you can select from the menu
File→New→Preset... or Save Preset... directly and if you are a used to keyboard shortcuts your can just press Ctrl+S. Whichever of
these actions you choose to take, the result will be the same: The Preset Definition window will pop up.
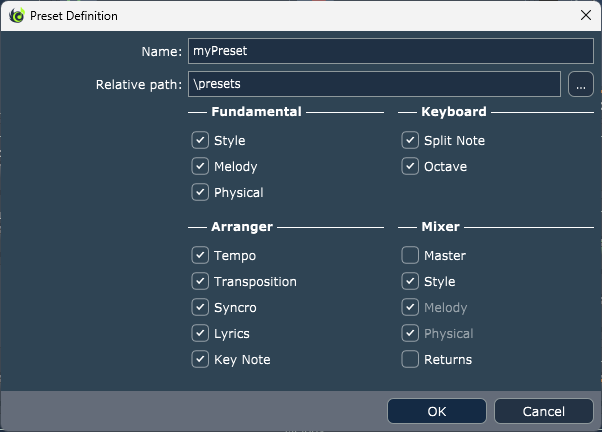 In the Preset Definition window you need to choose which attributes will be saved. You can choose to take a full snapshot of the Arranger's
state by selecting all of them or you may wish to select partial attributes to be saved. In any case it is important to understand that only the attributes that you
have choose to save will be reinstated while others will remain as they are.
In the Preset Definition window you need to choose which attributes will be saved. You can choose to take a full snapshot of the Arranger's
state by selecting all of them or you may wish to select partial attributes to be saved. In any case it is important to understand that only the attributes that you
have choose to save will be reinstated while others will remain as they are.
- Style (Foundamental): Saves the current style that has been set to the arranger. The option will be disabled if there is no style currently set to the Arranger. Note that the preset does not keep a copy of the style's data and only saves the relative path of the style. As such, if you edit the style after creating the preset then, by reinstating the preset, the modified style will be loaded. If you move a style into a different place within your Styles Directory, Giglad will try to find it but it may fail. If you rename your style or delete it then the preset gets broken and you will have to manually edit the JSON file to set the new style's path.
- Style (Mixer): Saves the style group in mixer. That is the volumes, pans, mutes, pans and effects of the style tracks as these have been modified in the mixer.
- Melody (Foundamental): Saves the melody tracks. That includes the track names, the selected instruments, effects, the playing ranges, the volumes, e.t.c. If an instrument cannot be found, when trying loading a preset (this may happen if for example the corresponding plug-in dll has been removed) then the preset will be loaded normally but the name of the instrument will be appeared in red.
- Melody (Mixer): This option is disabled as it is linked with the Melody (Foundamental). Checking/Un-checking one will check/uncheck the other. It is only there for consistency and for the user to understand that the melody in the mixer and the "Melody" tab are linked together.
- Physical (Foundamental): Saves the physical tracks. That includes the audio input channels, the effects, the volumes, e.t.c.
- Physical (Mixer): This option is disabled as it is linked with the Physical (Foundamental). Checking/Un-checking one will check/uncheck the other. It is only there for consistency and for the user to understand that the physical in the mixer and the "Physical" tab are linked together.
- Master (Mixer): Saves the master of the mixer. That includes the master volume, the master pan, the effects, etc. Mind that this option is off by default. That is because in most cases you will not want the master to be reinstated. If for example you are playing something and for any reason you have set the volume to -10db you will probably want for this to stay there if you set a different preset. Another common scenario is that you wish to set some effects to your master and you want them to stay as they are even if you set another preset.
- Returns (Mixer): Saves the return effects of the mixer. The choice to save them or not is a bit tricky. If you do not save them and in the future you decide to change the default returns, then every preset which has not saved them will respect the default returns and will sound different. Which is something that you may want.
- Tempo: Saves the selected tempo.
- Transposition: Saves the selected transposition.
- Syncro: Saves the selected start/stop syncro state.
- Pads (Arranger): Saves the pads that have been assigned to the 4 button slots in the Arranger. Consistent with styles, the relative path of the files will be saved.
- Pads (Mixer): Saves the pads group in mixer. That is the volumes, pans, mutes, pans and effects of the pads tracks as these have been modified in the mixer.
- Lyrics: Saves the selected lyrics file..
- Key Note: Saves the key note.
- Split Note: Saves the note which defines how your current Arranger's Virtual Keyboard has been split the Chords/Melody ranges.
- Octave: Saves the +/- octave which which has been selected for Arranger's Virtual Keyboard.
You may feel the urge to always save all the attributes mentioned above but in most cases, it will be quite useful to save only some of them. For example you can create a preset that its purpose will be to set your melody instruments. In this case you only wish to save the Melody. Or you may wish to have a preset that will set your microphone. Again you only need to save physical.
Pads
Pads are handled in Giglad as they have been styles so a pad is in in fact a style with 1 track only, 1 section and some attributes which define its behavior. Pads can be assigned to the Arranger and be played on top of your style. If you wish to create a pad then you must create a new style as described in styles and then select the option "Style will be used as pad" as shown below. When you do that you, you will get a toast message saying that the relative path has been changed and this is because the new file to be created will not be placed in styles working directory but in pads working directory.

- Synchronized: The pad will play in phase with your style. Changing the arranger tempo, will also affect the tempo in which the pad is played.
- One Shot: The pad will play what has been defined on its unique section and then it will stop. I.e. it will not loop but be played once
- Start On Measure: If while the Arranger is playing you trigger a pad and this option is on then the pad will not start immidiately but it will start playing at the start of the next measure.
Clicking on the OK button will create a style file in you hard drive which will be handled as pad. The pad will automatically be assigned to the first available spot in the Arranger and then the app will navigate you in the Style Editor, from where you can describe your pad.
You can assign a pad in the Arranger by drag & drop the pad file in the corresponding button. Pads can be triggered either in Syncro either Immediately. If in Syncro and the Arranger is stopped it will start playing once the Arranger start playing. Otherwise it will start immediately. To start it in Syncro you can either use your midi controller assigned button or from the user interface but Ctrl + Click or if you have enabled the double click behavior from the settings the pad will be triggered on syncro or immediately depending on if you single or double clicked.
It is also possible to assign audio files in the Arranger pads. To do that, you must copy your audio file (using your O/S Explorer/Finder) somewhere inside the working directory of pads so Giglad can find it. Then same as for style pads, you simply drag & drop the audio file into an available spot. But mind that audio files never play in sync. If you wish to have audio in sync in pads, you must create a style and use audio loops.
Pads are not saved automatically when assigned or de-assigned. You must explicitly save your preset or style (depending on where they belong) whenever you are happy with your changes.
Songs
A song is a list of instructions which can be set to the Arranger in order for this to play by itself. The instructions describe which style will be used and when, the chords to be played, tempo changes, etc. These instructions are based on a kind of a scripting language; YAML which is a human-readable data-serialization language. This may sound difficult at start but once you get used of it, you will acknowledge how fast and easy this approach allows you to create your songs.
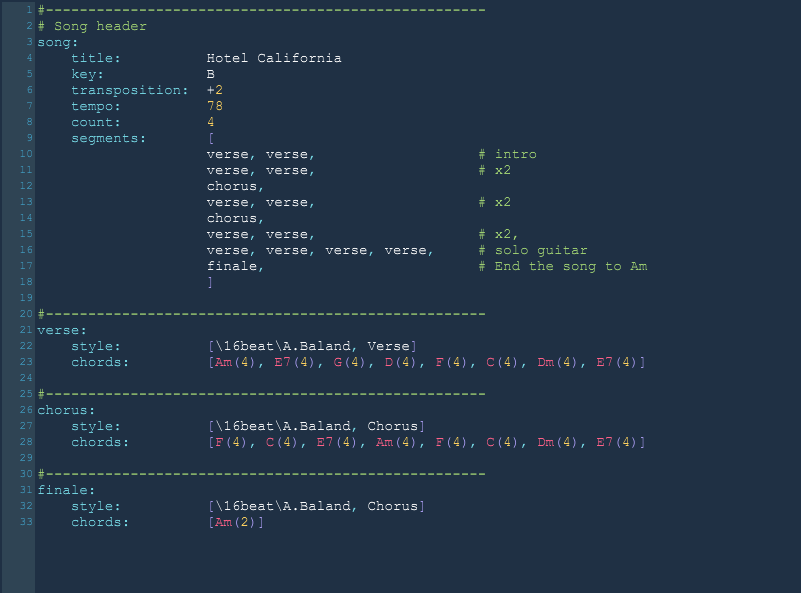
You can create a new song from the menu File→New→Song... or in the Songs Explorer by right clicking on the
parent directory where you wish to create your song and then select the corresponding menu command New→Song.... In both cases the Song Definition window
will pop up where you need to define the basic attributes of your song.
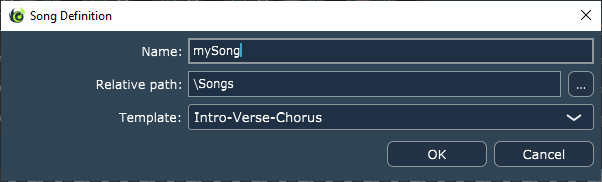
- Name: A unique in its relative path name for your song. Because the name of the song is used to save the corresponding file, only valid file names are allowed. You can easily rename a song after creating it.
- Relative Path: The relative path of the song considering the Songs Directory. You may not type directly into the edit box. You need to click on the button at the right side of the control and select the directory from there. Songs can be moved around after their creation.
- Template:
You can leave it to none or you can select one of the existing templates which will be your starting point in the process of creating the song. Please mind
that if you try validating a template it will fail as you need at the minimum to set the song title and the style/section that will be used.
Audio
Giglad can play audio files. Wav, Ogg-Vorbis, Flac and Aiff audio file formats are supported. Left click(for List View) or Double Click (for Tree View) on an audio file in the Audio Explorer will cause the file to be played within Giglad. The audio player is quite limited. You may not seek or pause for example, you can only start and stop. This feature is mainly there to be able to quickly listen your audio recordings. Also please note than when start playing an audio file, previous played style or song will be stopped. Hence, you may not mix the audio with your style or songs.
Audio Loops
Audio Loops allow you to play audio in some (if not all) of the tracks of your style. Please refer to the audio loops section of the Style Editor.
Lyrics
Lyrics are displayed in the Lyrics tab at the top right panel in the Arranger user interface after Left click(for List View) or Double Click (for Tree View) on the corresponding file in the Lyrics Explorer. They can be text files (Left Picture) or any other format which is supported by your native O/S browser component such as html, pdf, etc. (Right Picture). The viewer also acts as an editor when files are text files, which means you can directly type and change your lyrics on the fly which will automatically be saved when is needed.
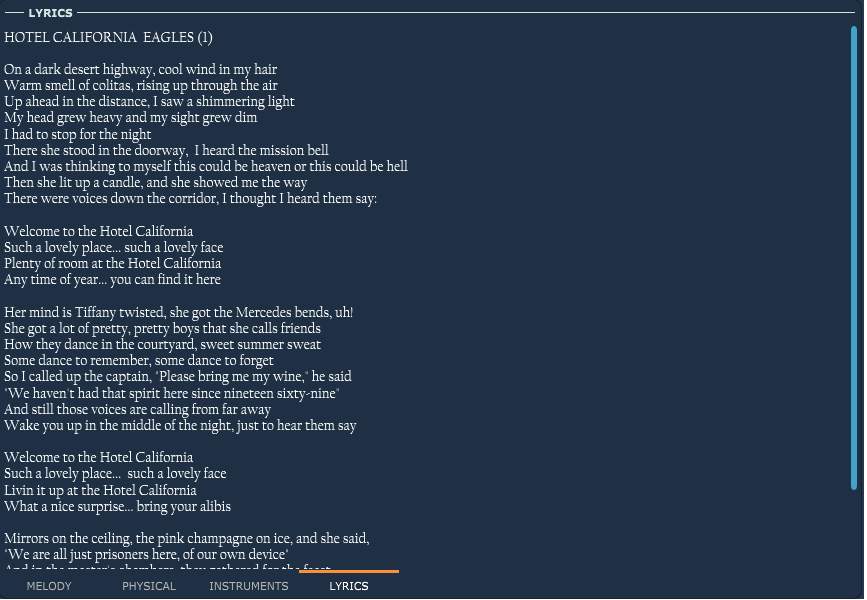
You can create a new lyrics from the menu File→New→Lyrics... or in the Lyrics Browser by right clicking on the parent directory where you wish to create your lyrics and then select the corresponding menu command New→Lyrics.... A text file will be created this way and will be set to the Lyrics Viewer where you can start typing your lyrics.
Although lyrics are meant for lyrics, because the viewer is quite flexible on the format that it can display, you can use this feature for other purposes such as your scores, notes, etc.
Patterns
Patterns allow you to set any chord (major, minor, 7th, etc) in the Arranger with one note only. This feature has mainly been implemented to be used with a foot midi controller in order for the user to be able to instruct Giglad the chords to be played using his foot. Why? Because the user may wishes to use his hands to play a different instrument like the guitar while using his foot to switch chords and have the Arranger playing while he solos.
Because a chord must be detected by a single note, you need to instruct Giglad which chord to play when a specific note is "on". This is achieved with patterns. Before start using this feature, you need to select mode Single Finger (Patterns) in the Arranger settings
You can create a new pattern from the menu File→New→Pattern... or in the Patterns Browser by right clicking on the
parent directory where you wish to create your pattern and then select the corresponding menu command New→Pattern..... In both cases the Pattern Definition window
will pop up where you need to instruct how the chords will be changed by a single note.

- Name: A unique in its relative path name for your patterns. Because the name is used to save the corresponding file, only valid file names are allowed.
- Relative Path: The relative path of the patterns considering the Patterns Directory. You may not type directly into the edit box. You need to click on the button at the right side of the control and select the directory from there.
- Key: The key note that corresponds to the chords that you will define in the table below. The key can change "in the fly" later for the defined chords to adapt to the new key.
The table is pretty straight forward. You instruct Giglad which chord to play for which note. You can do this by double clicking on the corresponding "Chord" column of the note you wish to assign. For example and as shown in the picture, I have instructed Giglad to play Am when I play the note A, Dm when I play the note D and E(maj) when I play the note E. You can define any chord you like in any note even if it makes no sense at a first glitch. For example I have instructed to play A(maj) when the note is A# because it is convenient to me. (Unassigned) notes will be ignored meaning that no chord switch will take place if any of these notes go "on".
After having created one or more patterns, the time has come to actually use them in order to switch chords in Giglad using one note. The patterns browser looks like any other files browser but it adds a few controls to allow you using this tool efficiently:
- Key: The key in which the selected pattern will use to adapt. In our image, we set the key "A" when we have created the pattern but here we have changed it on the fly to be C. All the chords have been transported to match our key.
- Adapt Key: When this option is on, setting another pattern to the Arranger will cause it to use the Key of this window. Otherwise it will use the originated key and the Key of this window will change to match the key of the pattern.
- Chords List: Not editable. It is there to remind you the chords that have been defined in the selected pattern.
Yamaha Styles
Giglad can read and play Yamaha SFF2 and SFF3 styles. The styles should exist inside styles working directory in order to be revealed in the Styles Explorer. You can then use them and edit them as you would do with your own styles.
When a Yamaha style is read for the first time, Giglad will use the External Files Sound Mapping to set the instruments. Using the Style Editor, you can change the instruments and even replacing them with your own plug-ins. Alteratively, you may adjust the volumes, the pans. etc directly in the Arranger's mixer and when you are happy with your changes, you can right click on the loaded style in the Styles explorer and select "Adapt style to the current mixer state". This is the faster way to accommodate an external file to your needs.
Because the Yamaha style data format does not exactly match Giglad's data format and because the sound mapping may be not quite right as Yamaha Styles are using more than 128 sounds (GM) the styles will not be heard as actually playing them in a physical Yamaha arranger but the result is quite decent and if you take the time to process them a bit and revoicing them, the result will be quite satisfying.An important note here is the midi messages received by tracks. Check your settings to decide which messages you wish to receive when loading a Yamaha style and you may further visit the style editor to change this for every style. But if you make changes to the volume for example using the mixer while the Volume Event is on, its likely that the volume will be set again by a midi event.
Audio Recordings
Anything that is played to the Arranger can be recorded in audio format.
You can create a new recording from the menu File→New→Recording→Audio... or in the Audio Browser by right clicking on the
parent directory where you wish to create your recording and then select the corresponding menu command New→Recording... or directly from the "Player" panel in the Arranger
by pressing the corresponding button (If it has been set as default in the arranger settings). In all cases (but the last) the Recording Definition window
will pop up.
- Name: A unique in its relative path name for your recording. Because the name of the song is used to save the corresponding file, only valid file names are allowed. You can easily rename a recording after creating it.
- Relative Path: The relative path of the recording considering the Audio Directory. You may not type directly into the edit box. You need to click on the button at the right side of the control and select the directory from there. Recordings can be moved around after their creation.
- Audio Format: Wav, Ogg-Vorbis, Flac and Aiff audio file formats are supported.
Midi Recordings
You may record what is played to the Arranger in midi format. Please note the limitation that the arranger should play a style for a midi recording to be started. It is not possible to record midi while playing freely, i.e. without a style. To workaround this, you may create an empty style or a style that may provide some beat in order to have a style playing while you are recording your melody only.
Because a midi recording will create a *.mid file, this will be saved in your styles directory from where you can later play it directly into Giglad by double clicking on it.
You can create a midi recording from the menu File→New→Recording→Midi... or in the Styles Browser by right clicking on the
parent directory where you wish to create your recording and then select the corresponding menu command New Midi Recording... or directly from the "Playback" group in the Arranger
by pressing the corresponding button (If it has been set as default in the arranger settings). In all cases (but the last) the Midi Recording Definition window
will pop up.
- Name: A unique in its relative path name for your recording. Because the name of the song is used to save the corresponding file, only valid file names are allowed. You can easily rename a recording after creating it.
- Relative Path: The relative path of the styles considering the Styles Directory. You may not type directly into the edit box. You need to click on the button at the right side of the control and select the directory from there. Recordings can be moved around after their creation.
- Table: The table displays the channel, the program change plus MSB/LSB for each track in your style + melody that Giglad will use to apply the midi events in the file. These values are read only and cannot be changed. If you are using soundfonts (or Giglad's Midi Engine) these should be accurate. If you are using virtual instruments then program change 0 will be applied. If you wish to change that then - For your style you may add program change events - For your melody, you should use soundfonts. In any case, all these can change later by using another midi editor or Giglad itself.
Arranger
The Arranger is the core of Giglad. Here you can play your music and perform live. The interface has been designed to be as simple and friendly to the user as possible and to simulate a physical keyboard arranger. Its elements are described below.
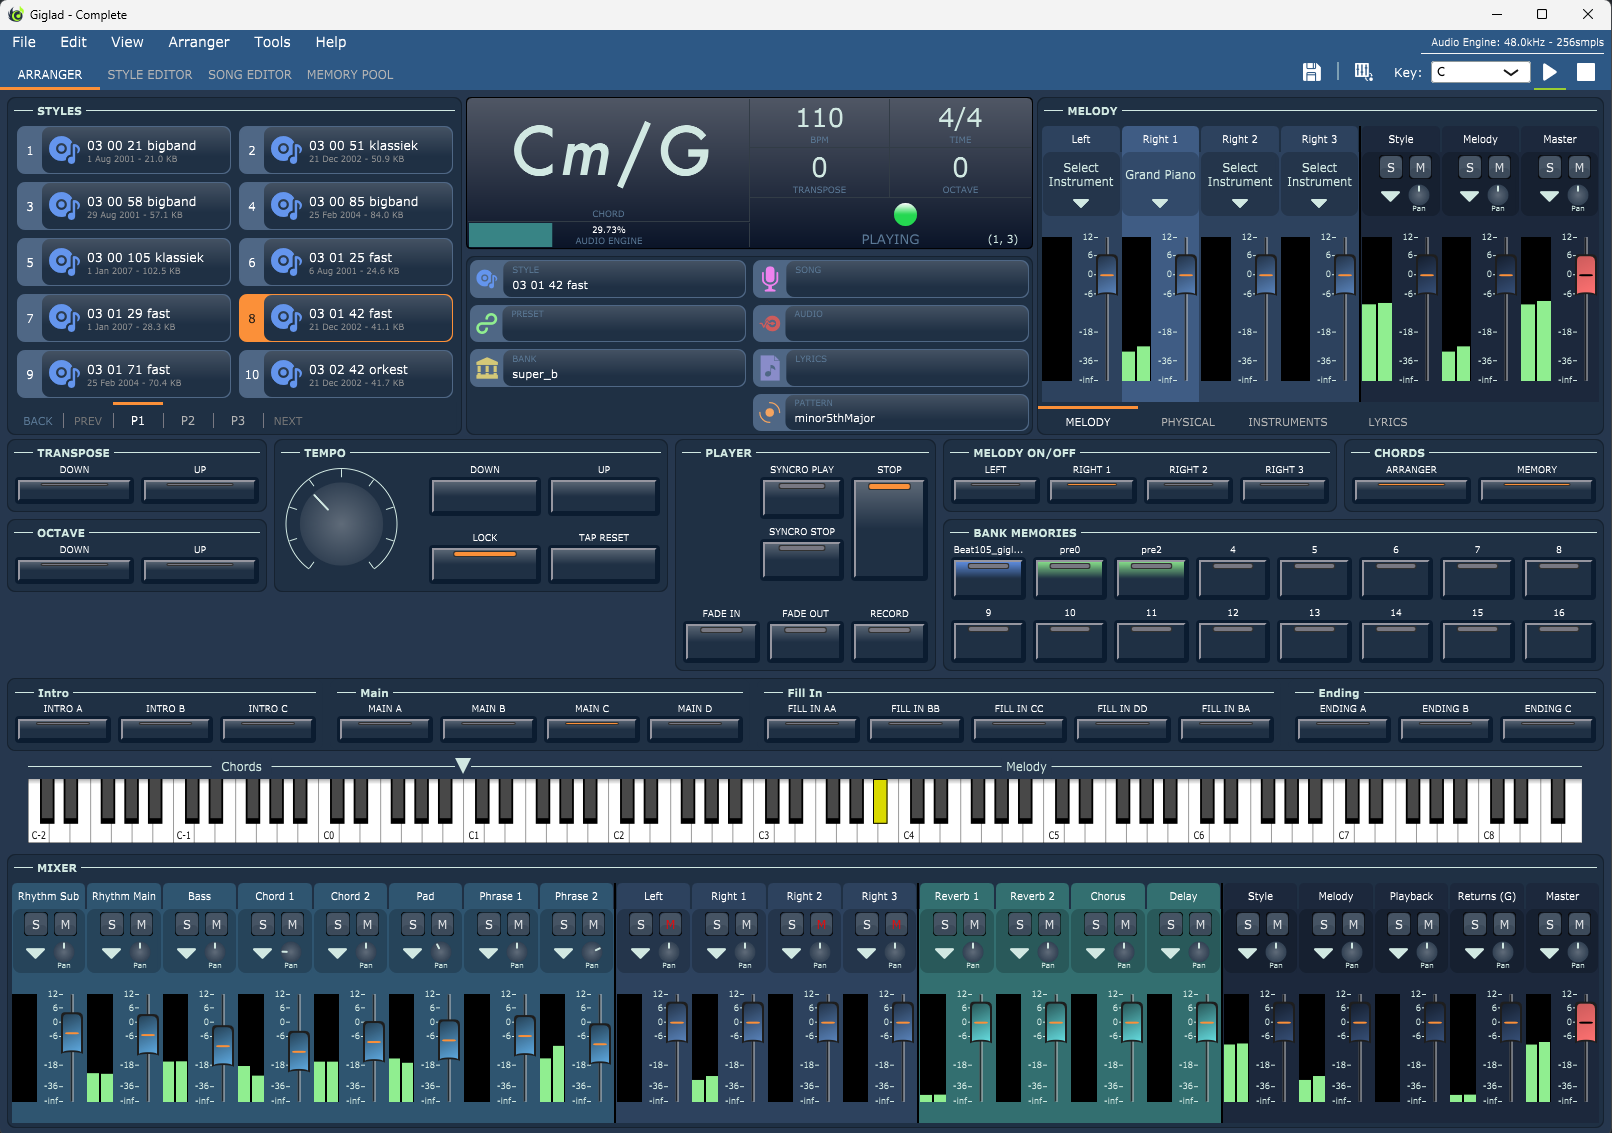
All the Arranger functionality such as play, stop, change tempo, select style, switch section, etc. can (and should) be mapped to your midi controller and/or PC/MAC keyboard in order to play without the need of a mouse.
Console
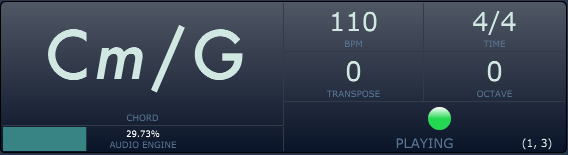
Displays the playing chord along with the chord detection mode (in the picture F.B. which means Fingered On Bass), the current tempo, the style's time signature, the current transposition and the applied octave. It also displays the beats while playing or any another related information (such as the time when playback audio file). Clicking on the chord area will swap between the chord detection modes which have been defined in the settings. This can also change via your midi controller. Clicking on tempo, transpose or octave will pop up a numpad window designed to be big for touch screen usage where you can enter directly the value you wish to set. Finally the audio engine load can be monitored here and if you click on it, the performance window will open from where you can see more details regarding the audio engine.
Navigator
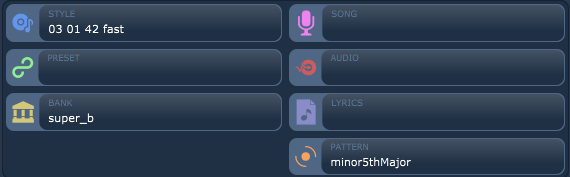
Each of these buttons display the currently selected resource. Here for example, my current style playing is "6-8Modern" and my current bank is "Demo". Clicking on any of these buttons will result the top left panel which hosts the Resources Browser to display the corresponding one.
Resources Browser
The top left panel hosts the Resources Browser from where you can set the resource you wish or managing your resources.
TR-Panel
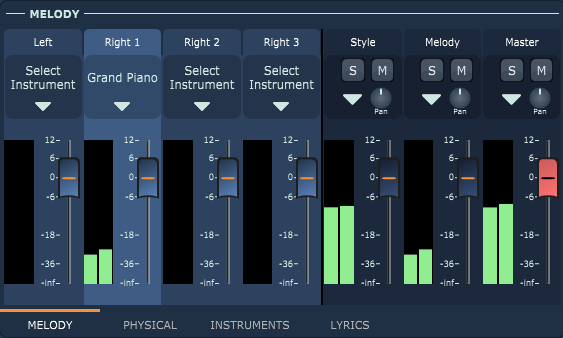
The top right panel hosts the melody mixer for the tracks which play the melody, the physical mixer for physical input tracks (e.g. microphone, guitar, etc), the Instruments Browser and the lyrics viewer. The name of the selected instrument or program is displayed in the track. Left clicking on this area will switch to the Instruments Browser for you to select your instrument. Right clicking on this area will pop up the plug-in's window. Clicking on the arrow button will pop up the track window from where you can access more advanced features for your track such as insert/send effects and midi options.
Right clicking on the title of the track (e.g. inside the "Right 1" text) will pop up a menu which will offer additional options for the track.
- VST, VST3, Native, Soundfonts, Memory Pool and Midi Output is yet another way to select your instrument.
- Notes Memory if checked will result the notes on this track to go off only where another note gets on. This is quite useful for your Left track where you may wish to remove your hand from the playing chord but the sound to remain but as Giglad tries to be f lexible this is also available for any track
- Watch Midi Events pops up the Auxilary Window in Midi Events tab.
- Midi Output Channel and Audio Input Channel allows you to set the corresponding properties.
- Edit... will pop up the plug-in window.
- Save As Program... will allow you to save the current state of the track as a program.
- Remove will result the track to have no instrument.
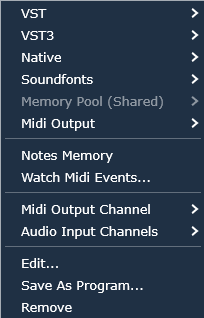
Player
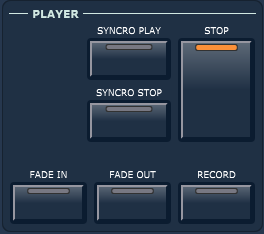
- Syncro Start: Will cause the arranger to go into syncro start mode, i.e start playing once a chord has been detected.
- Syncro Stop: Will cause the arranger to go into syncro stop mode, i.e stop playing once no note is down in the chords section.
- Play/Stop: Starts the arranger if not already playing and stops the arranger if already playing.
- Semi Bar: This option affects fills and if checked then triggering a fill section while playing before the half meter it will move the timeline cursor + half meter. For example on a 4/4 style if a fill gets triggered on beat 1, it will actual start playing at beat 3, then beat 4 and then back to main.
- Fade In: Will cause the arranger to start plying with fade in.
- Fade Out: Will cause the arranger to stop plying with fade out.
- Record: Starts/Stops an audio or midi recording (depending on the default which has been set in the Arranger settings). A file with a unique name will be created in the working directory of the recordings or styles.
Tempo
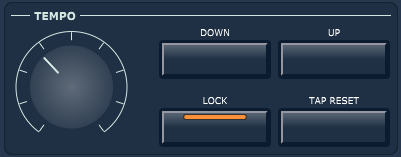
- Tempo Knob:A graphical tool to change the tempo
- Down:Will decrease the current tempo by 1.
- Up:Will increase the current tempo by 1.
- Tap Reset: If the arranger is stopped, by clicking 4 times in BPM sequence, the tempo will be extracted and will be set and the arranger will start playing. If the arranger is already playing, it will instantly move the playing cursor at the beginning of the section.
- Lock:You may lock/unlock the tempo in order for this not to be applied automatically when a style or a style section is set. See also arranger settings.
Transposition
- Down:Will decrease the current transposition by 1.
- Up:Will increase the current transposition by 1.
Octave
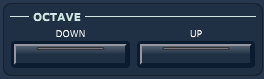
- Down:Will decrease the current octave by 1.
- Up:Will increase the current octave by 1.
Melody On/Off

Activates/Deactivates the corresponding melody tracks. This in fact the same as muting a track from the mixer but its here for convenience and consistency.
Chords
- Bass On/Off: When this is on, the arranger plays normally the style. When it gets off the arranger will only play the drums but additionally you can play the bass track manually using your left hand. Because the track of the style will be used for this, the style must indeed have a bass track and this can be identified by the CTA (e.g. N-Shift [Bass]) or simply if the track is named "Bass".
- Arranger On/Off: When this is on, the arranger plays all tracks. When this is off then the arranger will only play the drums. To be more precise, the arranger will only play tracks which have CTA "Bypass". This is usually the case for drums but if for any other reason a track has CTA Bypass, it will also be played when this is off. When "Off" the split point will also be moved so "Melody" gets to be the whole virtual keyboard.
- Memory On/Off: When this is on, the arranger will keep playing the last chord even if you take your hand from your keyboard. When this is off, the chord will be set to nothing if you stop playing it.
Pads
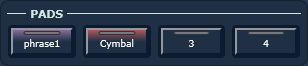
Pads by default belong to the Arranger and to that extend can be saved within a preset in order to be reinstated (i.e. reinstate the "assign" state). However, it is possible to "move" them in a style which means they will belong to a style and reinstated when a style gets loaded. See below of how this can be achieved.
Bank Memories
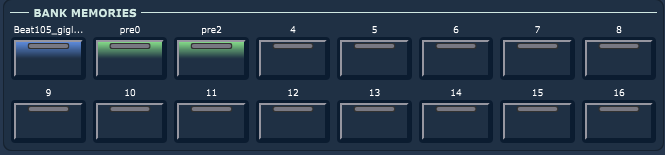
You may assign resource you want to the arranger memories, such as a style, a preset, a program,etc. You can even assign a resources directory. In order to do so, you need to drag the corresponding resources from the Resources Browser to the memory you wish to make the assignment.
If the assignment is successful, the memory will take partial the color of the resource type and its name. A new assignment will overwrite the existing one. You can also remove an assigned resource by right clicking on the assignment and select "Clear".
The memories are auto-saved within the currently selected bank. If you create a new bank, the new bank will be selected and all the memories will be deassigned. Respectively, selecting a bank will populate the memories with the resources that exist in the bank. Bank memories will keep your workflow organized and allow you to quickly set the Arranger in the "state" you want this to be.
Style Memories
Style memories are resources which belong to a style. Same as bank memories, you may assign any resource you wish such as a a preset, a program, a bank and the "assign" state will be reinstated when a style is loaded. This is a very handy feature which will help keep yourself organized. In the most common scenario, you can assign 4 presets which will only contain the melody and as such when loading a style you will also have 4 different instruments ready to play.
In the picture, I have assigned a preset which will set to my Right 1 "Alto Sax" when triggered and another one which will set to my Right 1 "Dig Piano". I also have assigned a bank so when this is triggered my bank memories will be populated with 16 different resources which I have prepared for this style or even another one. If you right click on an assigned style memory, you can of course remove it but you can also set it to "Pre-Select". This means that this resource will be set to the Arranger after the style is loaded. So you load a style and you have your right hand ready to play with the sound you wish. You may have only one "Pre-Select" style memory.
The resources for the style memories are saved within the style as referenced paths. Which means that the resources must exist physically as files in your hard drive in order for the style to find them. If you delete resources that a styles is using, trying to trigger a style memory after the style is loaded, it will fail. There is an exception to this when it comes to preset resources. If you drag & drop a preset into a style memory you will be queried if you want this referenced or embedded. If you choose to embed it then the preset data will be copied within the style and from that point on the original preset file will not be needed. This method has advantages and disadvantages. The advantage is obvious, the style will not depend any more on any other file. The disadvantage is that if for example you assign a preset to 20 styles and then you wish to change something in your preset, you will have to do this for all the 20 styles while if you have it referenced, you only change the preset file and all you styles will automatically be up to date.
Style Memories are not saved automatically when assigned or de-assigned. You must explicitly save your style whenever you are happy with your changes.
Sections

This is where you can switch to a different style section. Sections are populated by the selected style, hence the number of sections and the names can be different from style to style.
Virtual Keyboard

The Arranger Virtual Keyboard represents your physical midi keyboard controller with the "Default" role. While playing notes on your default midi controller, you will have the corresponding ones highlighted in the Arranger Virtual Keyboard. If that is not the case then re-visit your settings. At the top of the Arranger Keyboard a splitter exists which can be moved by the mouse or by the assigned midi control to define your Chords range and your Melody range. A note that is played in the Chords range is used to identify the chord that must be played for the activated style. These ranges are also taken under consideration by the Melody tracks.
Toolbar

- Save: Pops up the Preset Definition window in order to take a snapshot of the Arranger's current state.
- Style: Pops up a menu with more actions related to a style. See below.
- Swap Controller/Mixer positioning A convenient way to easily switch the positioning of the mixer with the Arranger controls.
- Key Note: Sets the Key Note.
- Start Playing: Starts the Arranger.
- Stop Playing: Stops the Arranger.
The style button has the following available menu commands:
- New...: Will pop up the Style Definition window for you to create a new style.
- Save: Saves the current style. This is convenient in cases you tweak the style mixer attributes (e.g. volume, pan etc) via the Arranger Mixer and you quickly wish to save without the need to go in the Style Editor.
- Presets 1,2,3,4: This will allow you to save the current state of the Arranger as a preset that will belong to the style. This will be an embedded style preset, see style memories.
- Pads Save: This will save the current assigned pads inside the style. The pads will then belong to the style and when a style gets loaded, these pads will be reinstated .
- Pads Detach: If the pads belong to the style indeed, you can remove them using this command. The pads will remain in the Arranger but will no more belong to the style .
- Pads Clear: If the pads belong to the style indeed, this will remove them from the style but also from the Arranger .
Key Note
Setting the key note is like changing the root chord of your currently playing style. If for example you are playing a style which has a root chord of Cmaj7 and you set the key note to A, then the style will behave as its root chord is Amaj7. Hence, if you are playing a song on Am scale, you will probably want to have the key set to A. But this not restrictive and sometimes it may even sound better if you have a different Key Note than the scale you are playing. It depends on the style and the virtual instruments.
Mixer

The mixer is divided into different groups which have different colors and the visibility of these groups can be set from the settings. You can change the volume of your tracks, you can change the pan and you can mute tracks (with the [M] button) or set them as solo (with the [S] button). You can have multiple solo tracks by Ctrl + Click the solo button. Drag & Drop an instrument on a track that can have instruments (a master track or a physical track for example cannot have instruments) will cause this instrument to be set on the track. If you right click on a track, a pop up menu will offer you additional options. Furthermore, if you click on the track arrow the track window will popup from where you can set more advanced options such as insert/send effects and more.
The mixer is resizable and does it best to fit all the tracks but if there are too many tracks, a scroll bar will be present which will allow you to access all your tracks eventually. The last group in the mixer contains the masters (i.e. Style master, Melody master, Mixer Master) from where you can achieve the balance you need between your left and right hands.
The mixer changes only affect the current state of the Arranger. If for example you change the volume of a style track lets say from 0db to 6db the change will not be saved in your style file. Which means that if you reload the style the corresponding volume will be 0db again. If you wish your changes to the attributes of the track to be permanent then you can right click on the applied to the Arranger style in the Styles Explorer and select "Adapt style to the current mixer state" or go to the Style Editor and press Save. This is because you can save the state (which includes the mixer) of the Arranger as a Preset and you can have the same style in different presets with different track attributes. A common simple example is to create a style which includes lets say drums instrument. And you wish to use the same style in two different songs but in one of these songs you wish to have the drums muted. Instead of creating two styles you are creating only one and you create 2 different presets: One with the style as is and one with the drums track muted.
A mixer is also available in the Style Editor.
Style Editor
The Style Editor provides you with the necessary tools to create your style. The main window's screen is divided in two, where at the top you can see the tracks
as well as the timeline of your style and at the bottom is the Midi Editor where you can view and edit the midi events of each track. You can alternatively switch at any
time the bottom window to see your styles, pads, instruments or the mixer. You can load a style (i.e. apply it to the midi editor) by double clicking on the corresponding resource in the tree or simply drag & drop it into the
main area. You can set an instrument on a track by using that track's window or by drag & drop the instrument into the track you wish this to be set.
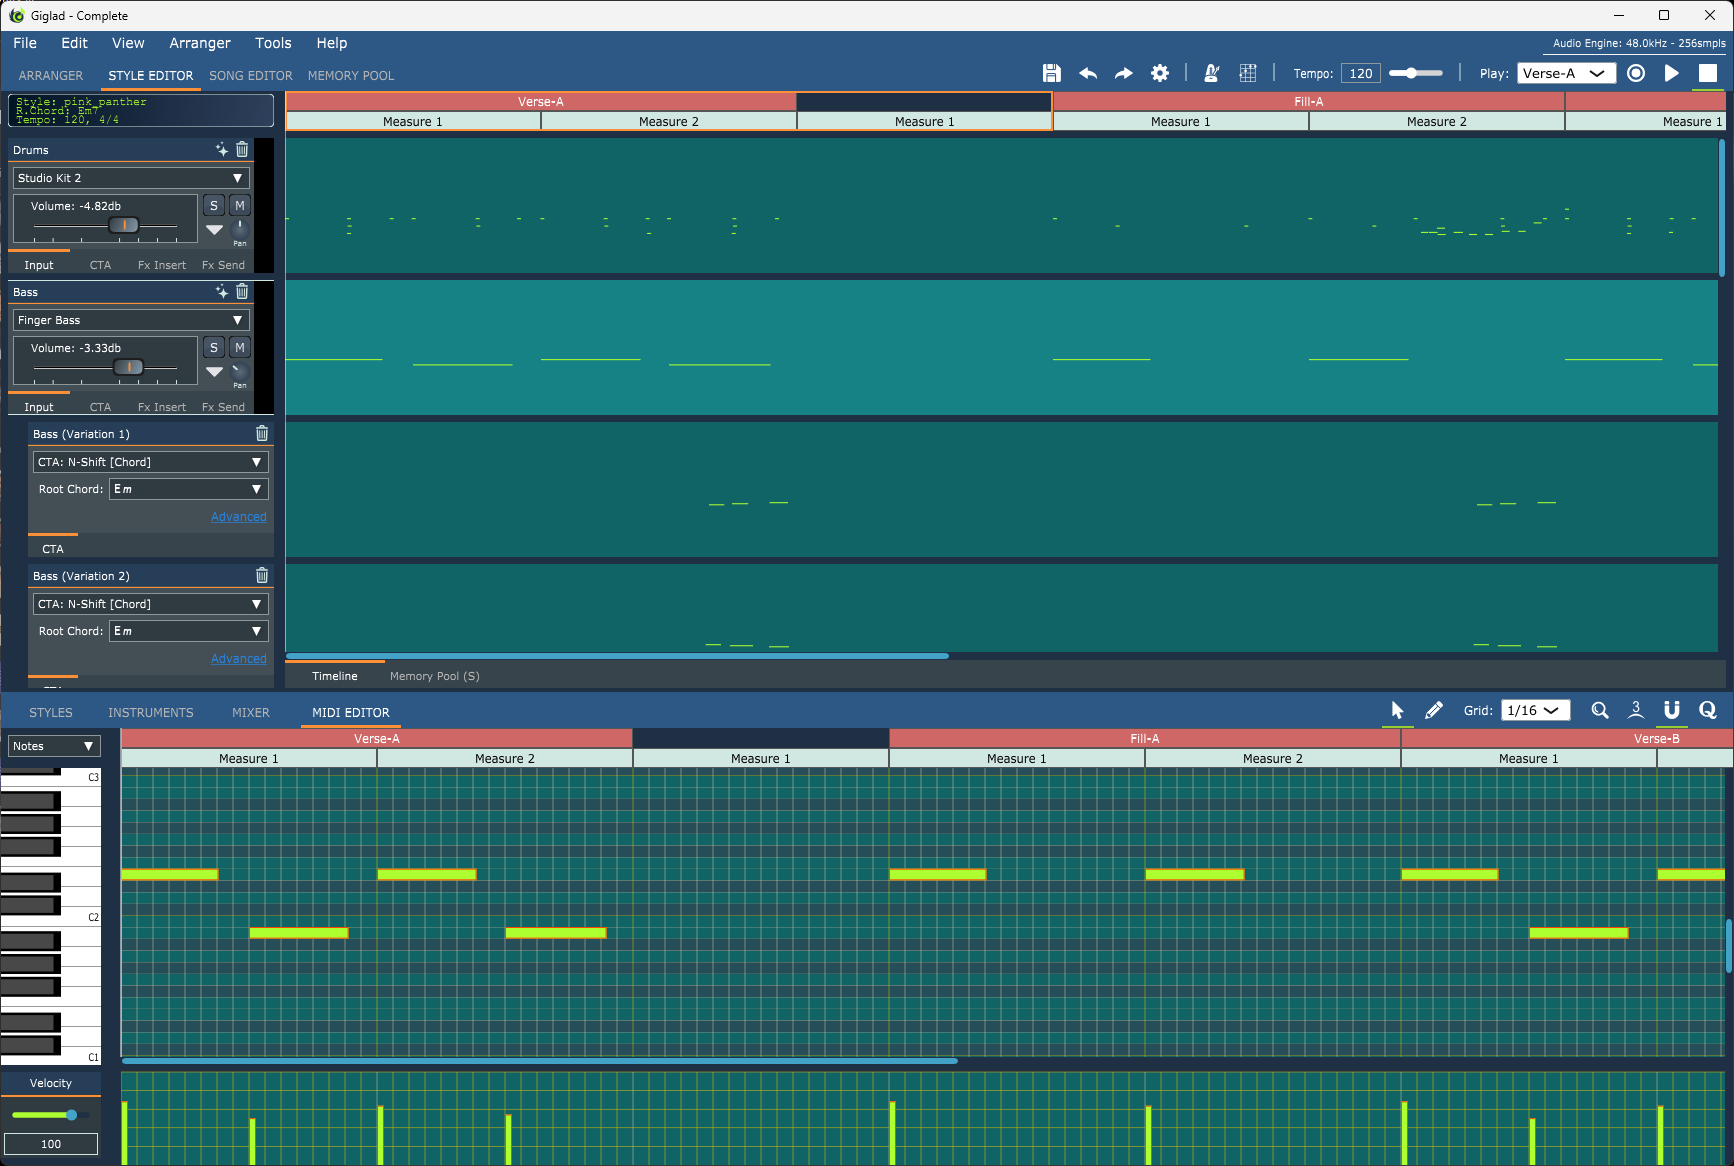 It is possible to have multiple styles open in the style editor. If you double click on the resource in the tree, the style will be loaded and then be added to the editor. You can see all your opened styles in tabs at the top of the window. If you however
drag & drop a style, this will replace the existing style with the new one. The active style (i.e. the one currently displayed) which can be set by clicking on the corresponding tab with the style name it is the one that also is set to the Arranger.
Meaning that switching to the Arranger, this will have the active style editor style set. Having multiple styles opened is beneficial when you wish to copy data from one style to another. But keep in mind that styles are using plug-ins and each style you laod may require
significant RAM memory so avoid opening too many styles at the same time if you do not need them.
A style is based on the midi protocol; it is a midi file after all. This document will assume that you have no previous experience with midi and will
try to explain things as simple as possible. Nevertheless, it may fails to do so in which case, if you are having a hard time understanding, you can learn more about midi
on the Internet. In fact, it is advised to do so as you will feel more comfortable of what it is that you are doing. Even if you are familiar with the midi protocol or experienced user with
other DAW's midi editor, it is still advised to quickly read this section because there are concepts (such as style sections and chord transposition algorithms) which are unique to Giglad.
☛
A style is composed by tracks. Each track plays a virtual instrument and all the instruments are mixed in order to produce the final result.
☛
A style has a timeline. The timeline is split into different sections and these are in fact the sections of the style.
When creating a new style, and if you leave all its definitions as default, your Style Editor window will look like the one below. By default, you get one track,
called Track 1, the EvBase section and one real section in the timeline called Main with one Measure; One more measure is added at the end of the timeline which does not belong to the
section and we will explain this later. Please remember to select a track before trying to add events in the midi editor. Eventually you will wish to add more tracks, more sections and instruct each track what notes should play and when.
It is possible to have multiple styles open in the style editor. If you double click on the resource in the tree, the style will be loaded and then be added to the editor. You can see all your opened styles in tabs at the top of the window. If you however
drag & drop a style, this will replace the existing style with the new one. The active style (i.e. the one currently displayed) which can be set by clicking on the corresponding tab with the style name it is the one that also is set to the Arranger.
Meaning that switching to the Arranger, this will have the active style editor style set. Having multiple styles opened is beneficial when you wish to copy data from one style to another. But keep in mind that styles are using plug-ins and each style you laod may require
significant RAM memory so avoid opening too many styles at the same time if you do not need them.
A style is based on the midi protocol; it is a midi file after all. This document will assume that you have no previous experience with midi and will
try to explain things as simple as possible. Nevertheless, it may fails to do so in which case, if you are having a hard time understanding, you can learn more about midi
on the Internet. In fact, it is advised to do so as you will feel more comfortable of what it is that you are doing. Even if you are familiar with the midi protocol or experienced user with
other DAW's midi editor, it is still advised to quickly read this section because there are concepts (such as style sections and chord transposition algorithms) which are unique to Giglad.
☛
A style is composed by tracks. Each track plays a virtual instrument and all the instruments are mixed in order to produce the final result.
☛
A style has a timeline. The timeline is split into different sections and these are in fact the sections of the style.
When creating a new style, and if you leave all its definitions as default, your Style Editor window will look like the one below. By default, you get one track,
called Track 1, the EvBase section and one real section in the timeline called Main with one Measure; One more measure is added at the end of the timeline which does not belong to the
section and we will explain this later. Please remember to select a track before trying to add events in the midi editor. Eventually you will wish to add more tracks, more sections and instruct each track what notes should play and when.
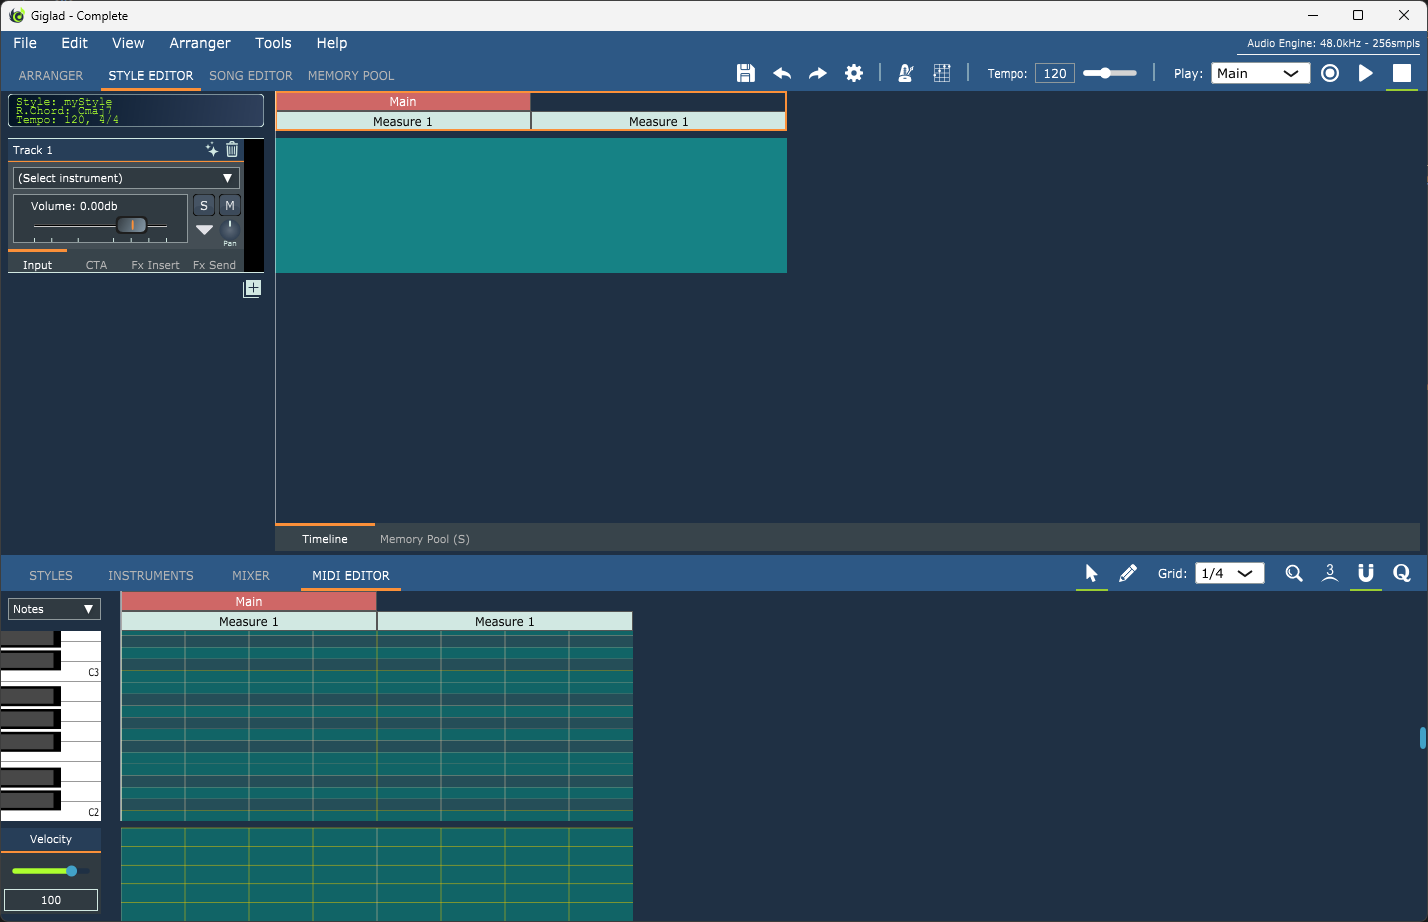
Tracks
Please refer to the tracks section which describes in detail how you can select an instrument and setup the volume, pan,etc.
The tracks in the Style Editor can be selected. You can select a track by clicking anywhere inside it (not inside of its controls) or by clicking on its corresponding timeline. You can also select multiple tracks by holding down the Ctrl key and change multiple attributes simultaneously.
You can add a track by clicking on the Add button which can be found at the end of the tracks and you can remove a track by clicking on the Remove button which can be found at the top right side of the track you wish to remove. You can also reposition your tracks by clicking on the arrow button in the track and select the proper menu action.
The Add button also offers you the option to Clone an existing track from your style or some other style which is already opened. This will add a new track which will be identical to the track you choose to clone. It also offers you the option to Paste which works similar but you must first have selected to copy a track into the Clipboard. Mind that for these purposes Giglad is using an internal Clipboard and not the Global clipboard of your system.
Chord Transposition Algorithm (CTA)
The style tracks have an additional tab window called CTA. The attributes of CTA describe how the midi events will adapt on each chord you are playing. As previously mentioned in this document, a style has a root chord. To make it easier, let's assume that the root chord will be Cmaj7. Every track plays notes by respecting the root chord. For example the guitar may play C4-E4-G4-B4 while the bass plays C4-G3-C4-G3. It is not compulsory for the tracks to play only notes that belong to the root chord, but they usually do. When playing live using your style and you play for example the chord Am, the Arranger's engine needs somehow to know how to play A3-C4-E4-A4 instead of C4-E4-G4-B4. This is succeeded with the CTA where you need to select for each track which algorithm will be used to do the conversion. CTA also takes under consideration the Key Note which is set either to the Arranger when playing live or to the song. The following explanations assume C Key Note.
- CTA: Bypass: No transposition is applied at all. This algorithm should always be set for percussion (drums) as the notes of the percussion are not affected by the chord that is playing.
- CTA: Free: No transposition is applied at all unless it comes from the global arranger transposition. This algorithm should be applied in tracks that play some kind of melody which should be the same regardless the playing chord but respects the transposition in case it changes. It can also be applied to tracks from a midi file that is loaded in the style editor but its not meant for a style but for a full song. It always produces notes regardless if a chord has been detected or not.
- CTA: Fixed: Transposes in such a way so the result notes to be as near as possible to the ones defined in the root chord. For example C4-E4-G4-B4 for Am chord will be converted to C4-E4-A4-C5.
- CTA: U-Shift: Transposes Up each note by maintaining the semitones relationship. For example C4-E4-G4-B4 for Am chord will be converted to A4-C5-E5-A5.
- CTA: N-Shift: Transposes Near each note by maintaining the semitones relationship. For example C4-E4-G4-B4 for Am chord will be converted to A3-C4-E4-A4 because A3 is nearer C4 than A4.
- CTA: D-Shift: Transposes Down each note by maintaining the semitones relationship. For example C4-E4-G4-B4 for Am chord will be converted to A3-C4-E4-A4.
-
Guitar:
This mode should be set only for tracks that play the guitar and it works completely different than these described above. Some notes no matter the octave they exist are mapped to one of the guitar strings.
- B → Guitar High E A → Guitar B G → Guitar G F → Guitar D E → Guitar A D → Guitar Low E C# → Quint C → Root Note
The X-Shift CTA can be X-Shift [Chord], X-Shift [Bass] or X-Shift [Riff]. Bass and Riff will only make a difference if the selected Chords Detection Mode in the Arranger settings is Fingered on Bass. In that case:
- Bass: The root note in the midi editor will be transposed to play the first note in your left hand. For example if the midi events are C-E-G and your left hand plays G-C-E, the arranger will play G-E-G, i.e. the root note which is C will be converted to G as this is the first note played in your left hand while all others will remain the same
- Riff: Works similar with the Bass but it will transpose all the notes, not just the first one. For example if the midi events are C-E-G and your left hand plays G-C-E, the arranger will play G-C-E
The CTA window has also the Root Chord which can be used to override the root chord of your style for the specific track only. If you choose something other than "Inherit Style", the track will use the selected chord as its root chord and will completely ignore the root chord of the style.
Chord Transposition Algorithm Advanced
By clicking on the corresponding link in the CTA window you can access the advanced options of the CTA.
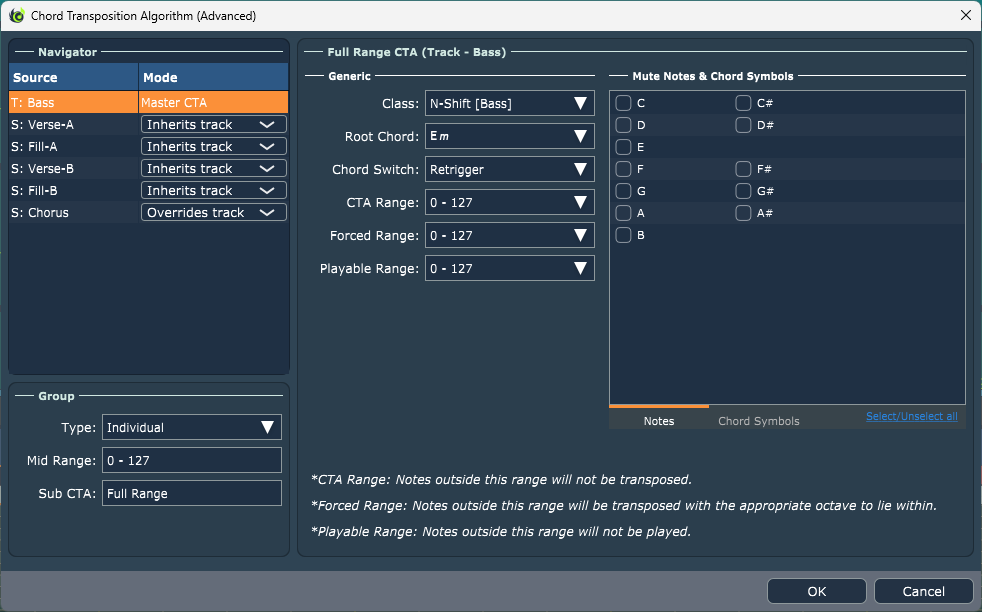
You can have different CTA per section or to choose the same CTA for all your sections. The first row is always the Master CTA. That is the CTA that will be applied for all sections unless one or more of them overrides it. In the image above, where we can see the CTA of the Bass Track, all secondary sections are using the same CTA, the Master CTA, while the "Main" explicitly overrides the Master Track and it is using its own CTA. It is possible to select multiple sections in this table and change CTA properties. Every change you apply while you have multiple sections selected will be applied to all the selected sections.
Furthermore, it is possible to have different CTA depending on the range a note exists. For this to be achieved, you need to select "Container" in group type. This will enable the three possible ranges and you can define the mid range from the corresponding combo while the low and high range will be auto set. For example if you choose mid range 36-83 then the low range will be 0-35 and high range will be 84-127. In this case every note depending on the range it exists will follow different CTA. Choosing the Sub CTA will cause the right panel (which is in fact the CTA) to be populated with the properties of the selected range.
At the top of the right panel, you can see info of what is selected and being edit. Full Range CTA (Track-Bass) indicates that I am editing the full range (i.e. no container and different ranges) for the master track. The CTA attributes are explained below.
- Class: The main CTA type which also exists in the track user interface for fast access and explained above.
- Root Chord: The root chord which also exists in the track user interface for fast access and explained above.
- Expects Chord: If "Yes", then no notes will be played if no chord is set to the Arranger.
- Chord Switch: Describes how the arranger will behave when the chord changes. ☛Soft Retrigger: If a note does not exist in the previous chord, the note will be played again to match the new chord. Notes that exist in the previous chord and the new chord will stay as is. ☛Hard Retrigger: All the notes from the previous chord will go off and will be played again to match the new chord. ☛Stop: If a note does not exist in the previous chord, the note stops playing. Notes that exist in the previous chord and the new chord will stay as is.
- Style Switch: Describes how the arranger will behave when the section changes. ☛Retrigger:Notes from the previous section will be stopped. If the section changes in the middle of its range, the Arranger will compute which notes should be on at this time and trigger them. ☛Stop: Notes from the previous section will be stopped and no retrigger will take place until a note on event is received later. This is a behavior you most probably want for Drums/Percussion and as such it is set by default when you set the CTA to bypass.
- Limit Key: Gets enabled when the Class is U-Shift or D-Shift. It provides a note limit after which the transposition is reverted. If for example you have chosen to shift up but with a limit key of F, notes after F will eventually be shifted down.
- CTA Range: Notes outside this range will not be transposed. This option can be quite useful for some plug-in instruments which use part of the midi range as a controller. For these instruments you probably with to leave the control range out of CTA.
- Forced Range: Notes outside this range will be transposed with the appropriate octave to lie within the selected range. For example if this range is 100 - 127 and the CTA needs to play note 98 it it will eventually play 98+12 = 110. This is a useful setting when you wish a note to be transposed within the playing range of an instrument.
- Playable Range: Notes outside this range will not be played at all. This can be useful for Yamaha styles which they use the very high range of the keybaord for special sounds that are not supported in giglad. Hence, these event are muted.
- Mute Notes & Chord Symbols: You may choose notes or chord symbols to be muted for the specific track. If for example you check the "m" symbol then all minor chords will not be played for this track. This is quite useful if you wish to have different variations depending on the playing chord.
Variations
Variations can be very useful when creating a style. A variation is like a track and contains midi events while also has its own CTA. However, no instrument or effects can be assigned to it as it inherits these attributes from the track that it belongs to. In the image below, the bass track has 2 variations.
What you usually want to do is to instruct Giglad to play different midi events (i.e. use track or any of its variations) depending on the chord you are playing while performing live. You do this by muting chords or symbols on the track CTA and its varitaions CTA. For example, in the image below (track CTA left, Variation 1 CTA middle, Variation 2 CTA middle) I have choose my track to play all chords normally but m(add9) which will be played by Variation 1 and mMaj7 which will be played by Variation 2. This means that if I play for example Em the midi events in track 1 will be played, if I play Em(add9) the midi events of Variation 1 will be played and if I play mMaj7 the midi events of Variation 2 will be played.
You can add a new variation by clicking on the arrow in the "Input" tab of the track and select "Add Variation" from the corresponding menu item. You can delete a variation by clicking the "Remove" icon button at the top right of the variation. You can use as many variations as you like and because these are not using any instruments or effects but inherit their track, they do not require additional processing power.
Midi Editor
The Midi Editor is used to describe the midi events that each track will send to the instrument. There are also meta events such as the tempo or the time signature which are actually send to the arranger. The midi editor is composed by
- The central grid where the midi events are defined.
- The bottom grid where the velocities of the notes are defined
- A keyboard on the left side which makes it easier to find the notes you wish to put in the central grid.
- A combo box on the left top side where you can select the midi events type to be visible (notes, controls, meta).
- A toolbar with available actions such as select, edit, zoom etc to help you editing.
- A simple input control where you can define velocities and other midi event values such as the tempo, the time signature, the program change, etc.

Most of the midi editor's critical functionality can be mapped to keyboard shortcuts and this is something strongly advised to do so in order to significantly reduce the editing time.
The Midi Editor reflects the selected track. Hence, you need to select at least one track to start editing (unless you are editing meta events). Selecting multiple tracks and using the editor is not advised and it is only needed in certain cases. Most of the time you will wish to select one track and start adding notes in it. Later on this chapter, we will see how the midi events can be added directly from the midi keyboard controller while the Arranger is playing but for now let's use our PC keyboard and mouse to better understand the editor.
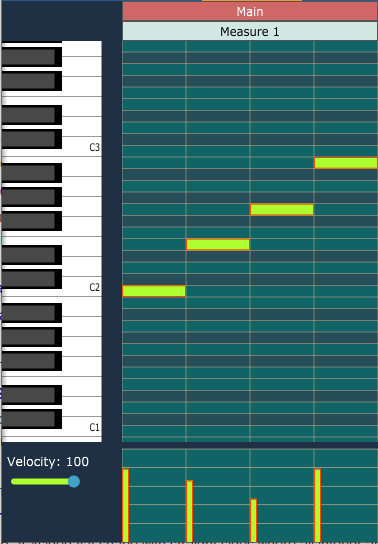

- Adding Events: In order to add an event, the Create New Events button should be selected (pencil). If you then click inside a cell of the grid, and while the snap button is on, an event will be created with the value of a grid cell. More frequently, you will wish to press the left mouse button somewhere inside the grid and start dragging to the right with your mouse. When you release the left mouse button, the event will have be inserted. Depending on if you have the Snap on/off, the event will fill the grid cells or will be placed exactly where you clicked. Pressing the Alt button while clicking it will cause the snap to be ignored.
- Selecting Events: In order to select an event, the Select Events button should be selected (arrow). If you then click on an event, this will be selected. You can click on another event, while pressing the Ctrl button at the same time time, to add more events in your selection. Alternatively you can select multiple events by pressing the left mouse button anywhere inside the grid and outside events and start dragging so that you enclose or intersect events inside your window. By pressing the Ctrl button and clicking on a note in the virtual keyboard at the left will result all the notes in the midi editor of the note that has been clicked to get selected.
- Deleting Events: To delete an event, first select it and then press the Del key or right click with your mouse and select Delete from the corresponding command menu. You can delete multiple events at the same time if multiple events are selected.
- Moving Events: To move an event, press the left mouse button on an event and start dragging. You will see the event moving. By releasing the left mouse button the event will be placed where you released the button. You can move multiple events at the same time if multiple events are selected. If while moving the Ctrl key is down, then the events will be copied instead.
- Copying Events: You can copy events as described exactly above on Moving Events. Alternatively, you can select one or more events and press Ctrl+C or or right click with your mouse and select Copy from the corresponding command menu. The events will get in the clipboard and you can paste them by placing the cursor where you wish for them to be copied and press Ctrl+V or or right click with your mouse and select Paste from the corresponding command menu.
- Changing Existing Events: By putting the cursor at the edge of an event (left or right), the cursor icon will be changed and imply that you can drag the event in order to change its value.
- Changing Velocities: When adding a note, this is is added with the velocity that can be seen at the slide bar under the music keyboard (default 100). You can change this before adding the note but usually you will want to change the velocities later, after placing a few notes. To do so, move your cursor at the top of the rectangle of one of your velocities (bottom grid) and drag it up or down to change its value. Alternatively, you can select one or more notes and change their velocity from the velocity slide bar.
Pressing the Ctrl button while moving the mouse wheel will cause vertical zoom while pressing the Ctrl+Shift button while moving the mouse wheel will cause vertical zoom.
Sections
It should be clear by now that the notes in each style section are played in a loop when the section has been selected in the Arranger. For example, a 4/4 style with selected the section Main which contains 4 quarter notes C-E-G-B will play C-E-G-B-C-E-G-B-C-E-G-B-C-E-G-B and so on. There is no restriction on the number of measures that each section can have. The section will repeat itself when all measures of the sections have been played. At the top of the timeline, in both the Midi Editor and the central window of the Style Editor you can see the sections and the measures of each section as well as the total sections in your timeline.
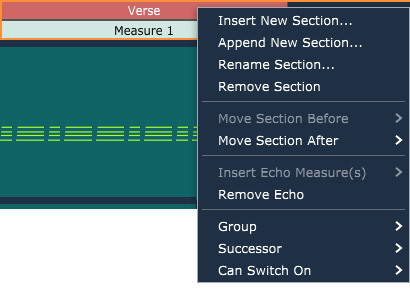
- Insert New Section: Inserts a new section before the section that has been selected. In the image example, the new section will be added before Verse. A window will pop up in order to give the basic attributes of your section such as the name, the number of measures and the number of echos.
- Append New Section: Inserts a new section after the section that has been selected. In the image example, the new section will be added after Verse. A window will pop up in order to give the basic attributes of your section such as the name, the number of measures and the number of echos.
- Edit Section...: Pops up a window to edit the section where in fact at the moment you can only enter a new name for it.
- Remove Section: Removes the section from the timeline and deletes all the note events that this contains.
- Merge Sections Merges the named sections and results one final section.
- Split Section Splits a section into 2 with the named measures.
- Copy Section Copies the section in the clipboard (that would be the internal clipboard and not the system clipboard) for later use to paste it somewhere else.
- Paste Section Adds a copy of the section in the clipboard after the selected section.
- Move Section Before: Displays a list with all the sections but the one selected in order to move the selected one before another existing section. In the image example, this option is disabled because the selected section is the first one so it cannot go before any other section.
- Move Section After: Displays a list with all the sections but the one selected in order to move the selected one after another existing section.
- Insert Echo Measure: Adds an echo to the section with a number of measures as requested. Echoes are explained in detail later in this document. In the image example, this option is disabled because the section already has an echo.
- Remove Echo: Removes the echo from the section. Echoes are explained in detail later in this document.
- Group: Can be "Into", "Main", "Fill In" or "Ending" and it only affects the way the sections are grouped and placed in the Arranger. It does not define its behavior which must be done using the Successor and Can Switch On entries.
- Successor: Displays a list with all the sections but the one selected in order to select the successor of the selected section. This comes handy to sections which suppose to act as Fill Ins. For example, let's suppose you have three sections in your style: Verse, Fill-In, Chorus. If you set the successor of Fill-In to be Chorus then switching to Fill-In while being in the Arranger will cause the Fill-In section to only be played once (instead of going into loop) and automatically switch to the Chorus section. You can also set the successor to be "Previous Playing" in which case the Arranger will switch to the section that was previously playing or you can set the successor to be "Ending" in which case the Arranger will stop playing after the section finishes.
- Can Switch On: By default, sections switch on the first beat. On a 4/4 style for example, if you switch section on the second beat, the arranger will play the remaining 2 beats before switching to the requested section. You may allow a section to switch on "any beat" by selecting the corresponding option. This is quite useful for "Fill In" sections.

- Insert Measure(s): Inserts one or more measures before the section that has been selected. In the image example, the measure(s) will be added before Measure 1.
- Append Measure(s): Inserts one or more measures after the section that has been selected. In the image example, the measure(s) will be added after Measure 1.
- Remove Measure: Removes the measure from the timeline and deletes all the note events that this contains.
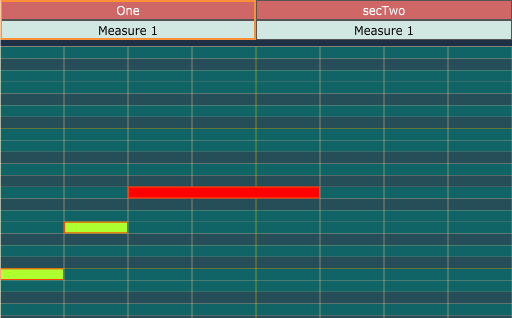
EvBase
EvBase is a special section in giglad which as acts as the base section for meta midi events. When creating a new style, this will be there by default. If you also open a Yamaha style this will also be present as SFF2 & SFF3 defines similar data. If you open any other midi file this will not be present.
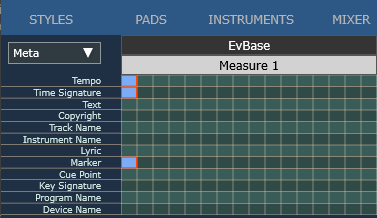
It is important to understand that a style in Giglad is a single midi file where sections are defined as markers. It is not like every section has its own midi file. To that extend there is a single timeline and events are processed in serial. So lets assume that you have 3 sections. Section A, B, C. and A contains meta event tempo = 100 which lets assume that this is the default tempo you want for you style. But you want B to have a different tempo so you add an event tempo = 80. What section C will have if you do not add a tempo event? As the midi protocol suggests the last one which is 80 but most probably this is not what you want so you are forced to add another meta event tempo = 100 to make things right. But then you start moving things around, you may delete sections or you may change their position in which case the timeline will change and the last fix you did may not worked as planed.
This is the purpose of the EvBase section and tries to save all this mess by taking under consideration that we are not creating a midi song but a style. So instead of adding the events that we wish to be consistent in the whole style at the first section we add them in the EvBase section. So we add a meta event tempo = 120 to the the EvBase for example. Now if a section has a tempo event, Giglad will respect that and set it. But if it does not have any tempo event instead of searching serially using the previous tempo in the timline it will simply use the tempo of the EvBase.
Giglad allows you to remove this section but it is not recommended unless you really have understand what explained above and you know what you are doing.
Echoes
Echoes are an advanced feature of Giglad. They may feel hard to understand at the beginning, but once you get familiar with them, they will allow you to take your style into the next level. Echo is the part of the timeline between the end of one section and the start of the next. In the image below, Measure 2 is echo. As the Arranger is playing, when the timeline reaches the end of section Main, it will be moved back again at the start of section Main. But at the same moment, another timeline continues in order to play the events of the echo. In other words, the events of a section's echo are "mixed" with the section itself.
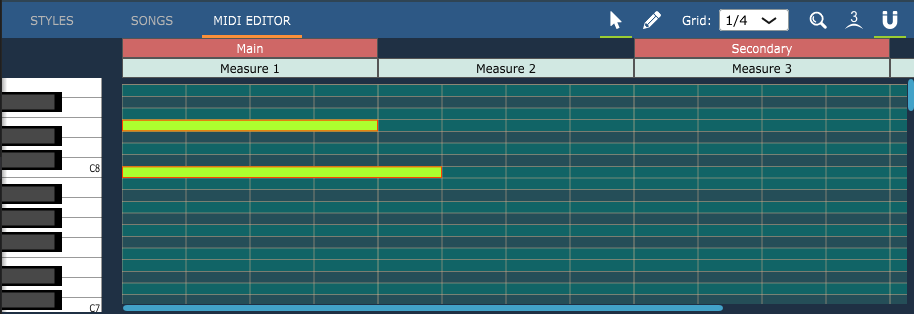
Let's understand the benefits of echoes. In the image above, note E (upper event) will be played at the start of the section Main. At the end of the section, the note will go off, and almost instantly it will go on again as the timeline will go back at the beginning of the section. This may of course be a desired behavior. But what if you wish the note to keep playing for ever and never goes off? This can be succeeded by using the echo of the section Main. In the image above again, note C (lower event) will be played at the start of the section Main. Because the note goes off at section's echo, but before goes off it has been set on again, as the timeline went back to the begging, what will happen is that the note will never go off and the sound will be constant. Echoes can also provide a great beneficial usage on a Fill In section, i.e. a section that exists only for the transition from section A to section B. In the image below, the bridge section will play C-E-G-B and at that time you can switch to a different section which will start playing but the echo of the bridge will continue and play all the notes C-E-G-B at once. The best practical example of the bridge is the crash cymbal of the drums which usually goes at the beginning of the next section. To achieve the desired behavior, you can use the bridge's echo end put the crash cymbal at the echo.
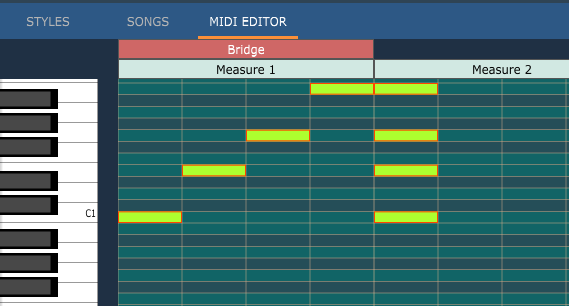
Toolbar

- Edit Styles: Sets the view in "Styles" mode where you can edit styles.
- Edit Pads: Sets the view in "Pads" mode where you can edit styles which meant to be used as pads.
- Save: Saves your current progress. Giglad does not save automatically so it is strongly advised to save your style often.
- Undo: Undo your last action.
- Redo: Redo your last action.
- Settings: Pops up the Style Definition window from where you can change some attributes of your style.
- Metronome: Sets the metronome on/off. The metronome will start when the Arranger starts, i.e. when you click on the Start Playing in the toolbar. The metronome is useful when you are adding notes to your style live, while playing on you midi keyboard controller.
- Play Chord: Allows you to listen how your style will sound if the selected chord is played in the Arranger. This comes handy as you do not need to switch to the Arranger UI in order to test your style.
- Tempo: Changes the style tempo. You can use the slidebar or type directly into the field the tempo that you wish to set. Mind that because the tempo is in fact specified by a midi event, changing the tempo here will in fact change the value of the corresponding midi event. This will be the tempo event right after the timeline cursor is placed.
- Play Section: Will move the timeline cursor at the beginning of the selected section.
- Record: Allows you to create note events directly from your midi keyboard controller without the need of using your mouse and keyboard. When this is on, and the Arranger is playing, any notes that will be played by your midi keyboard controller will be inserted directly into your style and will be visible on the Midi Editor as well. Note, that a track must be prior selected in order for this to work. Also, mind the Midi Editor's snapping option. If it is on, the notes you play will be automatically adjusted to the grid.
- Start Playing: Starts the Arranger.
- Stop Playing: Stops the Arranger.
Memory Pool (S)
You can switch to the Style's Editor memory pool by using the corresponding tab at the bottom of the top right window. Please refer to the Memory Pool section to understand the purpose of the memory pool and how you can use it. Style's memory pool is a shared memory pool and for styles it should be used for plug-ins which support multiple channels (e.g. Kontakt) in order to relief your system by creating only one instance of the plug-in and use multiple instruments in your style's tracks. It can also be used to change instruments on one or more style tracks. By defining MSB:LSB:PGM on a memory pool instrument and add the corresponding midi events to the style editor, a track may have different instrument depending on where the timeline cursor is and which event has been triggered.
Style's memory pool is referred as Memory Pool (S) and it is created when the style gets loaded. When the style gets replaced by another style, it's memory pool is destroyed. Hence it does not not make the style loading faster if used here and should only be used for the reasons explained above.
Audio Loops
Audio Loops allow you to play audio in some (if not all) of the tracks of your style. It is considered one of the most powerful features of Giglad as it can indeed be a game changer by improving significantly the style's quality and make it sound more natural. The most challenging part of introducing audio within a style is to adjust the tempo of the audio with the tempo of the Arranger. We believe that the third party Bungee Audio Time Stretch and Pitch Shift Library by Parabola Research Limited handles this pretty well.
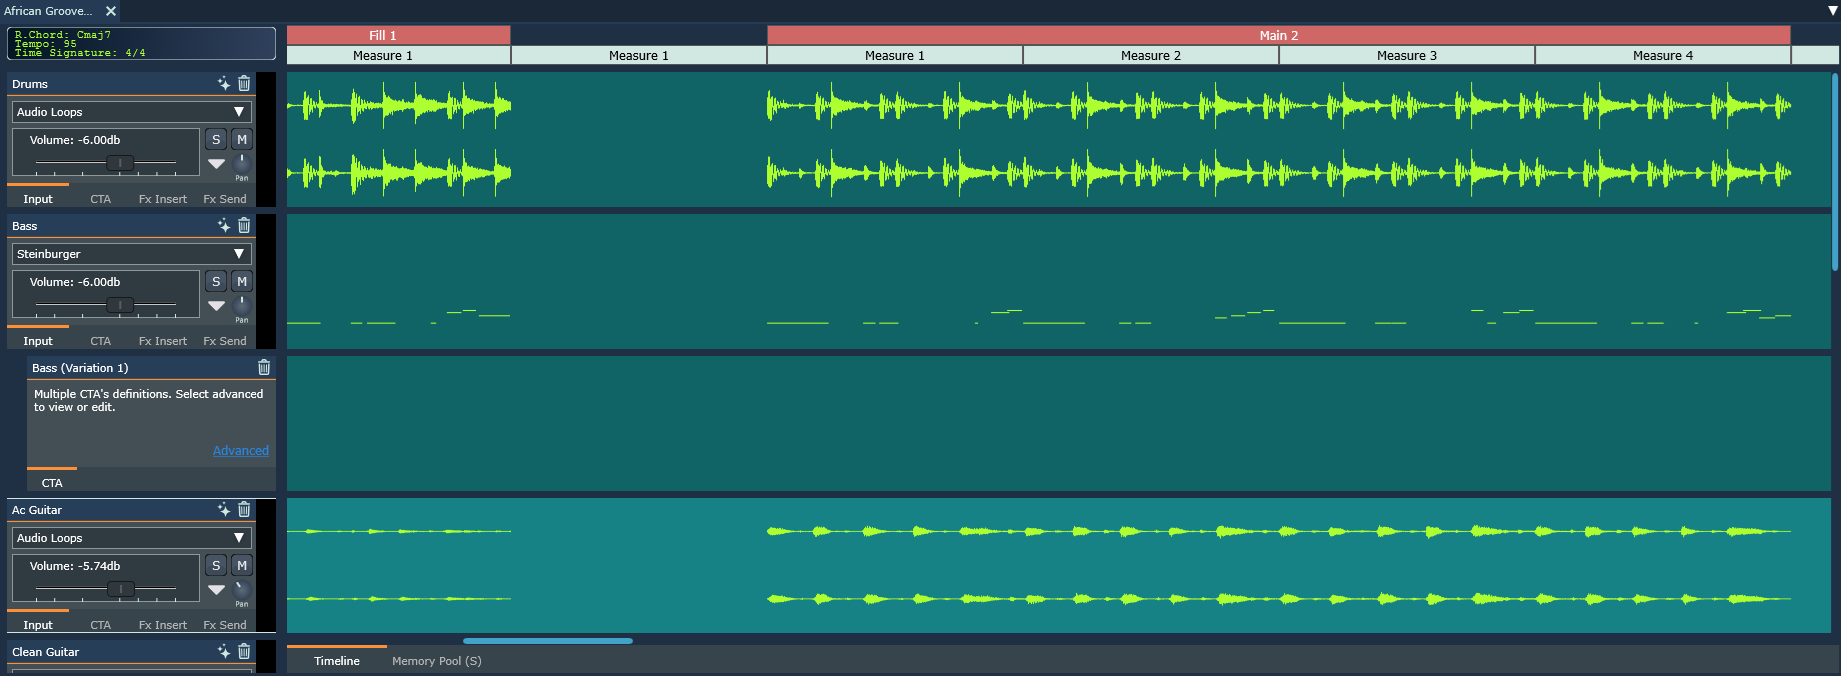
To use audio loops in a track, click on the Select Instrument and select Native Audio Loops. This will pop up the audio loops window from where you can define the type of audio and how this should play.
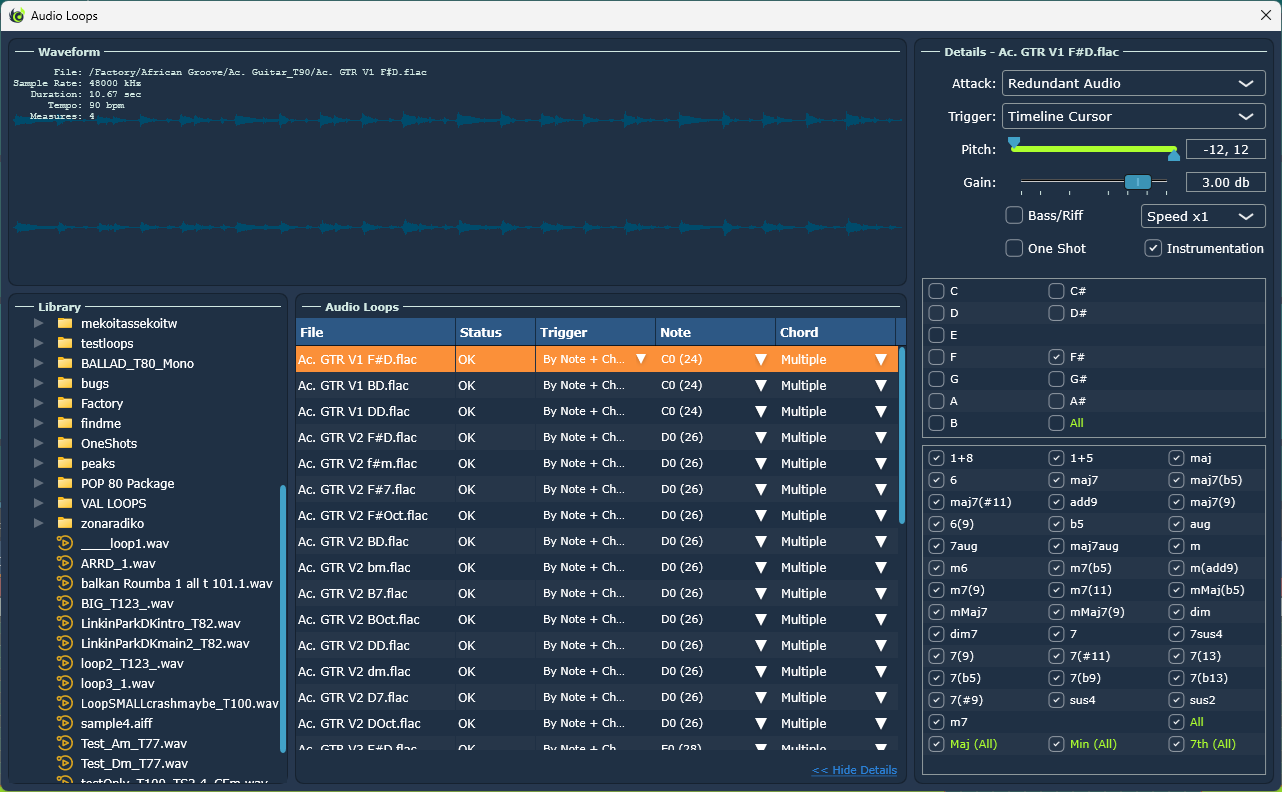
- The top panel (Waveform) displays the waveform of the selected file and provides some information such as the sample rate, the duration, the tempo and the number of measures.
-
The left panel (Library) is populated with all your available audio loops as these exist at your audio loops working directory. As you cannot actually create the audio files in Giglad, you must manually
place the audio files within this directory in order for Giglad to find them here in this window. You can then drag & drop a single file or directory on the Audio Loops panel so these files can be used from the audio loops engine.
The audio loops engine needs to know the original tempo of the audio file in order to adjust the audio to the Arranger tempo. This information sometimes exists in the audio file meta data so Giglad finds it and uses it automatically. But depending on the audio file this information may does not exist. In this case you may get an error and in case of any error you should click on the Error link to get information about the error. In such cases where tempo cannot be found automatically, you must name the audio file in such a way so Giglad can extract the tempo or any other information as the error message in the image suggests.
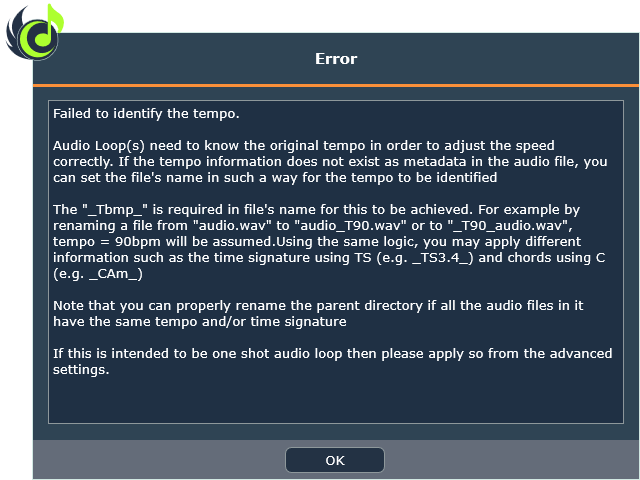
- The mid panel (Audio Loops) is populated while you drag & drop files from the Library. In the top image, we can see multiple files. This is because we want depending on the section and the current playing chord to trigger different audio file for this track. The view contains multiple columns so let's explain these one by one: ☛File: Simply displays the audio file name. No interaction is available here. ☛Status: Displays the status of the audio file. If "OK" then the file has been read and its ready to play. If "Error" you must click on the error to get more information and try resolving it ☛Trigger: Determines when each of the audio files will be triggered (i.e. start playing). This option is available only for the first file as all other files will use the same option. The following options are available: - Constantly: This will result the file to always play. Mainly applicable for drums/percussion which do not depend on chords. Should be avoided unless you are creating a style which will be used as a pad or if you truly wish all your different sections to have the same audio loop playing. - By Note: This will result the file to start playing when the corresponding midi note event goes on in the midi editor and eventually will stop playing when the note goes off. This again mainly applicable for drums/percussion but allows you to have different audio playing in different sections by using the corresponding note in the section for the audio file you wish to be triggered. - By Chord: This will result the file to start playing when a specific chord is detected. Applicable for voice instruments which depend on chords. Mind that the chord information comes straight from the Arranger so you should not form the chord in the midi editor. If you wish to have an audio guitar (for example) you do not need to add all 12 different notes for a major chord let's say. The audio engine will apply pitch by finding the closest file that matches. Additionally, it would be madness to actually set all different chords. This is why we see Multiple at the top image as this file is set to be used by many chords. - By Note + Chord: This will result the file to start playing when the specific chord has been detected but also when when the corresponding midi note event goes on in the midi editor. Both conditions must be met, it is not one or the other. This again applicable for voice instruments but allows you to have different audio playing in different sections by using the same logic described above. If you press "Space Bar" or double click on a file, this will start playing so you can preview it. Mind that the file plays at its original tempo and no time stretch is applied here.
- The right panel (Details) has advanced definitions for each of the selected files. Mind that some options can only be changed at the top level file (as all other files use the same option). Let's explain the different options one by one: ☛Attack: Determines the algorithm to be used when the time stretching library does not have the required audio samples in time (i.e. at the very beginning of the file). It is not the purpose of this document to explain this in detail but in our tests it seems like drum instruments work better with the "Raw Audio" while voice instruments work better with "Redundant Audio". ☛Trigger: Determines on where the file will start playing when triggered. "Timeline Cursor" means from where the timeline cursor of Giglad is when the audio file should start playing. So if an audio file gets triggered for example at Measure 2, audio loops engine will start playing the file from its "Measure 2". While "Start" will result the file to also play from its beginning when it gets triggered. ☛Pitch: Defines the range in which this is allowed to be pitched. If the audio engine does not find an audio file for a specific chord, it will search to find the closest and if the pitch range allows it, this will be used on the missing chord and will be pitched to match the audio. ☛Gain: Allows you to change the gain of each file in order to have a balance in all your audio files. ☛Bass/Riff: Should be checked when the track will play bass or riff as special algorithms are applied. ☛Speed: Allows you to set the audio file to play in double or half speed. ☛One Shot: Loops with this option will be played once and stopped and will not be time stretched or pitched. A crash cymbal could be a perfect example of such an audio file. ☛Instrumentation: Checking this or not will determine the time stretch algorithm. In our tests it seems like "Instrumentation" works better with voice instruments while for Drums it is better for this to be left unchecked. Every audio file is unique so this is just a general rule and you may wish to try the different options in your files and choose which sounds better. ☛Notes & Symbols: will allow you to select multiple chords in which the file should be triggered. Valid only for Trigger by Chord or Trigger by Note+Chord.
Song Editor
The Song Editor is the tool which you will use to create and edit your songs.
A song is based on the human-readable data-serialization language
YAML; hence, you could use any text editor such as Notepad (or even better Notepad++ which also supports YAML syntax)
to create your songs. However, the in house Song Editor provides some additional functionality such as playing specific song segments, formatting chords
and validating not only the YAML syntax but also the song requirements. This additional functionality will be a great asset in the process of creating your song.
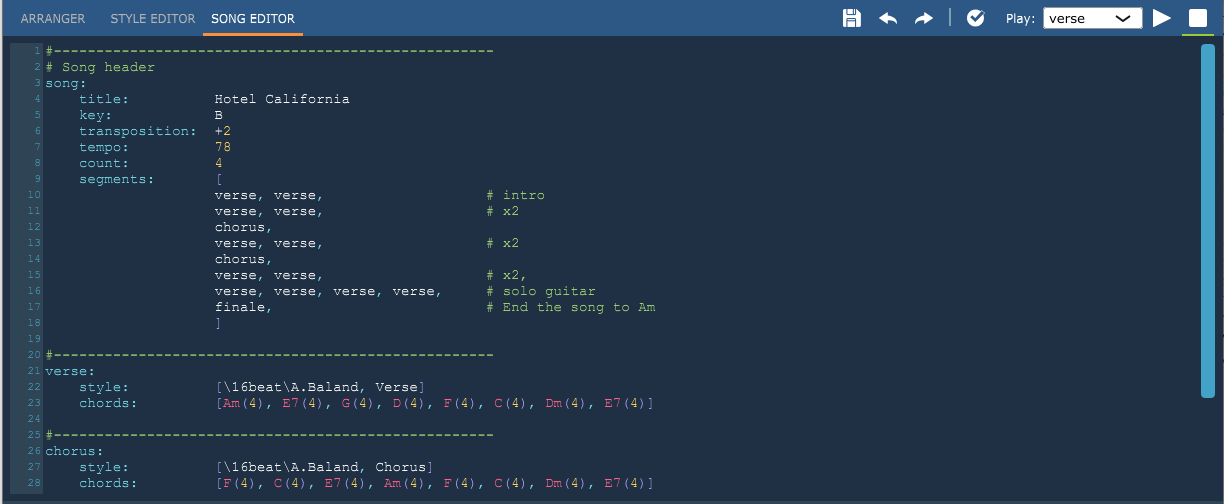
Song Syntax
If you find it hard to understand the song syntax as explained below, you should search on the internet a bit about the YAML syntax. A song is after
all based on YAML and it just adds a few simple rules to form the song. But the core syntax does not change.
A song consists of the Header which must be unique and the Segments which can be as many as you like. Each of them consists of
a number of mandatory or optional attributes. Lets see and explain the example below
which is one of the simplest songs that can be created.
- #---------------------------------------------------- # Song header: Anything after the # character is considered a comment and it is not taken into consideration. You can write anything you want after a # and it is just for your own convenience. The song will play even if this is omitted or if we write instead "# This is my song header".
- song: This declares the song header and it is a mandatory field.
- tempo: This is an attribute of the song and it will set the tempo to 100bmp.
- segments: Here we describe the segments which we want to be played in our song. We describe our segments by separating them with comma and enclosing them inside brackets, i.e. [segment1, segment2, segment3, etc]. In this example we have defined a segment below named mySegment and we have instructed here for this to be played twice.
- mySegment: This declares a segment and as we have seen, it is used by the song header. Any name can be used (within YAML restrictions).
- style: This is an attribute of the segment and instructs the style and the style section to be used when the segment is about to be played. We describe the style by the relative in our Styles Directory path of the style, separated with comma with the style section name inside brackets, i.e. [relative_style_path, style_section_name].
- chords: This is obviously the most critical part where we describe the chords to be played. For simplicity, we’ll consider for now a beat and quarter note to be synonymous. The chords are described again with comma separators inside brackets while the parenthesis states the number of beats for the chord to be played. Hence, in this example, the chord Am will be played for 3 beats and then the chord E7 will follow and will be played for 1 beat. It is also possible to describe the length of the chord in quarter notes, e.g. 1/4, 1/8, 1/16. As such, Am(1) is the same as Am(1/4) on a 4/4 style. Finally because the parenthesis character is reserved for the length, if you wish to use chords which include parenthesis you must type the '_' character. Eg. Am(add9) should be typed as Am_add9 and to also add some length Am_add9(1/4).
 At the end of the day, it does not make too much difference and the best practice is the one that suits each user. So as long as you get the expected result and you are
happy with it, it does not matter how you have form your song.
At the end of the day, it does not make too much difference and the best practice is the one that suits each user. So as long as you get the expected result and you are
happy with it, it does not matter how you have form your song.
Song Attributes
The song header and the segments contain attributes which are specific keywords for the song and provide a single instruction to the Arranger. In the example above, we have seen some of these attributes e.g. the tempo which instructs the tempo to be set. Most of the attributes can be set to either the song header or to each segment. If for example the tempo is set at the song header, there is no need to be set to the segments. The song will have the same tempo as this has been defined in the song header. But, you may wish to have a different tempo in some parts of the song in which case you declare the tempo in the segments. ☛ The following attributes are supported:
- title Restricted to the song header and at the moment it does nothing. It can be omitted, but it may have some use in the future.
- tempo Sets the tempo of the song or the segment. It optional and if omitted, the tempo will be set from the tempo of the style. The value should be a number in range 32-288.
- transposition Sets the transposition to the song or the segment. It optional and if omitted, there will be no transposition. The value should be +number for transposition up or -number for transposition down, e.g +2.
- key Sets the Key Note to the song or the segment. It optional and if omitted, the default key note will be used. The value should a note e.g. "A".
- count Restricted to the song header and it is optional. The value should be a positive number. If set, then before the song starts a metronome will count the number that has been set as beats.
- style Sets the style to the the song or the segment. It is mandatory to exist in the song header or to the segments. The value is the relative in the Styles Directory path of the style, separated with comma with the style section name inside brackets, i.e. [relative_style_path, style_section_name].
- segments Restricted to the song header and it is mandatory. Describes the list of segments to be played. The value should be a list with pre-defined segments e.g. [segment1, segment2, segment3]"
- chords Restricted to the segments and it is mandatory. Describes the list of chords to be played. The value should be a list with chords that include their beat value inside the parenthesis i.e. [Am(4), E(2), G(1), A(1)]. If the chord lasts less than a beat, you may add a fraction instead of a number. For example an eighth chord would be written as Am(1/8)
A Complete Song
Now that the song attributes and the basic syntax have been explained, let's examine and explain in detail a complete and well-known song, the Hotel California
song.
- Anything after a # character is simply ignored. It is formatted with a green colour and just explains the song parts quickly.
- We have set the key to B as this is in fact the song key and it will result the CTA to perform better.
- We have set the transposition to +2. This way, we will define the chords to Am scale but in the end the song will be played in +2, i.e. Bm
- We have set the same tempo to 78bmp. The song has indeed the same tempo.
- We have set a counter to 4. A metronome will count 4 beats before the song starts playing.
- We have define 3 segments which we use with the order that must be played in the song header. Mind that YAML does not get affected by new lines, which gives us the flexibility to place the segments in the song header in different lines in order to make it easier for the eye to read. The intro chords sequence is the same with the verse chords sequence so we are using the same segment for the intro and the verse part of the song. Additionally, the verse segment actually defines half verse of the actual song. That is because in the specific song, the chords in the verse part of the song are repeated. As such to play the verse part of the song, we put the verse segment twice each time.
- We are using the same style in the song, i.e. \16beat\A.Baland. But we use a different style section for the verse and the chorus, i.e. Verse style section for the verse segment and Chorus style section for the chorus segment.
Toolbar

- Save: Saves your current progress. Giglad does not save automatically so it is strongly advised to save your song often.
- Undo: Undo your last action.
- Redo: Redo your last action.
- Validate: Validates the syntax and reports the errors (if any) to the Output Window.
- Play: Allows you to select an individual segment to be played or the whole song to be played.
- Start Playing: Starts playing the song.
- Stop Playing: Stops playing the song.
Memory Pool
Memory pool is an advanced feature of Giglad and the main idea behind this, is to keep virtual instruments in memory(RAM) in order to eliminate the time required to load and set them up while loading a style, a preset or a program. Memory Pool is for plug-ins only and not for soundfonts as the way the soundfonts are implemented in Giglad, already make the loading time trivial.
When a plug-in is required for usage in Giglad (e.g. loading a style, loading a preset, loading a program), 2 main steps are involved which take most of the time for this process to complete:
- Loading the plug-in to memory: This is the time needed from O/S to load an external dll (dylib) at runtime in Giglad application and the initialization time.
- Set plug-in state: This is the time required by the plug-in to restore each of its parameters in order for this to be sound as it was saved
There are 2 types of memory pools in Giglad, each to be used differently and for a different purpose. Adding instruments in any of these pools will cause the loading time of Giglad at start up to be increased as it will then load these instruments but of course it will make things faster later when you actually need to use the instruments. We will explain first the Exclusive Memory Pool as it is easier to understand.
Memory Pool (Exclusive)
The Exclusive memory pool successfully eliminates the time that is needed to create a plug-in instance. However, the time required to set the plug-in state is still present.
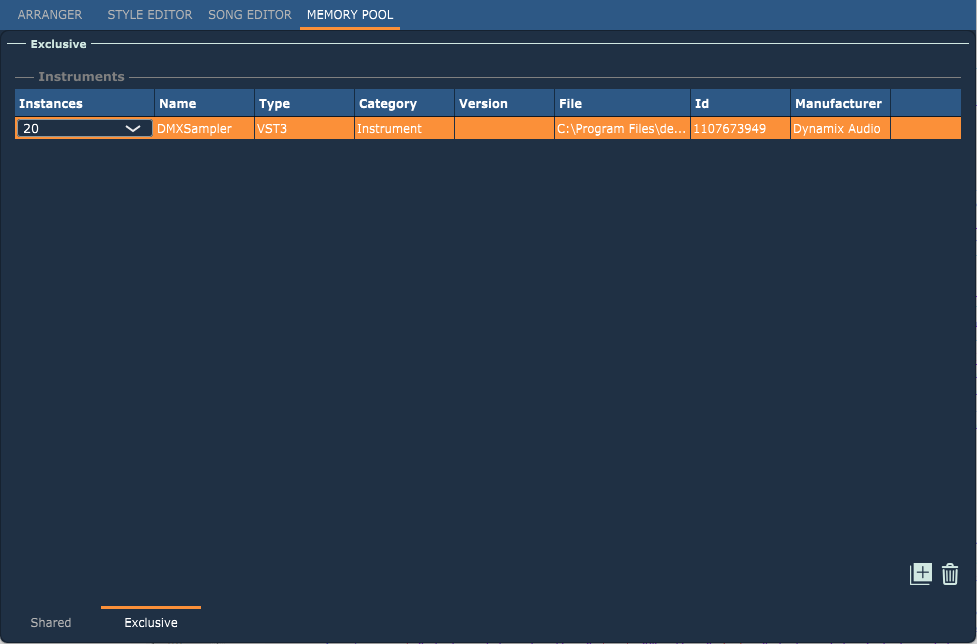
In order to add a plug-in in the exclusive memory pool, select the corresponding tab "Exclusive" from the "Memory Pool" tab, click on the Add button and select the plug-in of your choice. After a plug-in has been added, its corresponding "Instances" column will display 1. You may change this to a different number depending on the number of instances that you wish to always be in the memory for this type of plug-in. In order to remove a plug-in from the memory pool select it by single clicking on the row that contains it and press the Remove button.
As shown in the image above, I have selected the Surge plug-in and I have created 4 instances to always exist in the memory pool. I am now done and I can exit the memory pool. What happens now?
Every time Giglad needs to use this type of plug-in (for example if I select Surge from my VST3 category in the melody, or I load a style which contains this type of plug-in, the software will first see if there is an available one in the memory pool. If this is the case, it will reserve it and apply the required state (e.g to make is sound as requested by the style) instead of creating a new instance from scratch. When it is not required any more (for example the style that is using it has been unloaded) it will release it from the memory pool so it becomes available for the next time something else needs it. So what I did, instead of creating new plug-in instances over and over again, I have created 4 instances that will be used and re-used from anything that needs them.
If there is no available instance in the exclusive memory pool, the software will create a new one as it would normally do. It will not add it to the memory pool but it will remove it as it will normally do for any other plug-in. So a good question here is how many instances one should create for the memory pool to actually be efficient. Lets say that most of your styles have max 8 tracks which are using this plug-in. And you also usually use 2 of this plug-in in your melody. So you need 10 instances. In that case you must put 10 x 2 = 20 instances in the memory pool. Why? When you wish to switch a style, the new style will be loaded before the previous gets unloaded. Otherwise the audio would stop and this is not what we want. So there is a small period of time, the transition period where 2 styles need 8 number of plug-ins. And if you are switching presets then add the 2 of your melody in this equation. As such you must always create double the number of plug-ins you are planning to use, in order to include the transition.
Memory Pool (Shared)
The Shared memory pool successfully eliminates the loading time similar to the exclusive memory pool but it also eliminates the time required to set the plug-in state. In that sense, it is faster but it comes with the limitation that you cannot change the plug-in' state. This is not always a problem. It does not work as the exclusive memory pool, i.e. reserving instruments and freeing them. Instead, the instruments in this memory pool can be used simultaneously as they are shared (hence the name). For drums for example you would create 1 instance of the drums plug-in in the shared memory pool instead of 2 that you would need in the exclusive one and this instance would be "ready" for any track that needs it.
It is important to not use an instrument from the memory pool on more than one track at the same time. That is because all the tracks that are using it will send messages to the same instance of the plug-in and this can create a complete mess. For example if you have a piano in the memory pool and you use it in a style on 2 different tracks that will most probably result note hanging unless you can ensure that the 2 different tracks send notes on different ranges. Memory pool can be very beneficial as you can see your style loading times significantly go down but it needs understanding in usage.
The Shared memory pool serves another purpose:
- To efficiently use plug-ins which can send different instruments to different audio channels: Some VST/VST3 plug-ins support multiple midi inputs and multiple audio outputs and they can send different instruments to different audio channels. An example of such a plug-in is Kontakt. In such cases, it is much more efficient in terms of audio processing to use only one instance of this plug-in in multiple tracks instead of creating a new instance of the plug-in for each track.
Finally, the shared memory pool can be used to:
- Change instruments on a track using program change midi events. In the photo shown below, If one of my style tracks is using for example Kontakt-Flute then if via the midi editor for example it receives MSB = 0, LSB = 1 & Program Change = 12 it will change to JazzOrgan. This is something we do not really recommend and the official way is to create more tracks each has its own instrument. But it exists as required by users and its there to be used at your own judgement.
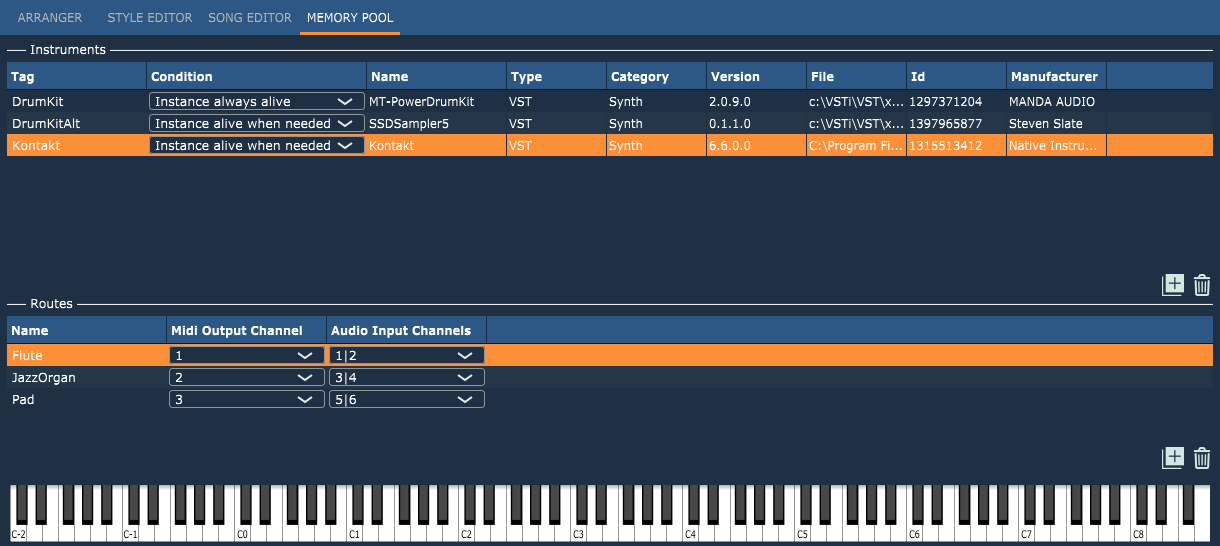
In order to add a plug-in in the memory pool, click on the Add button and select the one of your choice. The plug-in's window will pop up from where you can change its state. You can change this state anytime you want from this window but your style and presets will not be able to do this when loading. In order to remove a plug-in from the memory pool select it by single clicking on the row that contains it and press the Remove button. By double clicking anywhere in the plug-in's row but the "Tag" and the "Condition", the plug-ins window will pop up again to allow you further editing.
After the virtual instrument has been placed in the table you should double click on the Tag cell and give a unique identifier for your entry. This identifier is crucial and it is used in the tracks to select an instrument from the memory pool but more importantly it is saved in the style file and in the presets. Wisely set it and do not change it after you have used it in a style or in a preset as the latest will fail to load the instrument. Additionally, any changes you make to the plug-in's state are going to affect every file that is using it. For example let's assume you have added a synth that sounds like a piano and set the tag as "myTag". You are creating a style that is using this in one of its tracks. Later on you change the synth and you leave the tag "myTag" but you make it sound like a guitar. If you load your style, the track will play the guitar instead of the piano. This can be good and bad so use it as appropriate.
You can also select for a plug-in to be "Instance always alive" or "Instance alive when needed". When an instance is always alive, it is loaded in the memory when the program starts. In the image above, because I am using these drums in almost every style, I have set "Instance always alive" to have them always in memory and do not waste time loading them. When an instance is alive when needed it is going to be created when a style or a melody track requests to use it. "Instance always alive" will be in most cases what you want to do.
When a plug-in is added, a route entry will be added named as "Main" with the default configuration routing. You may add more routes by clicking on the Add button and name them as you wish. If a plug-in in the memory pool does not support multiple instruments then its pointless and probably wrong to add more than one route. But for a plug-in that does support multiple instruments (e.g. Kontakt), this is how you can achieve to use only one instance of this plug-in in multiple tracks. In order to setup this correctly you need first to set up different instruments on different midi channels and in different audio channels in the plug-in (See for example the Kontakt below). Then you must correspond the instruments of the plug-in with the routes in Giglad.
If everything has been setup correctly, you should be able to select the corresponding route from the memory pool in the track as shown below and listen at the correct sounds. Notice that the DrumKit does not have a sub menu. That is because there is only the Main route available.
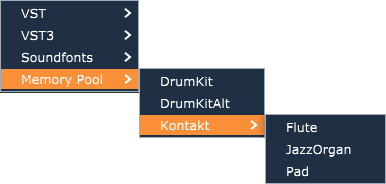
Always use your midi input controller or the virtual keyboard displayed in the memory pool when setting up the memory pool and avoid using the keyboard of the plug-in as it will mislead you on what is sent where.
Tracks
Clicking on the arrow button in the Arranger Mixer will popup the track window, from where you can access additional features to set up each track. In the Style Editor these windows are always visible at the left part of the main window. Each track has multiple tabs from where you can access the different track features. The name of each track is displayed at the top and can be changed by entering your cursor inside it. In the Style Editor, at the top right corner, there is a "program" icon button which can be used to save the current state of the track as a Program and a "remove" icon button which will remove the corresponding track from the style.
Input (Instrument)
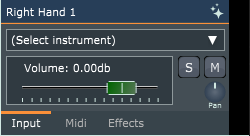
(Available for Melody and Style tracks)
In this window, you can select a virtual instrument for your track and setup its volume, pan, solo and mute attributes.
- Select Instrument: The arranger user interface provides an easier way to select an instrument but this is still a valid way to select an instrument. To select an instrument click on the arrow button, where (Select Instrument) is displayed and select a VST, a VST3, a soundfont or an instrument from your Memory Pool. if you are in the Style Editor, you can optionally choose an instrument from your style's memory pool referred as Memory Pools (S). Furthermore you can apply an instrument by drag and drop the corresponding file from the Instruments Browser into this field. The plug-ins are categorized by their manufacturer to save some space. The list will be empty if no plug-ins are available in Giglad. Ensure that you have plug-ins installed in your system and that you have defined the plug-ins search directories in the settings. If the list is still empty, try doing a full re-scan from the Tools→Plugins→Re-scan. When you select the instrument, the plug-in's window will pop up from where you can change the plug-in settings. If you wish to remove an instrument from your track, click on the same arrow button and select Remove from the corresponding menu. In order to access the plug-in's window and change its settings just click on the plug-in name inside the field or click on the same arrow button and select Edit.... You can also set the midi output channel which the track will use to send the midi messages to the plug-in and the audio inputs channels from witch the track will receive the audio from the plug-in. These settings are for advanced users and unless you know what you are doing, it is advised to leave them as they are.
- Volume: To increase/decrease the volume on a track, use the slider. The volume is indicated in decibels(db). By double clicking on the slider the volume will be set to 0db.
- Pan: To change the pan, use the corresponding knob.
- Mute: You can mute a track by clicking on the [M] button.
- Solo: You can make a track solo by clicking on the [S] button. When a track is solo, it will be the only one producing audio in its group. For example, if a track has been set as solo in the melody group, then only this track will produce audio in the melody group but other groups such as the style group or the physical group will not be affected. You can have multiple solo tracks by Ctrl + Click the solo button.
When selecting an instrument for your track you should be able to play and listen sound by using your midi controller or the virtual keyboard (if you are at the Arranger). If you cannot listen any sound coming out from your speakers then: ☛ Double check your hardware connections. ☛ If the LED's on the track and the mixer are not moving check your audio device settings. ☛ If while playing, the corresponding notes do not get highlighted in the keyboard ensure that your hardware midi keyboard controller has been set and selected in the settings. ☛ Ensure that you are playing at the midi keyboard controller range which corresponds to the range of the track.
The Style Editor tracks also have an arrow button from which provides additional functionality.
- Midi Events Received: Will pop a window from which you can override the midi events received by this track. By default "Inherits Style" will be selected which means that the track will receive the midi events as these have been defined in Style Settings. However, you may choose to override the style and have different settings of this for each track. Mind that if you change an attribute of the track for example the volume, then Giglad will automatically set this override as it will assume that you wish to control the volume from the track and not from the midi events.
- Add Variation Will add a variation track. See variations on Style editor to learn more.
- Move Before/Move After Allows you to reposition your track.
- Source Channel This is the channel that the midi events (exist on this track) are using. If you change the source channel, all the midi events in this track will be updated to use the new selected channel. Although this option will not make much difference when creating a style from scratch and using virtual instruments, it is generally a good tactic to ensure that there is no channel conflict and that drums are playing on channel 10 for midi protocol compatibility.
Input (Physical)
(Available for Physical tracks only)
In this window, you can select to include an external audio source in Giglad. In order to do so, you must first select to open one or more audio input channels from the audio settings.
- Select Input Channel(s): Click on the arrow button, where (Select input channel(s) is displayed and select a single channel (mono) or two channels (stereo) which will be the audio source that you wish to bring into Giglad. If you wish to remove an audio source from your track, click on the same arrow button and select Clear from the corresponding menu.
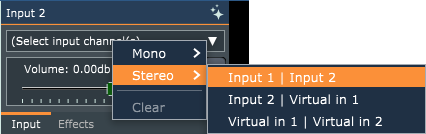
Midi
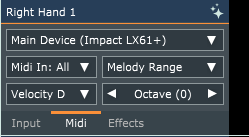
(Available for Melody tracks only)
In this window, you can setup further your midi controller with the specific track.
- Select Midi Input Device: By default, each track will receive input from your main midi keyboard controller (i.e. the midi controller which has been enabled with the role "Main"). But if you have more than one midi controllers which you have assigned them with the role "Aux" then you can instruct the track to receive input from a different midi controller. This feature allows you for example to have multiple keyboards and have assigned one track to each one of them which will end up for you to being able to play a different virtual instrument on each of your midi keyboard controllers. Mind that if you select "Main Device" then the track will always receives the input from the main device which means that if you change your "Main" from settings, the track will adapt. But if you select the name of your device, then the track will always use this device. If the device is not found, because for example you forgot to turn it on when starting Giglad, it will be in red and the track will play nothing.
- Select Midi Input Channel: By default, this is set to "all" which means that on whatever midi channel the midi device sends the data, the track will receive the data and send them to the corresponding virtual instrument. But you can optionally filter to only receive midi data from a specific midi channel.
- Select Range: You can select the range from where the input will be received. By default, the Right Hand tracks have the "Melody" Range set and the Left Hand tracks have the "Chords" range set (The chords and melody ranges are defined by the splitter on the top of the virtual keyboard). When you play something in your midi controller, notes that do not belong to the specified range will be ignored. You may also define a custom range. This feature gives great flexibility as you can use one midi controller in order to play different virtual instruments in each range.
- Select Velocity By default the "Dynamic" options is set (Velocity D) which means that the velocity of the midi notes that are played for this track will be determined by the midi controller. You may select the "Fixed" option to override this value as it comes from the midi controller and always apply the same velocity value (0-127). Finally, you may select the boost option to increase or decrease this value as it comes from the midi controller by the giving percentage. For example if you have applied boost +10% and you play a midi note with velocity = 100, the software will apply a velocity 100 + 0.1 * 127 = 113.
- Select Octave You can select the octave in which this track will eventually output. If for example your play C1 in your midi keyboard controller and this setting is +1, then you will eventually listen C2.
CTA
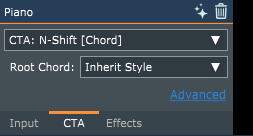
(Available for Style tracks only)
In this window, you can define the attributes which will transpose the midi note events of the track for each chord you are playing.
The attributes of this window are explained in detail in the Style Editor Chord Transposition Algorithm (CTA) section.
Fx Insert
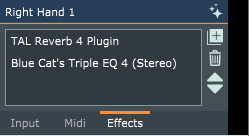
(Available for Melody, Physical and Style tracks)
In this window, you can add one or more VST/VST3 effects in your track.
- Add Effect: Clicking on the Add button will pop up a menu with the available Native & VST/VST3 effects. The plug-ins are categorized by their manufacturer to save some space. The list will be empty if no plug-ins are available in Giglad. Ensure that you have plug-ins installed in your system and that you have defined the plug-ins search directories in the settings.
- Remove Effect: Clicking on the Remove button will remove the selected effect.
- Up/Down Arrow buttons: Using the Arrow buttons you can change the order of the effects. The effects in Giglad are serial processed and as such the order matters.
- Double left clicking on a plug-in will display its window.
- Right clicking on a plug-in will pop-up a menu with additional options. Using this menu, you can insert a plug-in in between of existing plug-ins. You can also choose to bypass a specific plug-in in which case there will be no audio processing.
Use insert effects with caution as they require additional processing power from your system. Always prefer send effects for these that support it (reverb, chorus, delay, etc).
Giglad does not compensate plug-in's latency as it would make it impossible to perform in real time. You will not be able to use VST/VST3 plug-ins which introduce latency and if you try to add one, you will get the appropriate message.
Although as above mentioned Giglad cannot compensate plug-in's latency, it is possible to force Giglad to accept a plug-in which has latency. This is not recommended and the sound will not be accurate but if the latency is too small, it may make no difference. Enable it at your own risk: Use the Input Command in the log window and type glSettings.set("lib::plugins_latency_neglect", 1).
Fx Send

(Available for Melody, Physical and Style tracks)
In this window, you can send the track audio to other effects. Use the knobs to send the required signal for each type of effect. The processing power required for send effects is trivial especially compared with insert effects so make it a habit to use them if possible instead of inserts.
Clicking on the corresponding name of the effect (e.g. Reverb 1) will pop-up the first available plug-in in the Returns chain. Mind that any change you do in this window will affect all the tracks which send to Reverb 1 for example.
The Return effects are by default in house implemented effects (mainly JUCE implementation) but you can replace these with your own plug-ins or even have a chain of multiple plug-ins. Click on a return track arrow and specify your plug-ins as you wish. Generally, this is only advised for experienced users. If you change any of the global effects (even if you change the native effects parameters) you must save them as a preset and then you must load this preset in order for these to be applied (Mind that you can create your own startup preset, see Arranger settings). For a style, if you have chosen to add the 4 additional returns, your changes will be saved within a style.
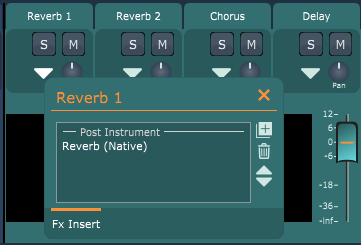
Sampler
Tone Instruments
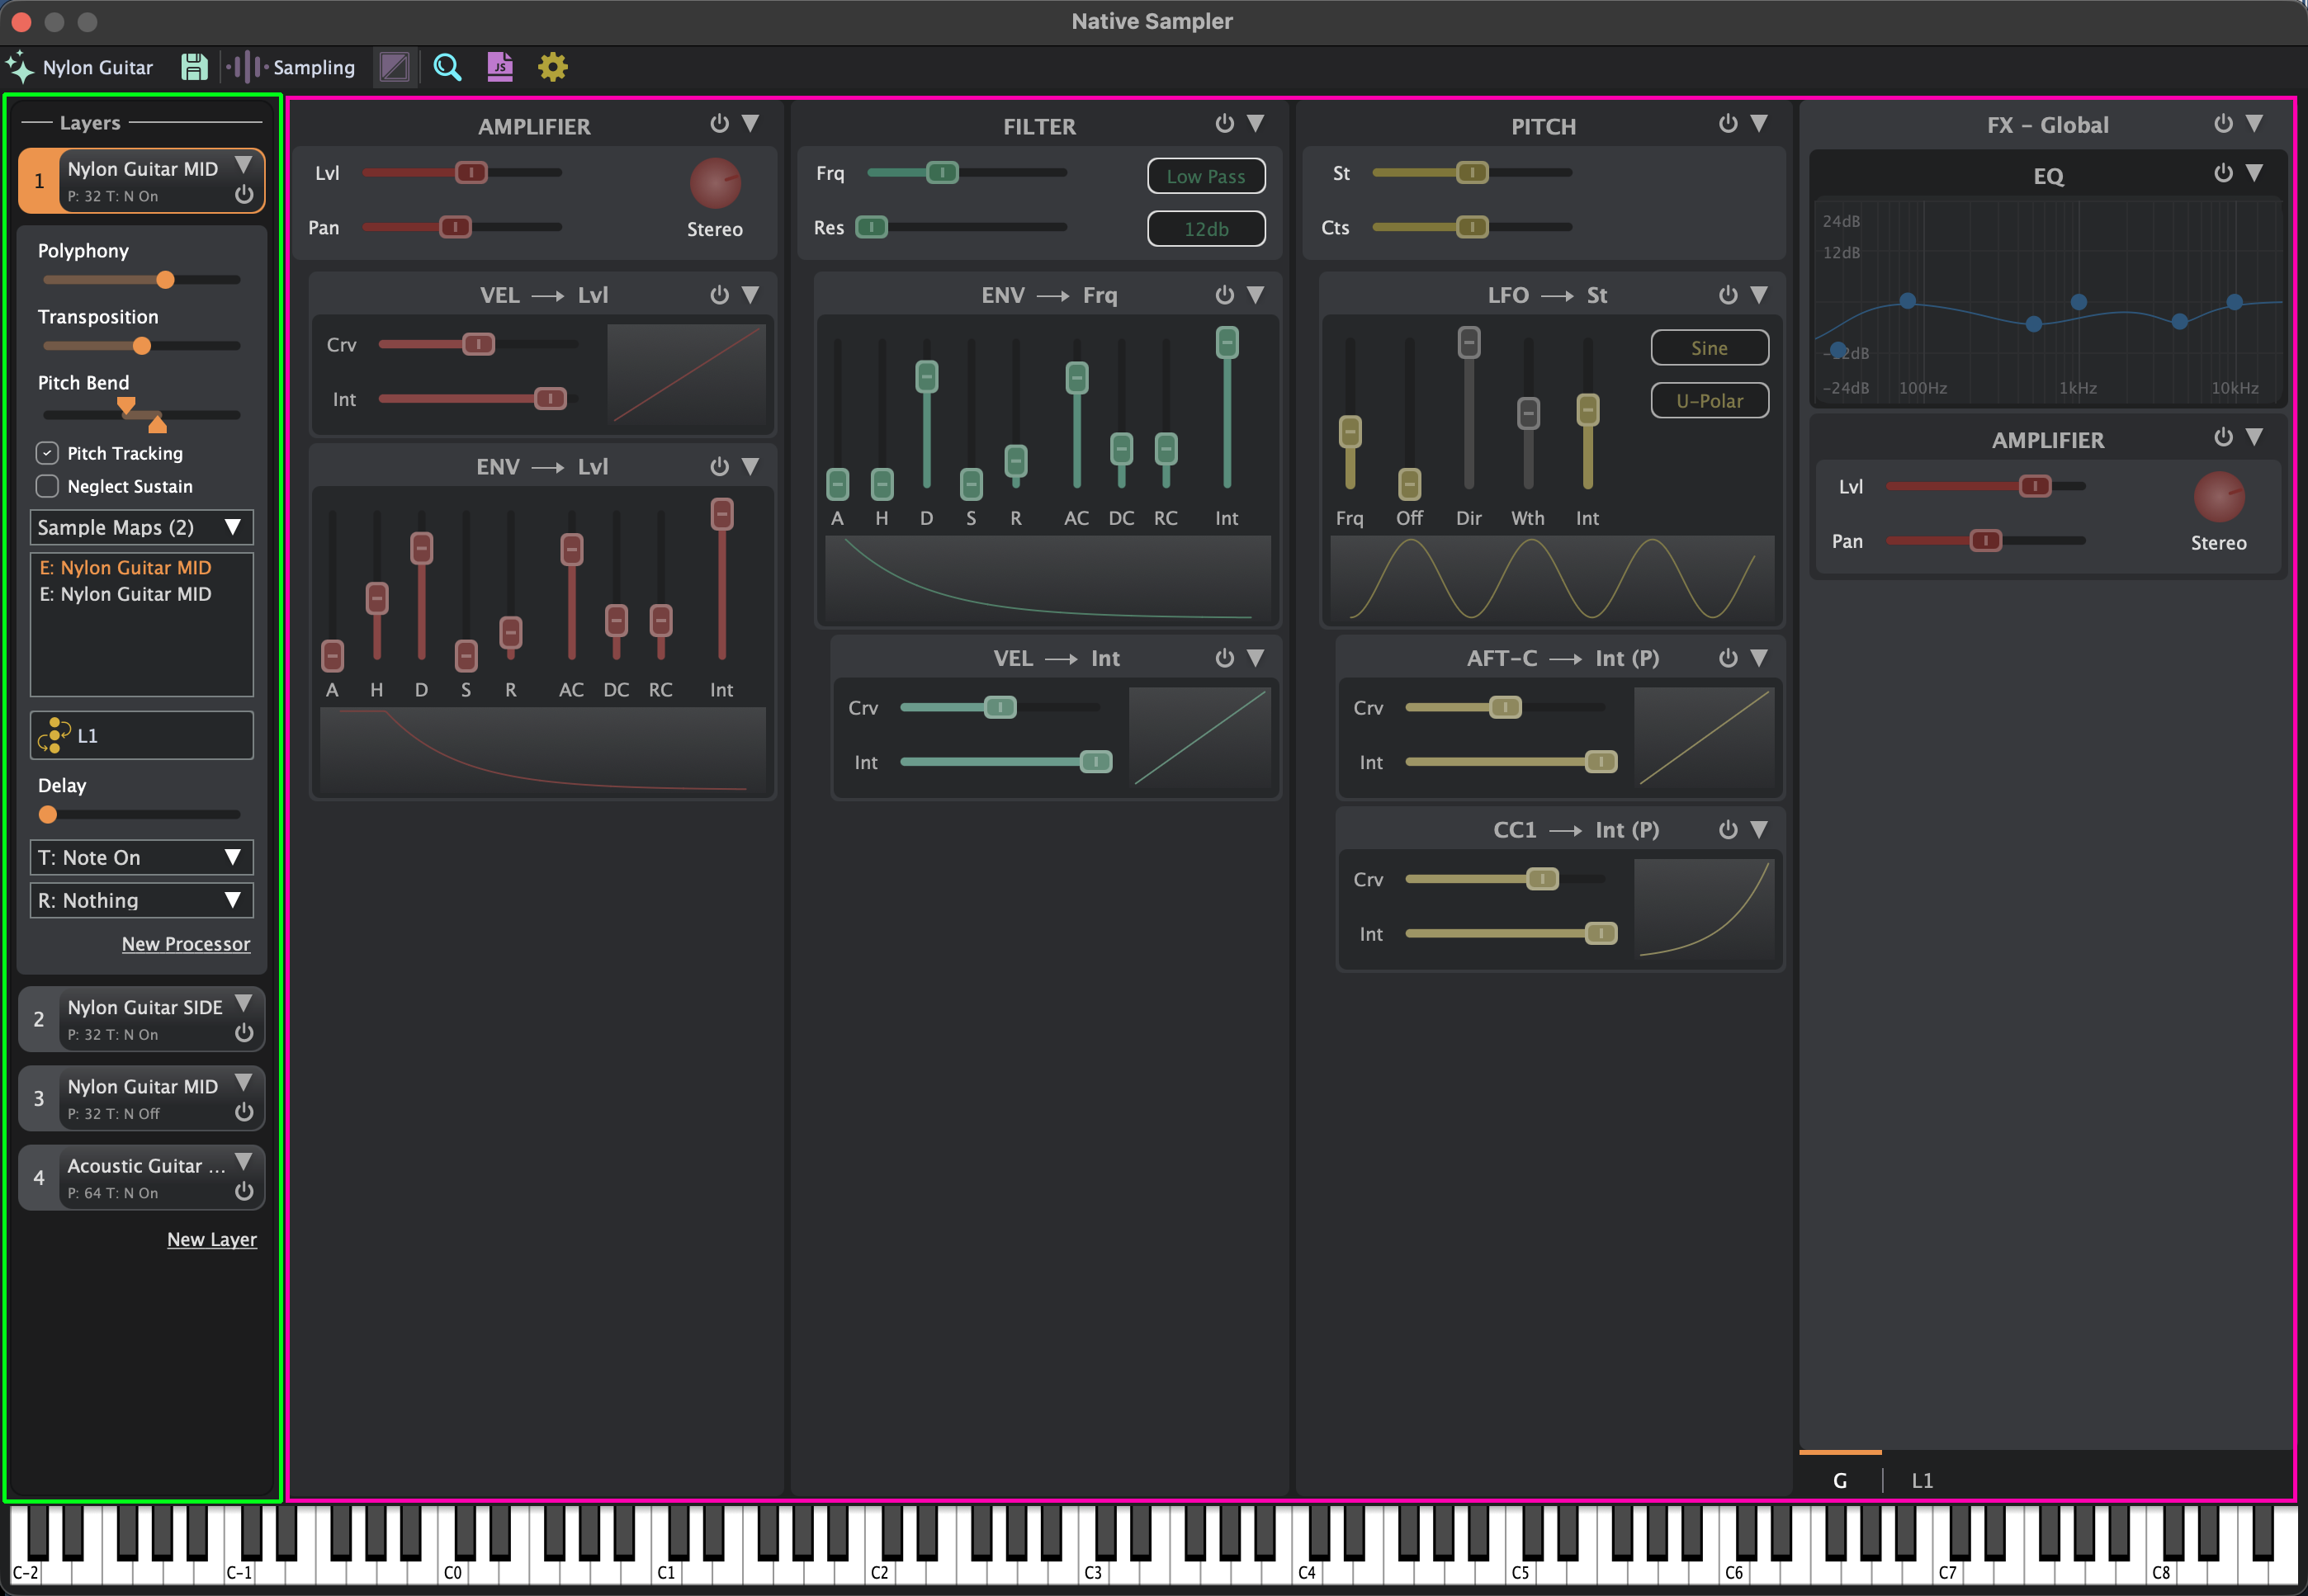
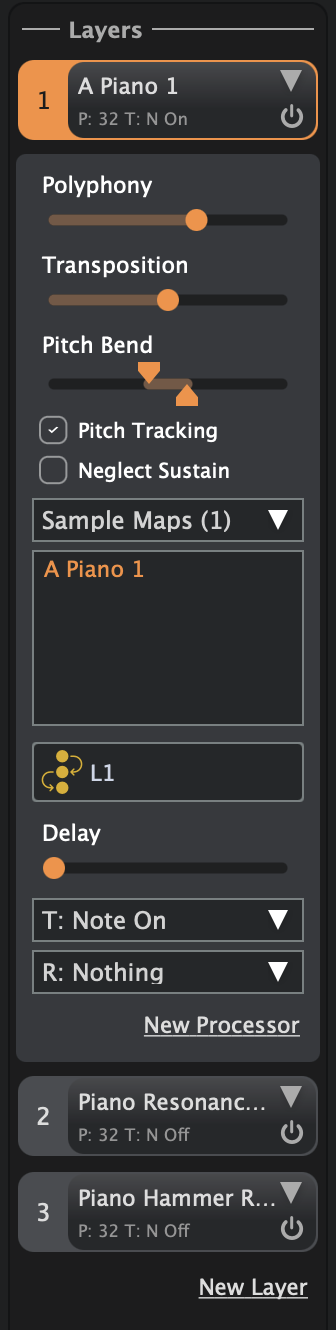
The Layers panel contains all available layers of the instrument, as well as the settings for the currently selected layer. An instrument can have an unlimited number of layers, but each layer has its own processing chain, so more layers increase CPU usage. While modern computers can handle multiple instruments with 16 or 32 layers, it is considered good practice to use layers efficiently: if a task can be accomplished on a single layer, there is no need to use multiple layers. An empty layer does not cause problems for the instrument or CPU usage, but it is still recommended to keep the interface tidy and retain only the layers that are in use.
Polyphony sets the maximum number of notes that can play simultaneously before the oldest one is stopped. Transposition allows the layer to be shifted up or down by 2 octaves. The Pitch Bender range is independent for upward and downward movements, with a maximum of -12 and +12. The layer can be set to ignore the sustain pedal. The layer can also be set not to track pitch, meaning each sample will always play at its original center key pitch, even when stretched across multiple notes.Each layer can have one or more sample maps. A sample map is a file that contains information about how the samples are mapped on the keyboard, their relative volumes, velocity mappings, center key pitch, and other settings. If more than one sample map is used, the Sampler plays them in a Round Robin manner, meaning it plays them in sequence. There is also an option to play them randomly, which together adds a lot of realism and increases playability.
A layer can be triggered in different ways, and this is what the T and R sections control. T stands for Trigger, R stands for Retrigger. The Trigger setting determines whether a layer is activated by a Note ON or Note OFF message. The Retrigger function defines what happens when the same note is played consecutively, specifically whether the previous voice is stopped or allowed to continue.
The Delay slider postpones the layer’s start time. This is useful for creating pseudo-stereo effects by shifting the phase when one of the layers is delayed.
The four columns on the right part of the interface is called a chain. There are three sampler processors, highlighted in yellow:
AMP, Filter, and Pitch, each with its own modulators.
The fourth column, highlighted in blue, is an additional audio FX chain containing the EQ and Compressor.
Each of the three processors has its own set of modulators, including Envelope, Key Track, Velocity, Mono and Poly Aftertouch, Attenuation, CC, and LFO.
Each layer can have only one AMP and one Pitch processor, but it is possible to use two Filters connected in series.
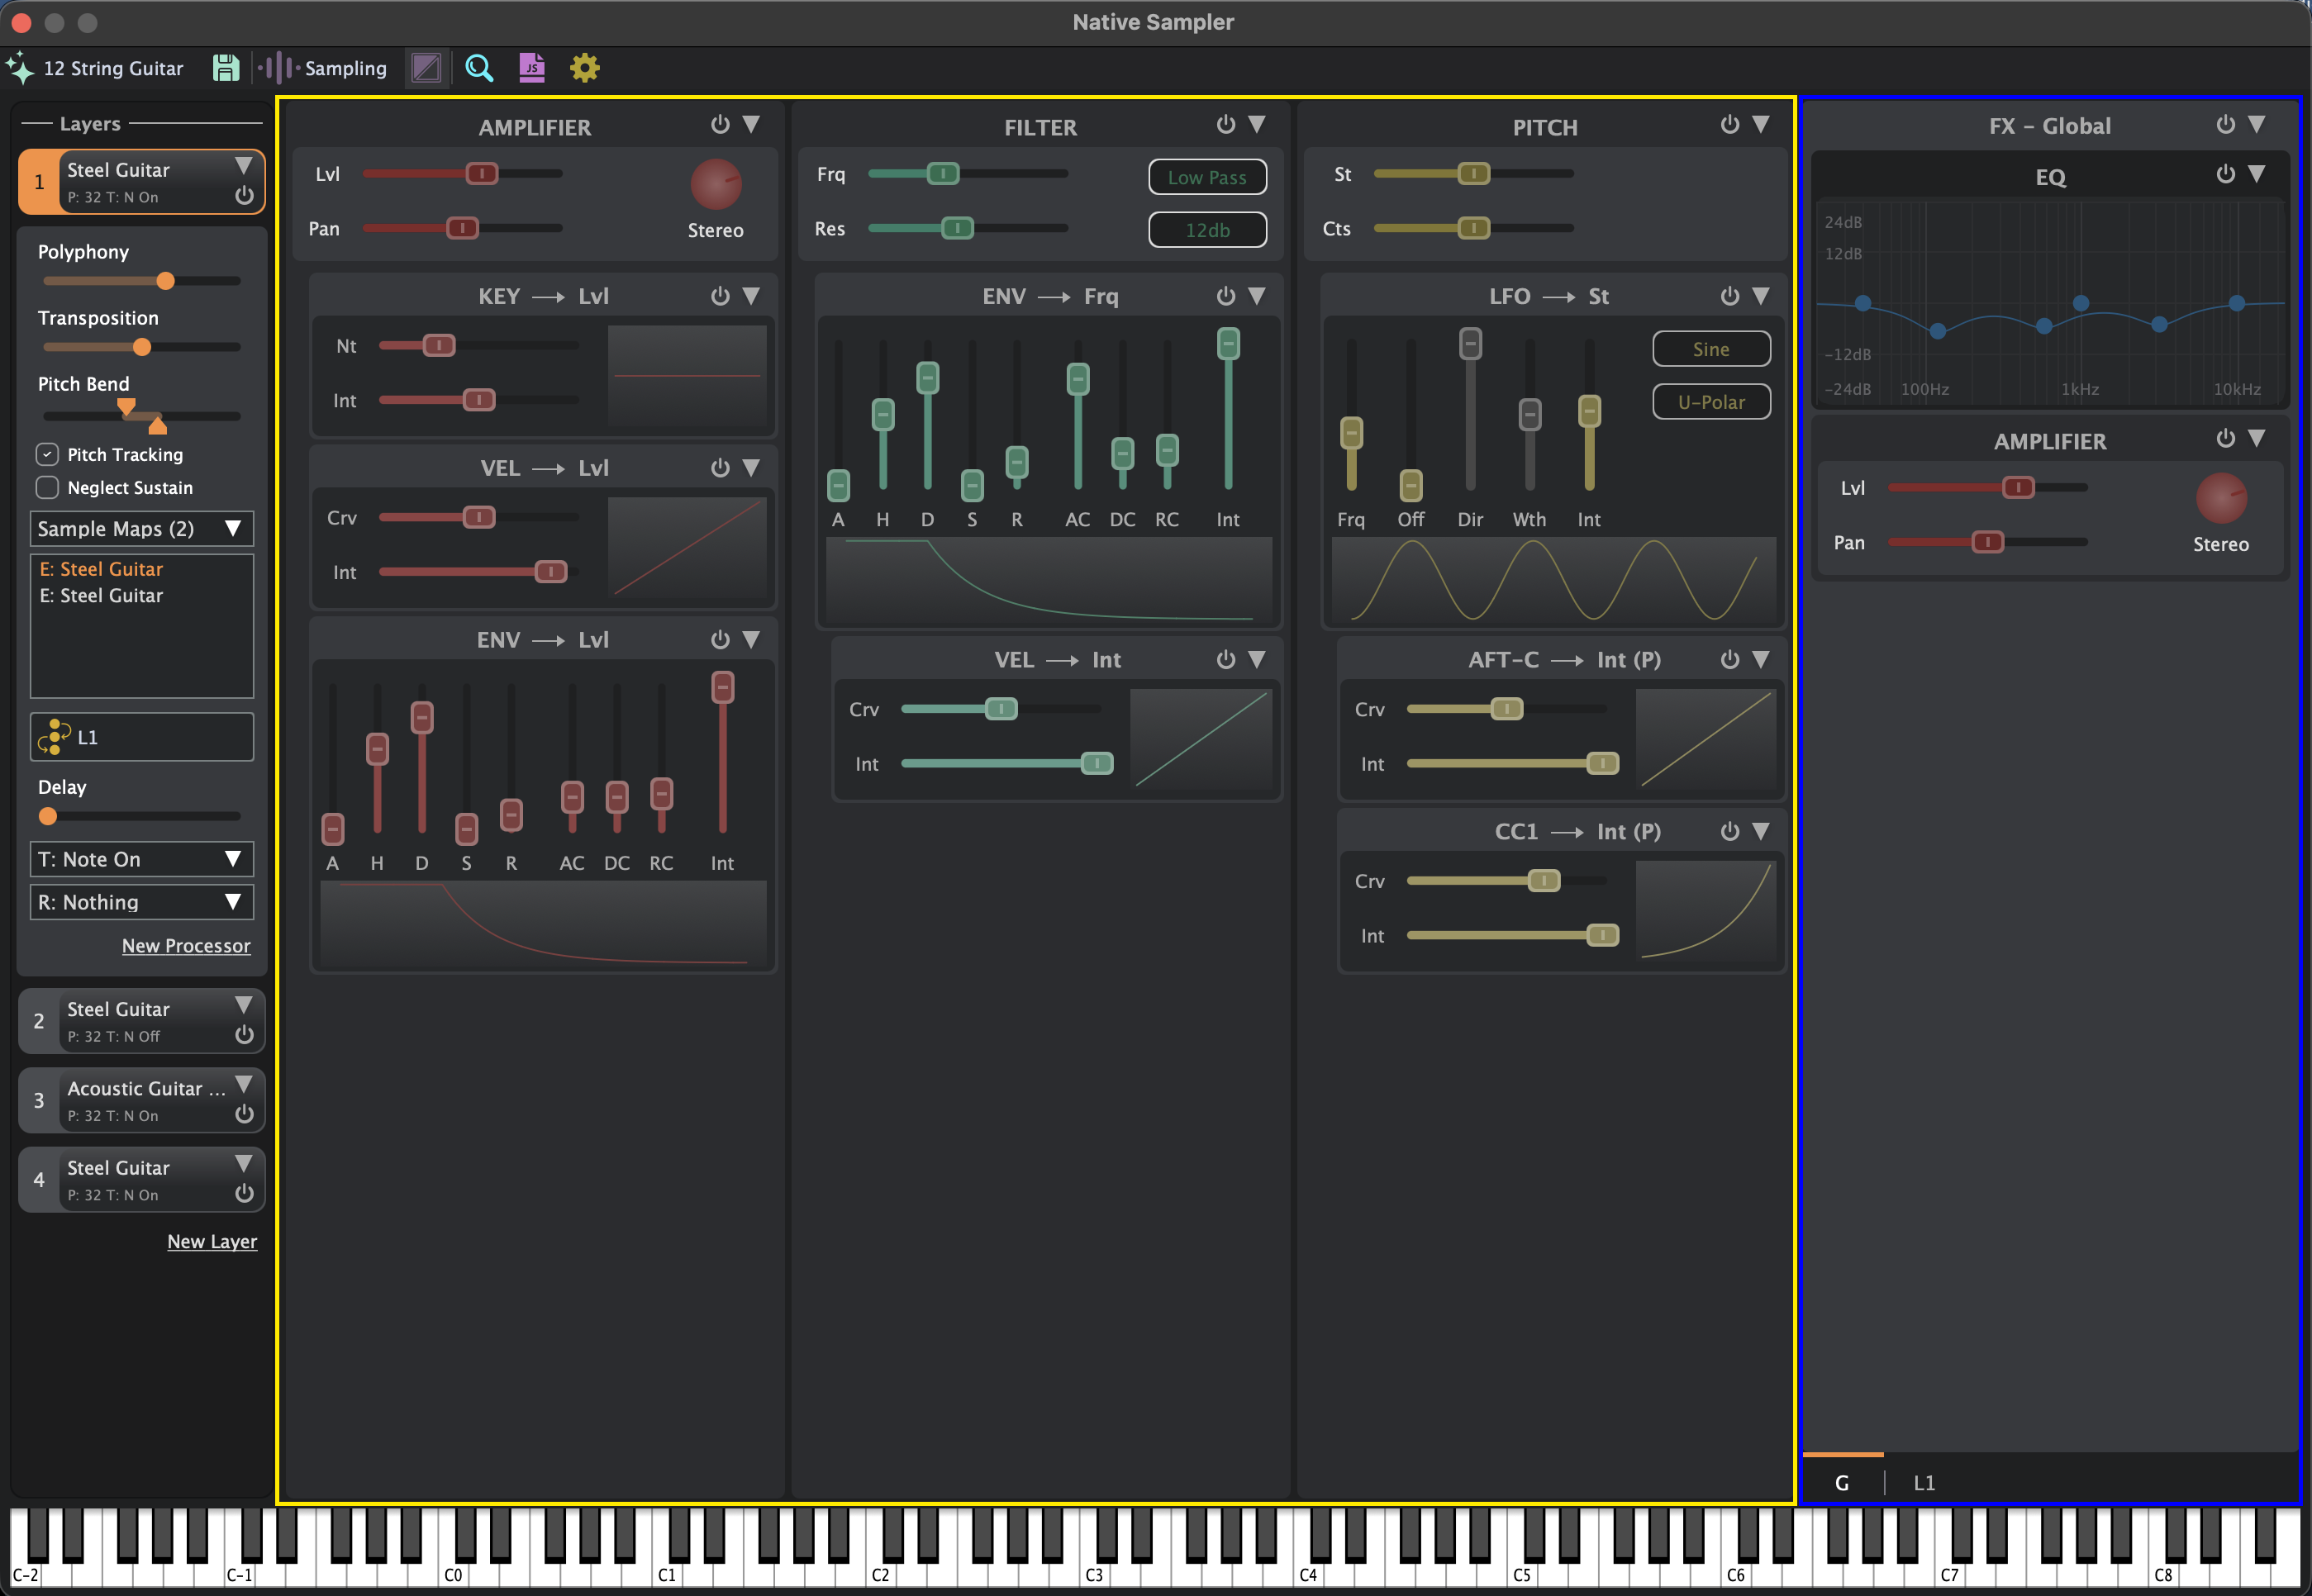
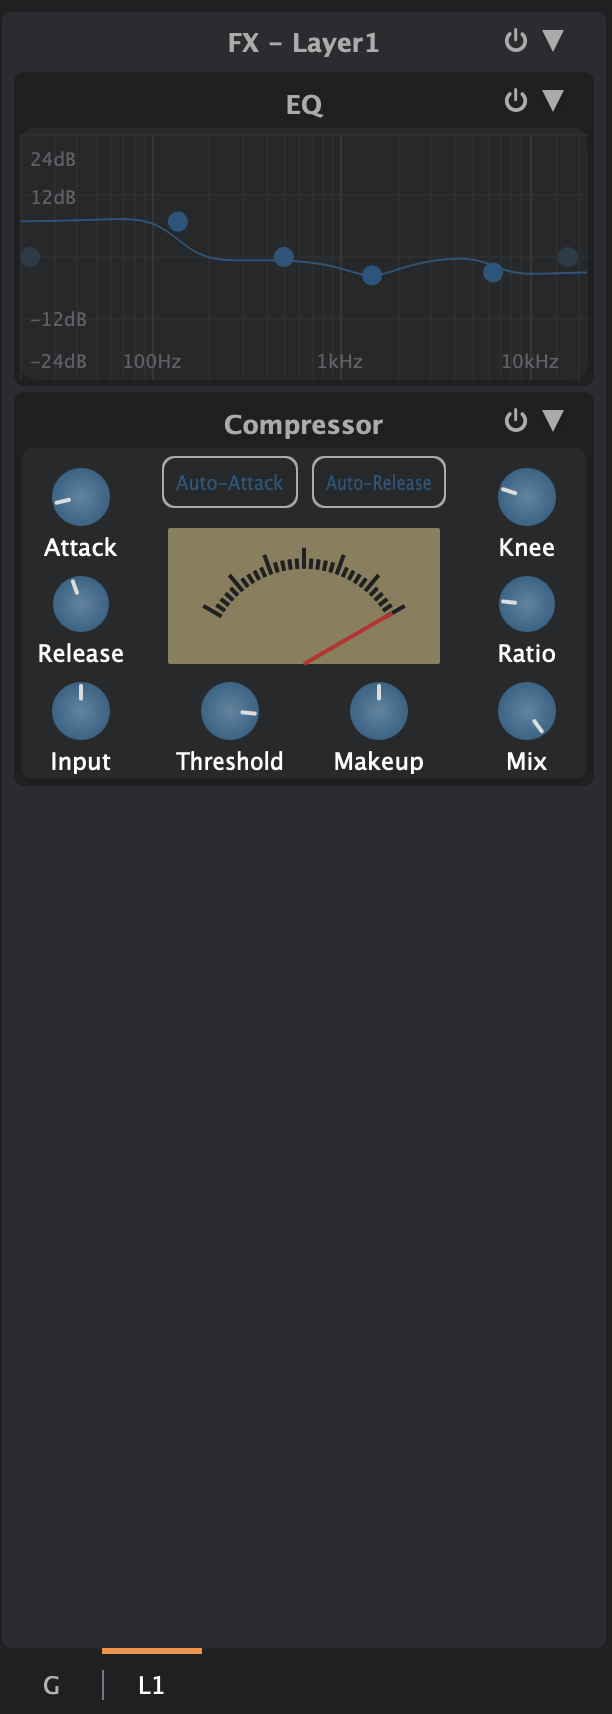
The fourth column, containing the audio FX chain, has two tabs: G and L. The G tab is the global audio FX chain for the entire instrument, while the L tab is the audio FX chain of the selected layer. This means that each layer can not only have its own set of processors—AMP, Filter, and Pitch—with modulators to shape the sound, but the EQ and Compressor plugins can also be used on each layer for additional tonal control. To access layer-level FX processing, press the L tab at the bottom of the column. When the G tab is active, it represents the global audio chain, and any processing here affects all layers, as the Global chain is located at the end of the audio signal path.
The audio FX chain cannot be modulated.The signal path of the audio FX chain can be altered by changing the order of the plugins. By default, the EQ is located before the compressor; however, this can be adjusted depending on your needs and how you want the instrument’s audio to be processed. What cannot be changed is the location of the Global Amplifier, which is always at the end of the audio chain.
Every processor and modulator has a white rectangle for an additional menu. From here, the processor along with all its modulator settings can be copied and pasted to another layer. From this menu, a processor or modulator can be removed, or its settings can be reset to default.
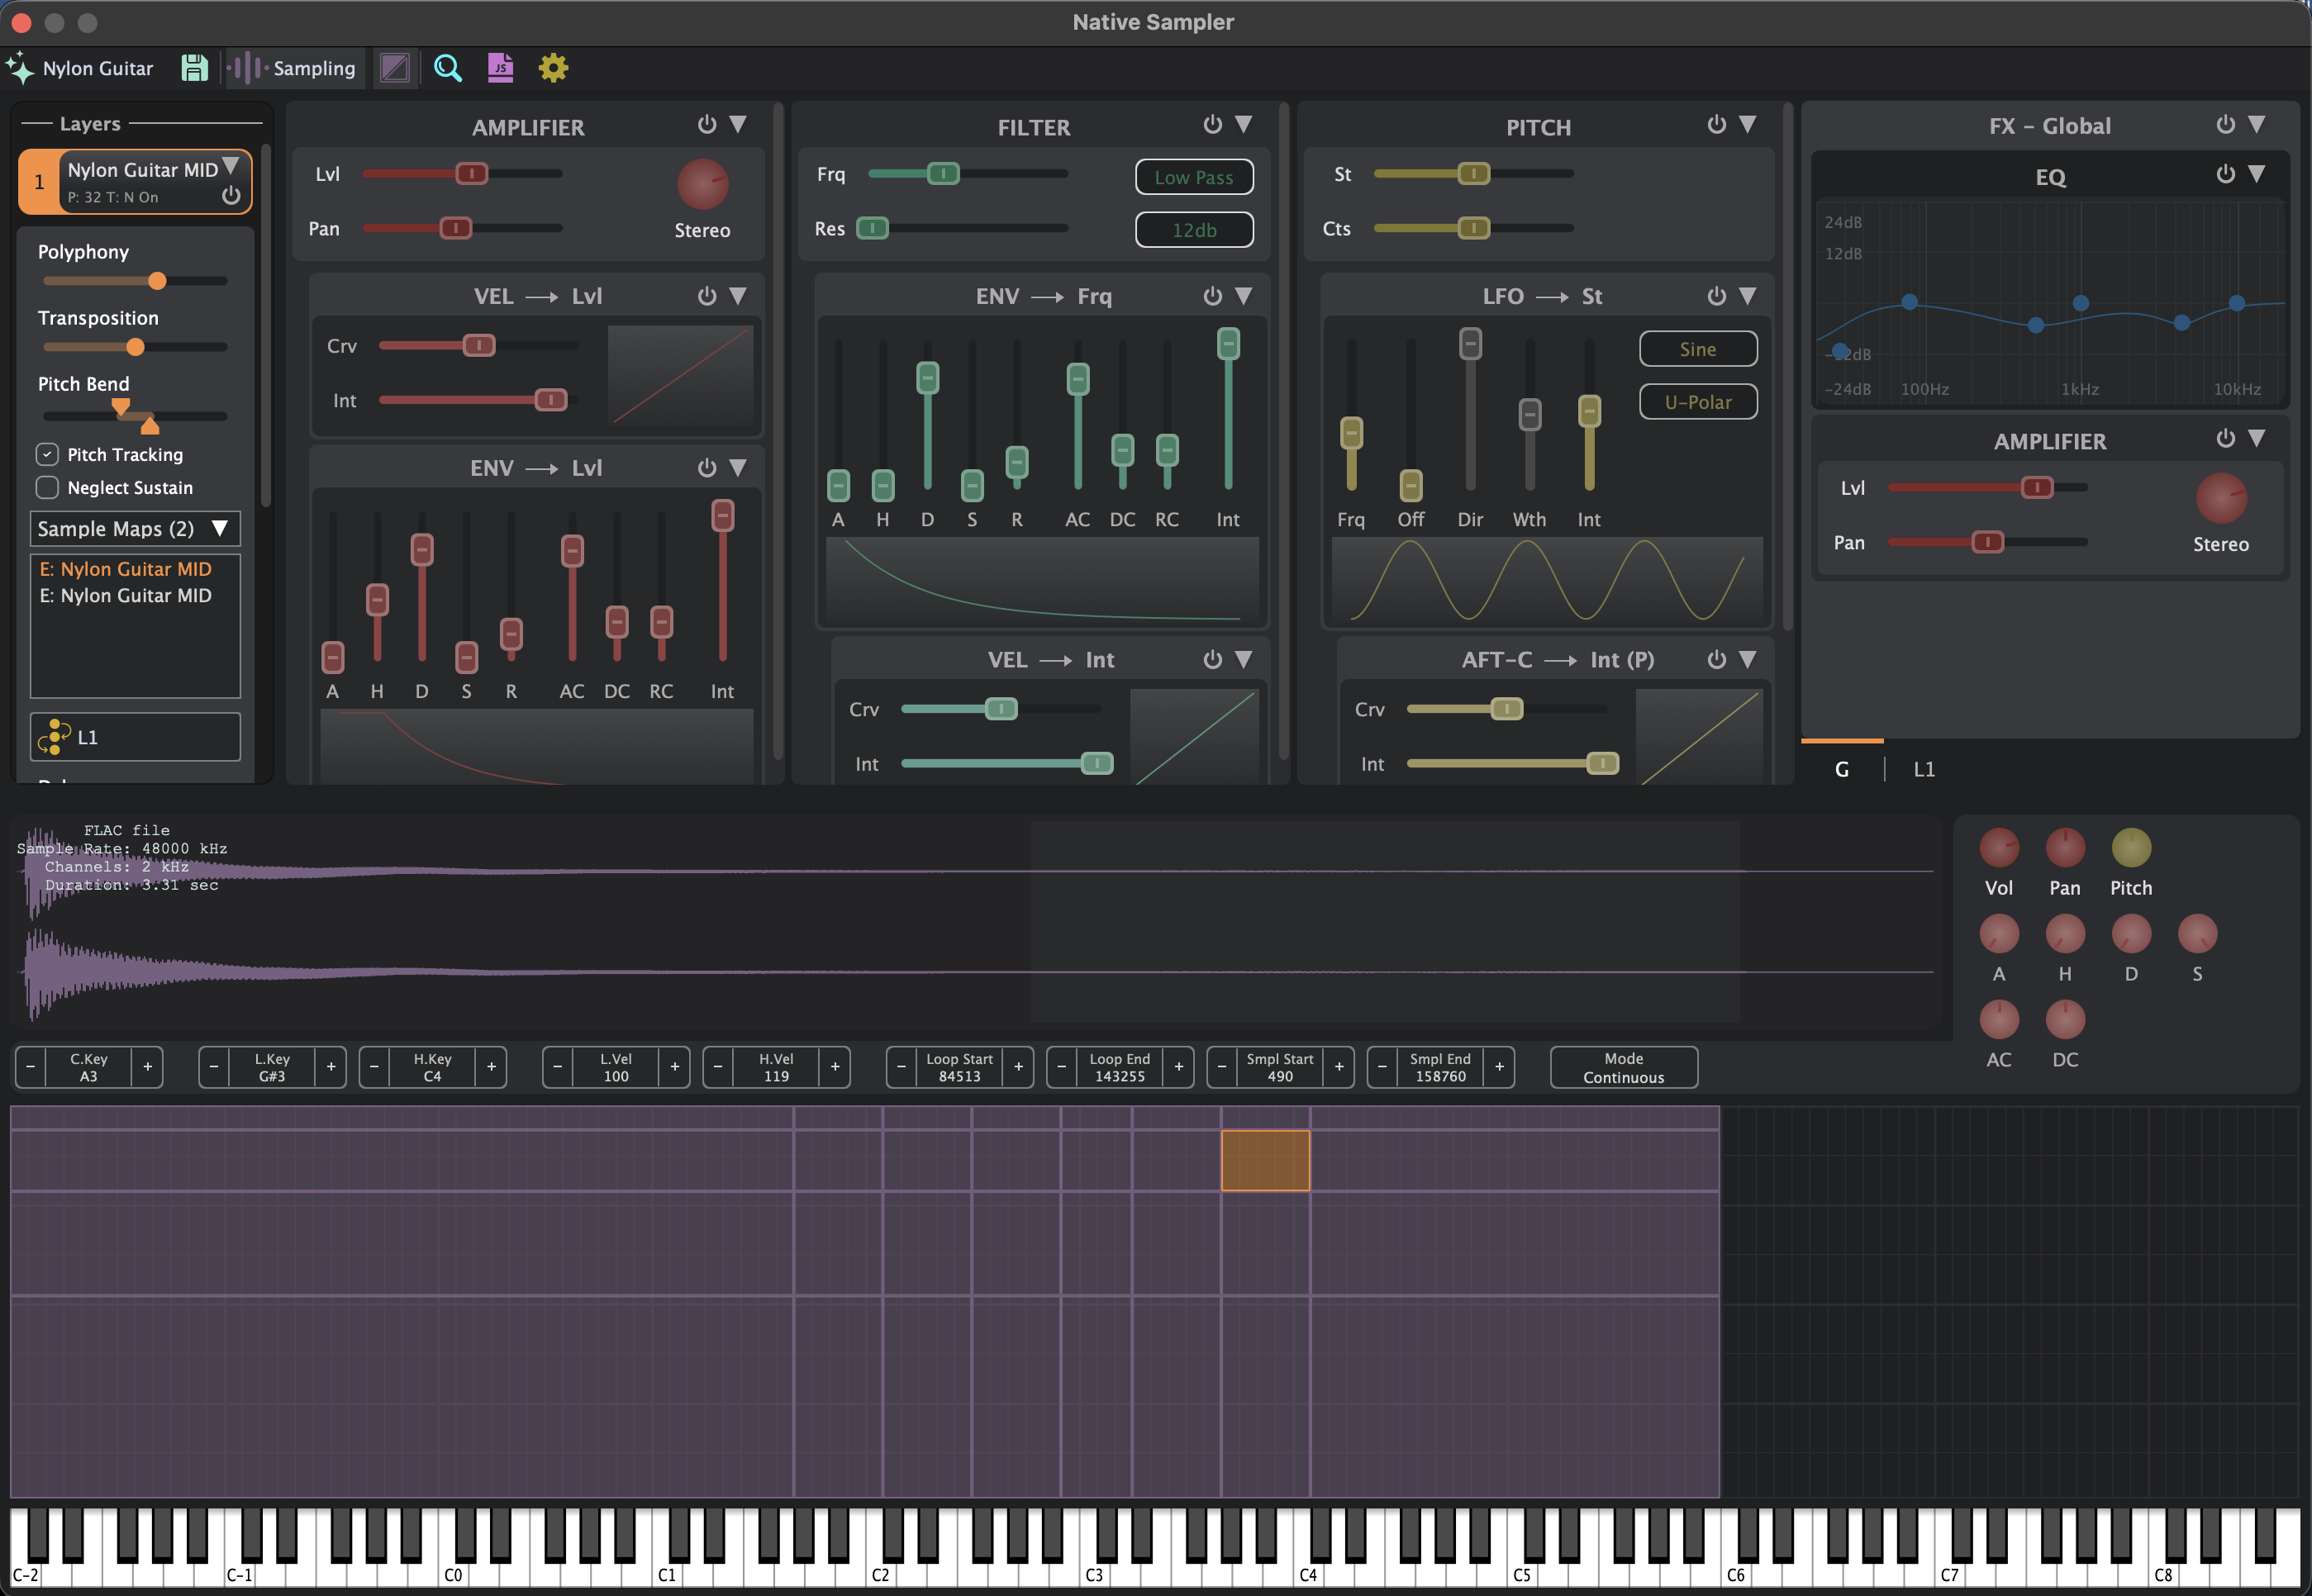
Drums Instruments
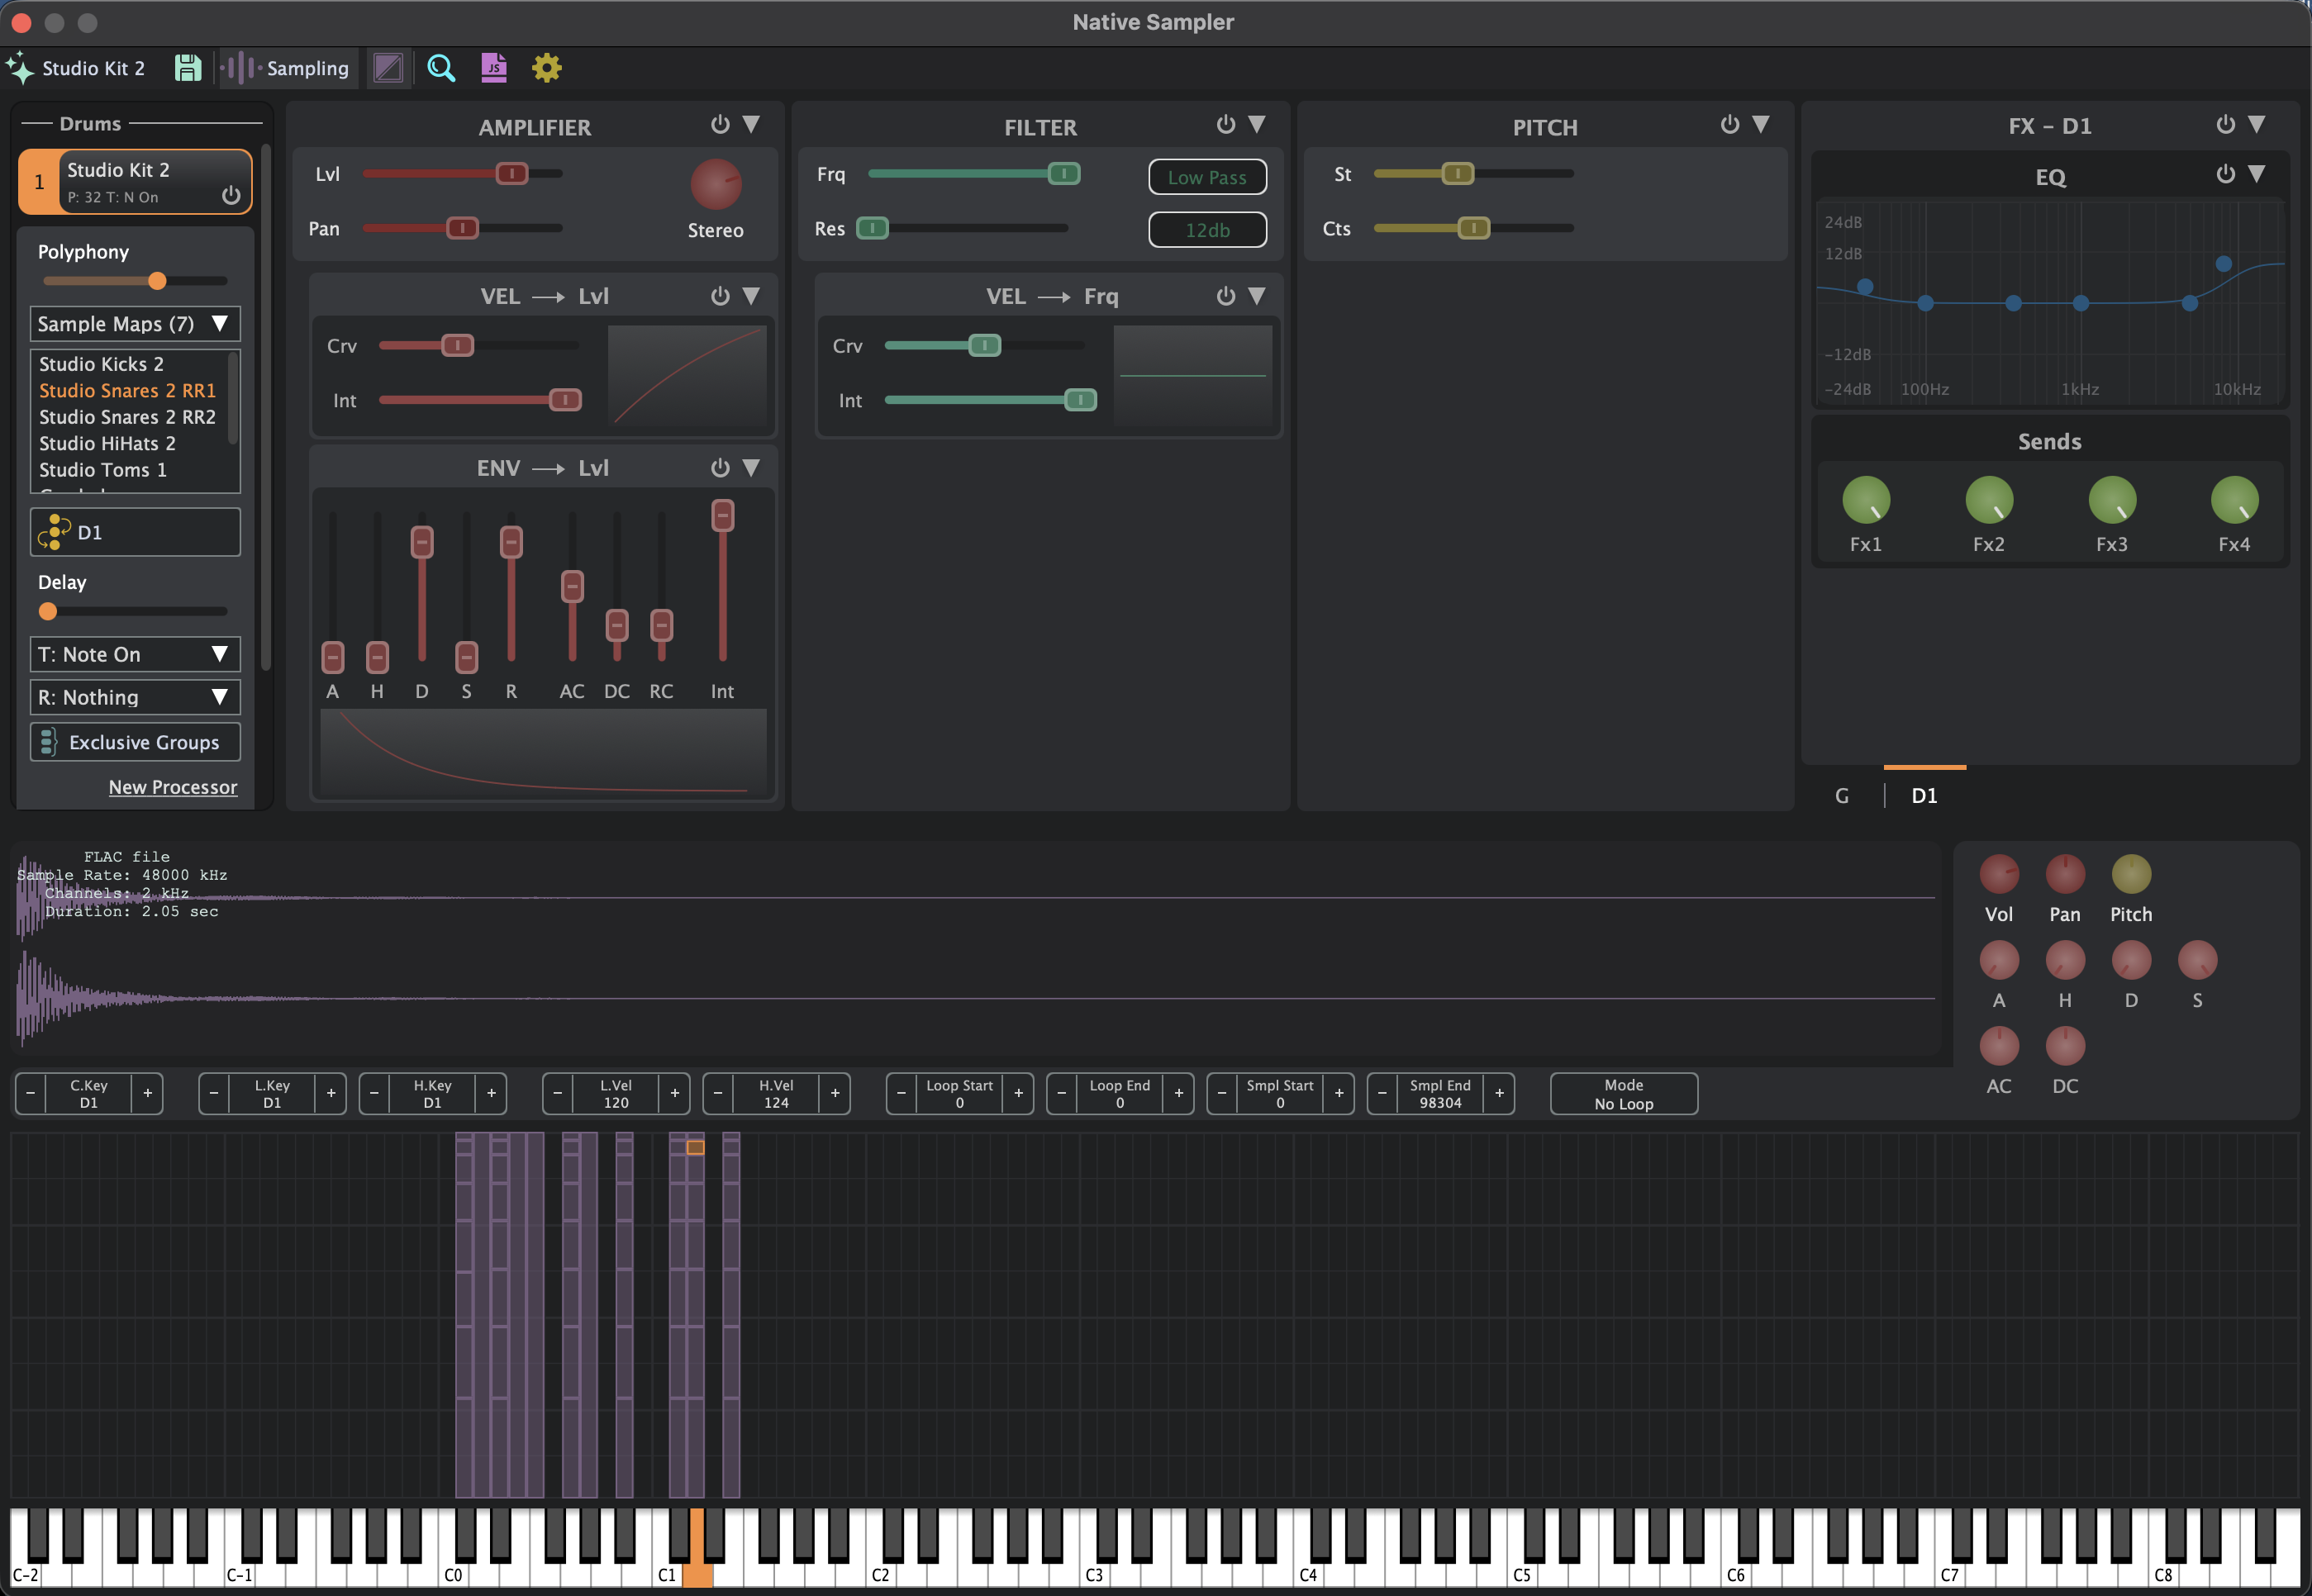 Drums Instrument mode interface is also divided into two parts. On the left, highlighted in green, is the drum kit settings panel, and on the right is the familiar
chain view from the Tone Instrument mode.
The drum kit settings panel contains all loaded sample maps, as well as the same trigger and release modes used in Tone Instrument mode.
However, it also includes the Exclusive Group feature, which allows two or more notes to be placed into a group with separate polyphony from the rest of the drum kit.
This is useful for hi-hats and triangle, where one note should stop the other from continuing to play.
As with Tone Instrument mode, the sampling window can be shown or hidden, which is often useful when creating or editing drum kits.
Since each note is a separate chain, the selected note on the virtual keyboard displays the chain for that specific drum component.
It is also possible to copy the entire note’s chain settings to another note, or only certain parts of it, such as the AMP processor with its modulators or just the filter settings.
Drums Instrument mode interface is also divided into two parts. On the left, highlighted in green, is the drum kit settings panel, and on the right is the familiar
chain view from the Tone Instrument mode.
The drum kit settings panel contains all loaded sample maps, as well as the same trigger and release modes used in Tone Instrument mode.
However, it also includes the Exclusive Group feature, which allows two or more notes to be placed into a group with separate polyphony from the rest of the drum kit.
This is useful for hi-hats and triangle, where one note should stop the other from continuing to play.
As with Tone Instrument mode, the sampling window can be shown or hidden, which is often useful when creating or editing drum kits.
Since each note is a separate chain, the selected note on the virtual keyboard displays the chain for that specific drum component.
It is also possible to copy the entire note’s chain settings to another note, or only certain parts of it, such as the AMP processor with its modulators or just the filter settings.
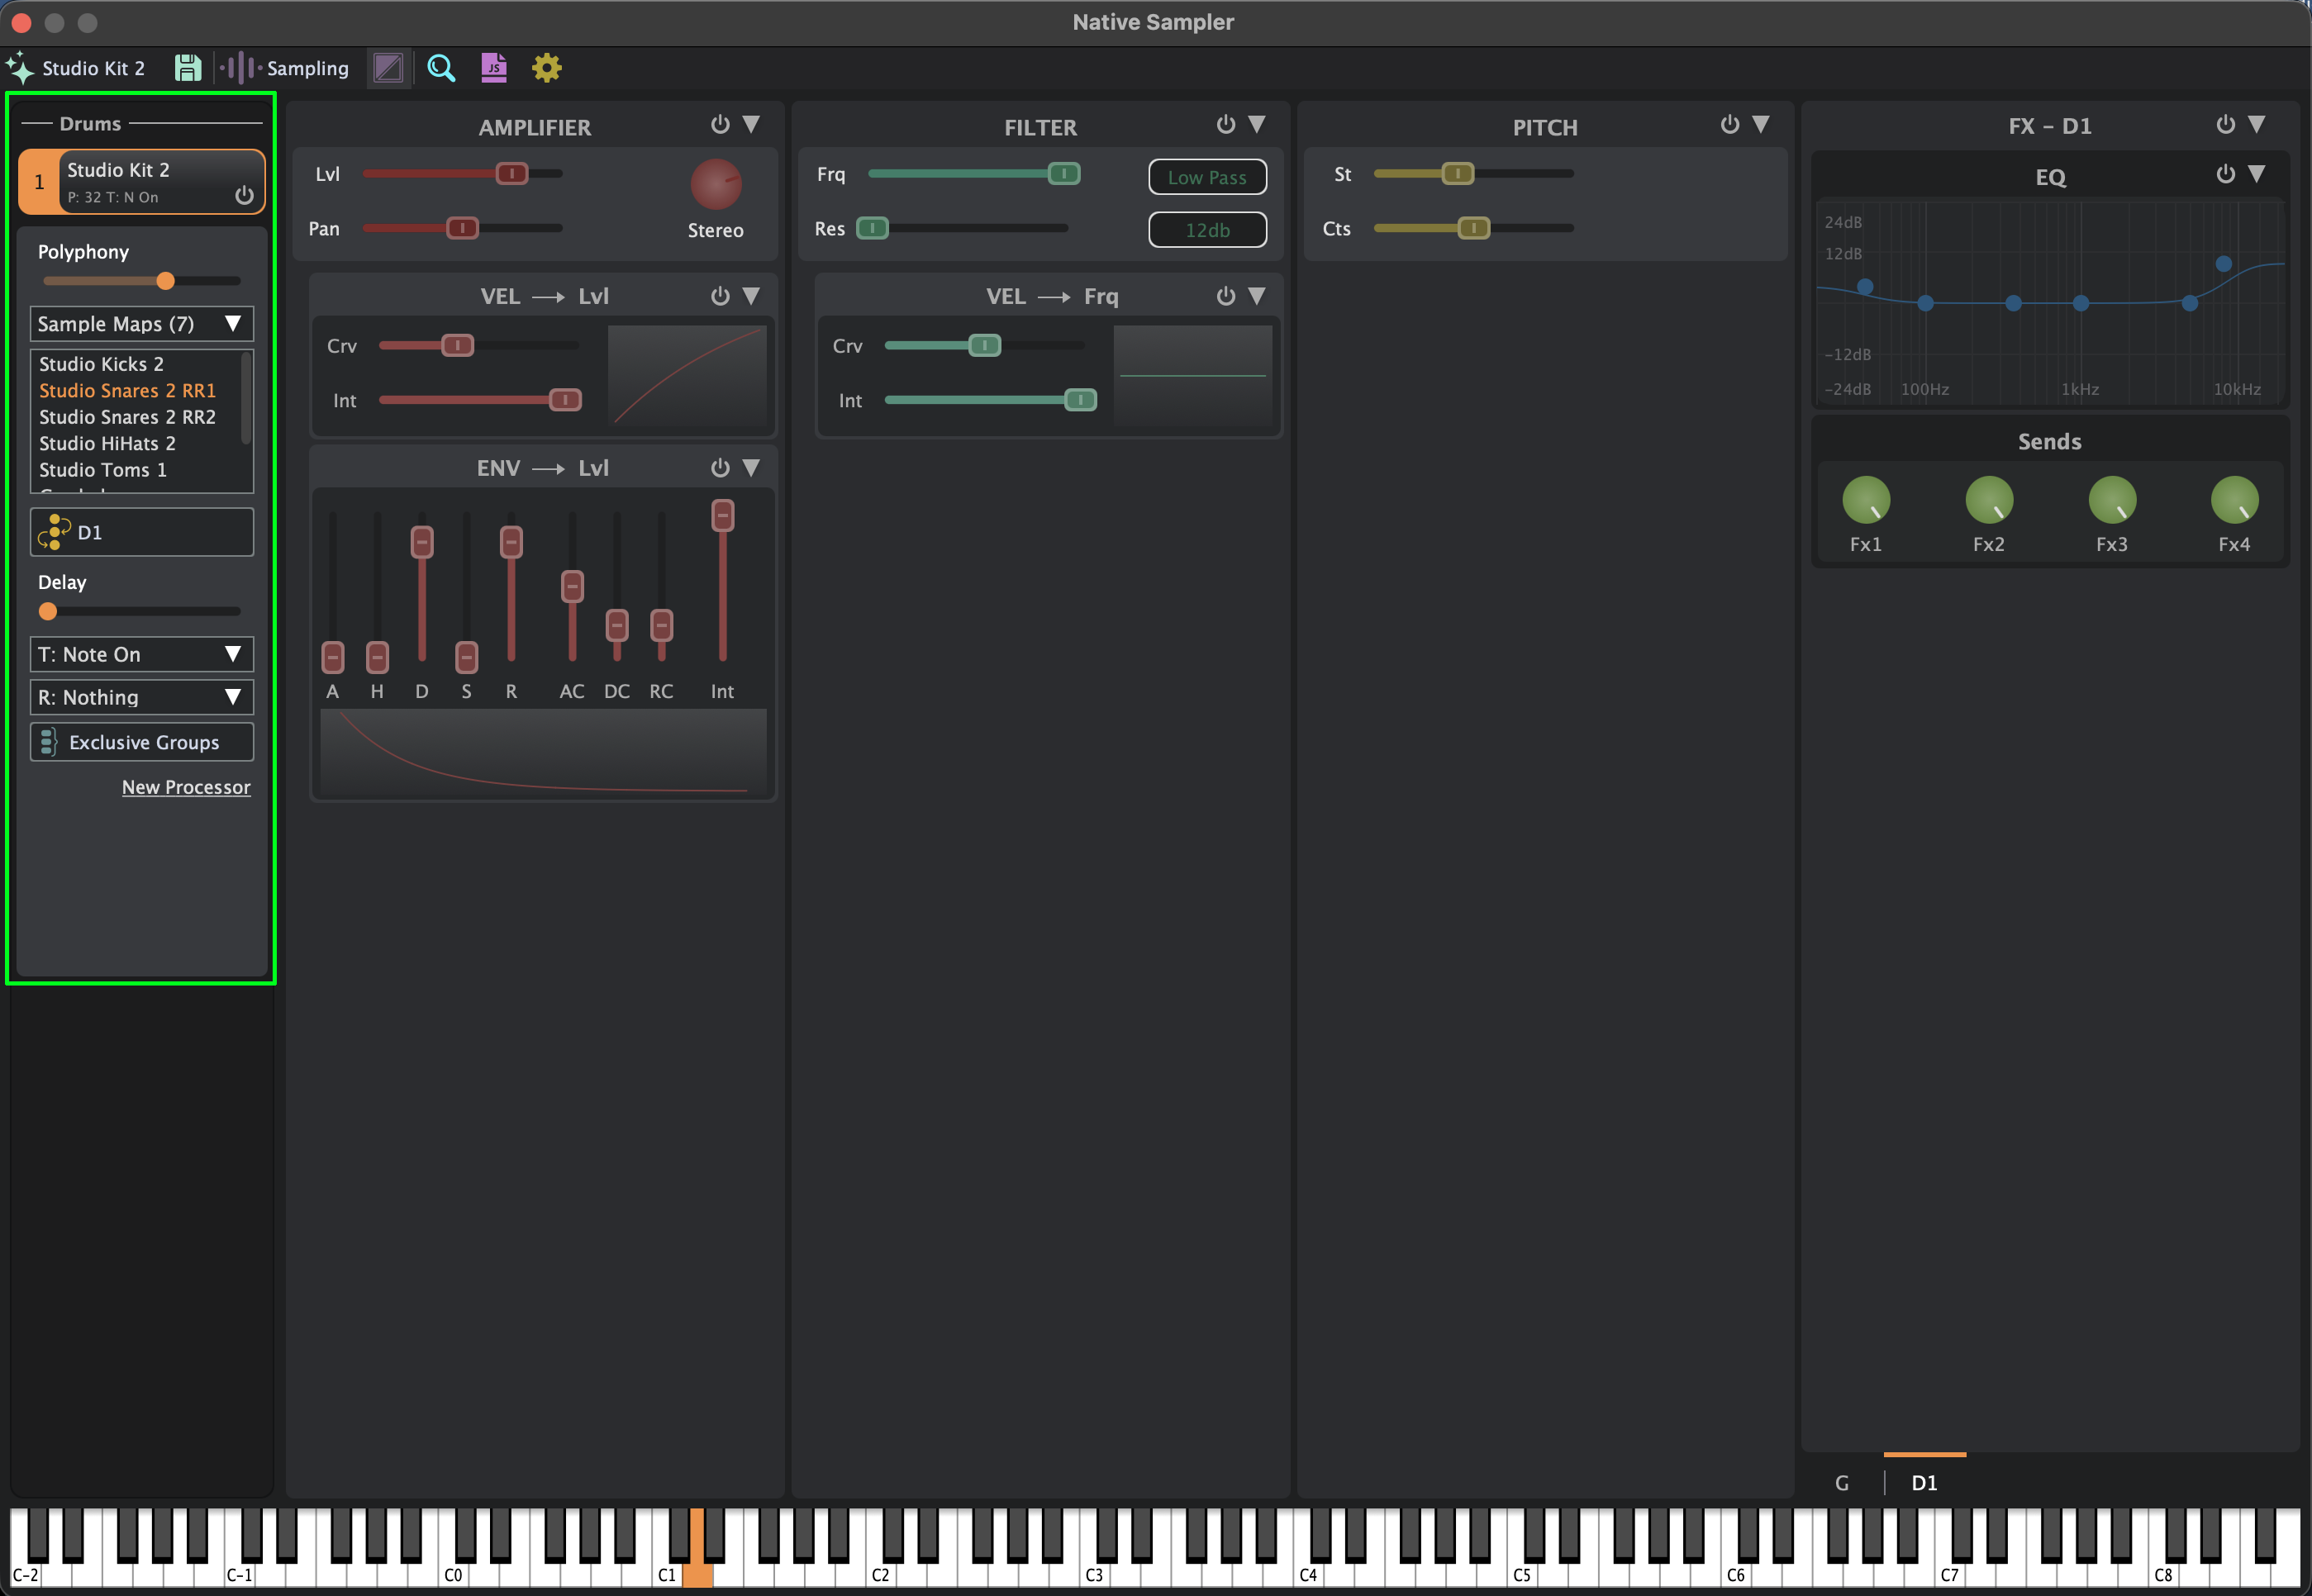 Drum kits also use the Round Robin feature, which works automatically by detecting all samples across different sample maps.
If more than one sample exists for the same note and velocity, Round Robin becomes active.
For example, if note D2 is played with a velocity of 74, the sampler will search all loaded sample maps, and if multiple samples are found at that position,
it will play them one after another or randomly, depending on the sample map settings.
Drum kits also use the Round Robin feature, which works automatically by detecting all samples across different sample maps.
If more than one sample exists for the same note and velocity, Round Robin becomes active.
For example, if note D2 is played with a velocity of 74, the sampler will search all loaded sample maps, and if multiple samples are found at that position,
it will play them one after another or randomly, depending on the sample map settings.
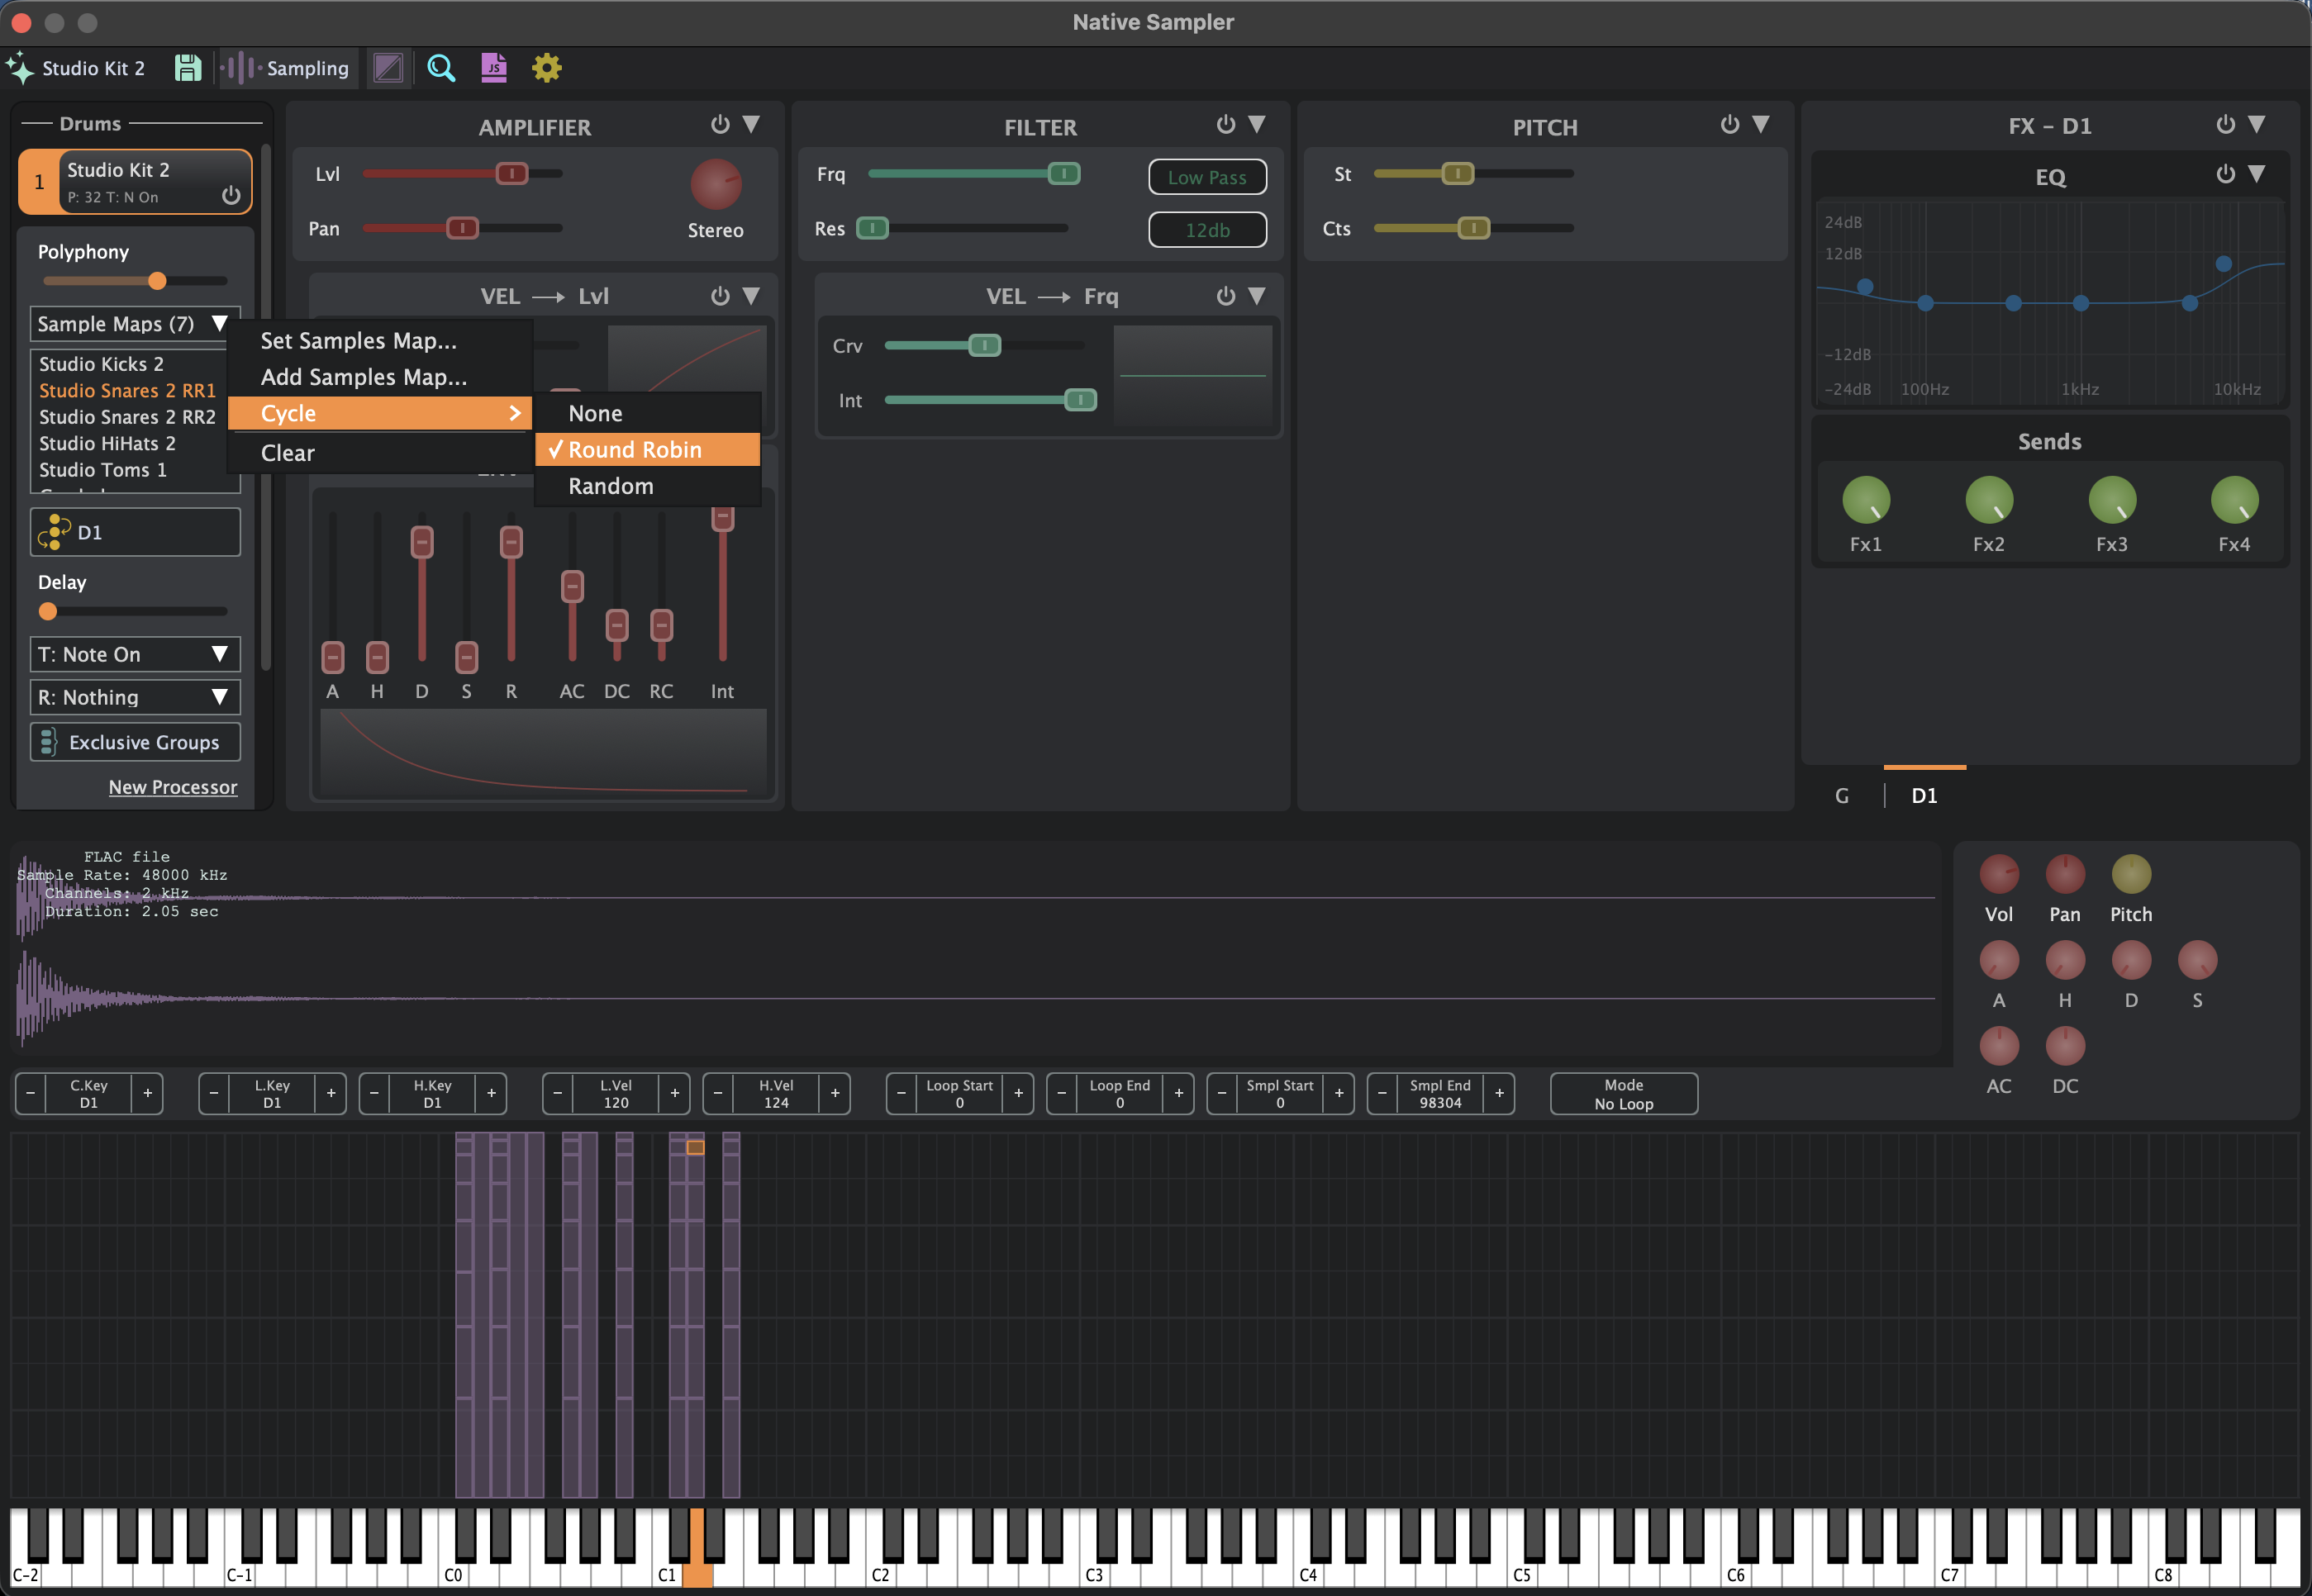 The addition to a Drum Instrument mode is the presence of FX sends. There are 4 FX sends that correspond to Giglad’s 4 Send FX: Reverb 1, Reverb 2, Chorus, and Delay.
This is not available for Tone Instruments, since effects for those are handled by Giglad’s mixer.
For drums, however, separate FX send levels per note are necessary, so when reverb is added in Giglad’s mixer, only the notes with their internal FX sends enabled will receive it.
This provides a wide range of flexibility and options when organizing drum kits and their individual components.
The addition to a Drum Instrument mode is the presence of FX sends. There are 4 FX sends that correspond to Giglad’s 4 Send FX: Reverb 1, Reverb 2, Chorus, and Delay.
This is not available for Tone Instruments, since effects for those are handled by Giglad’s mixer.
For drums, however, separate FX send levels per note are necessary, so when reverb is added in Giglad’s mixer, only the notes with their internal FX sends enabled will receive it.
This provides a wide range of flexibility and options when organizing drum kits and their individual components.File management
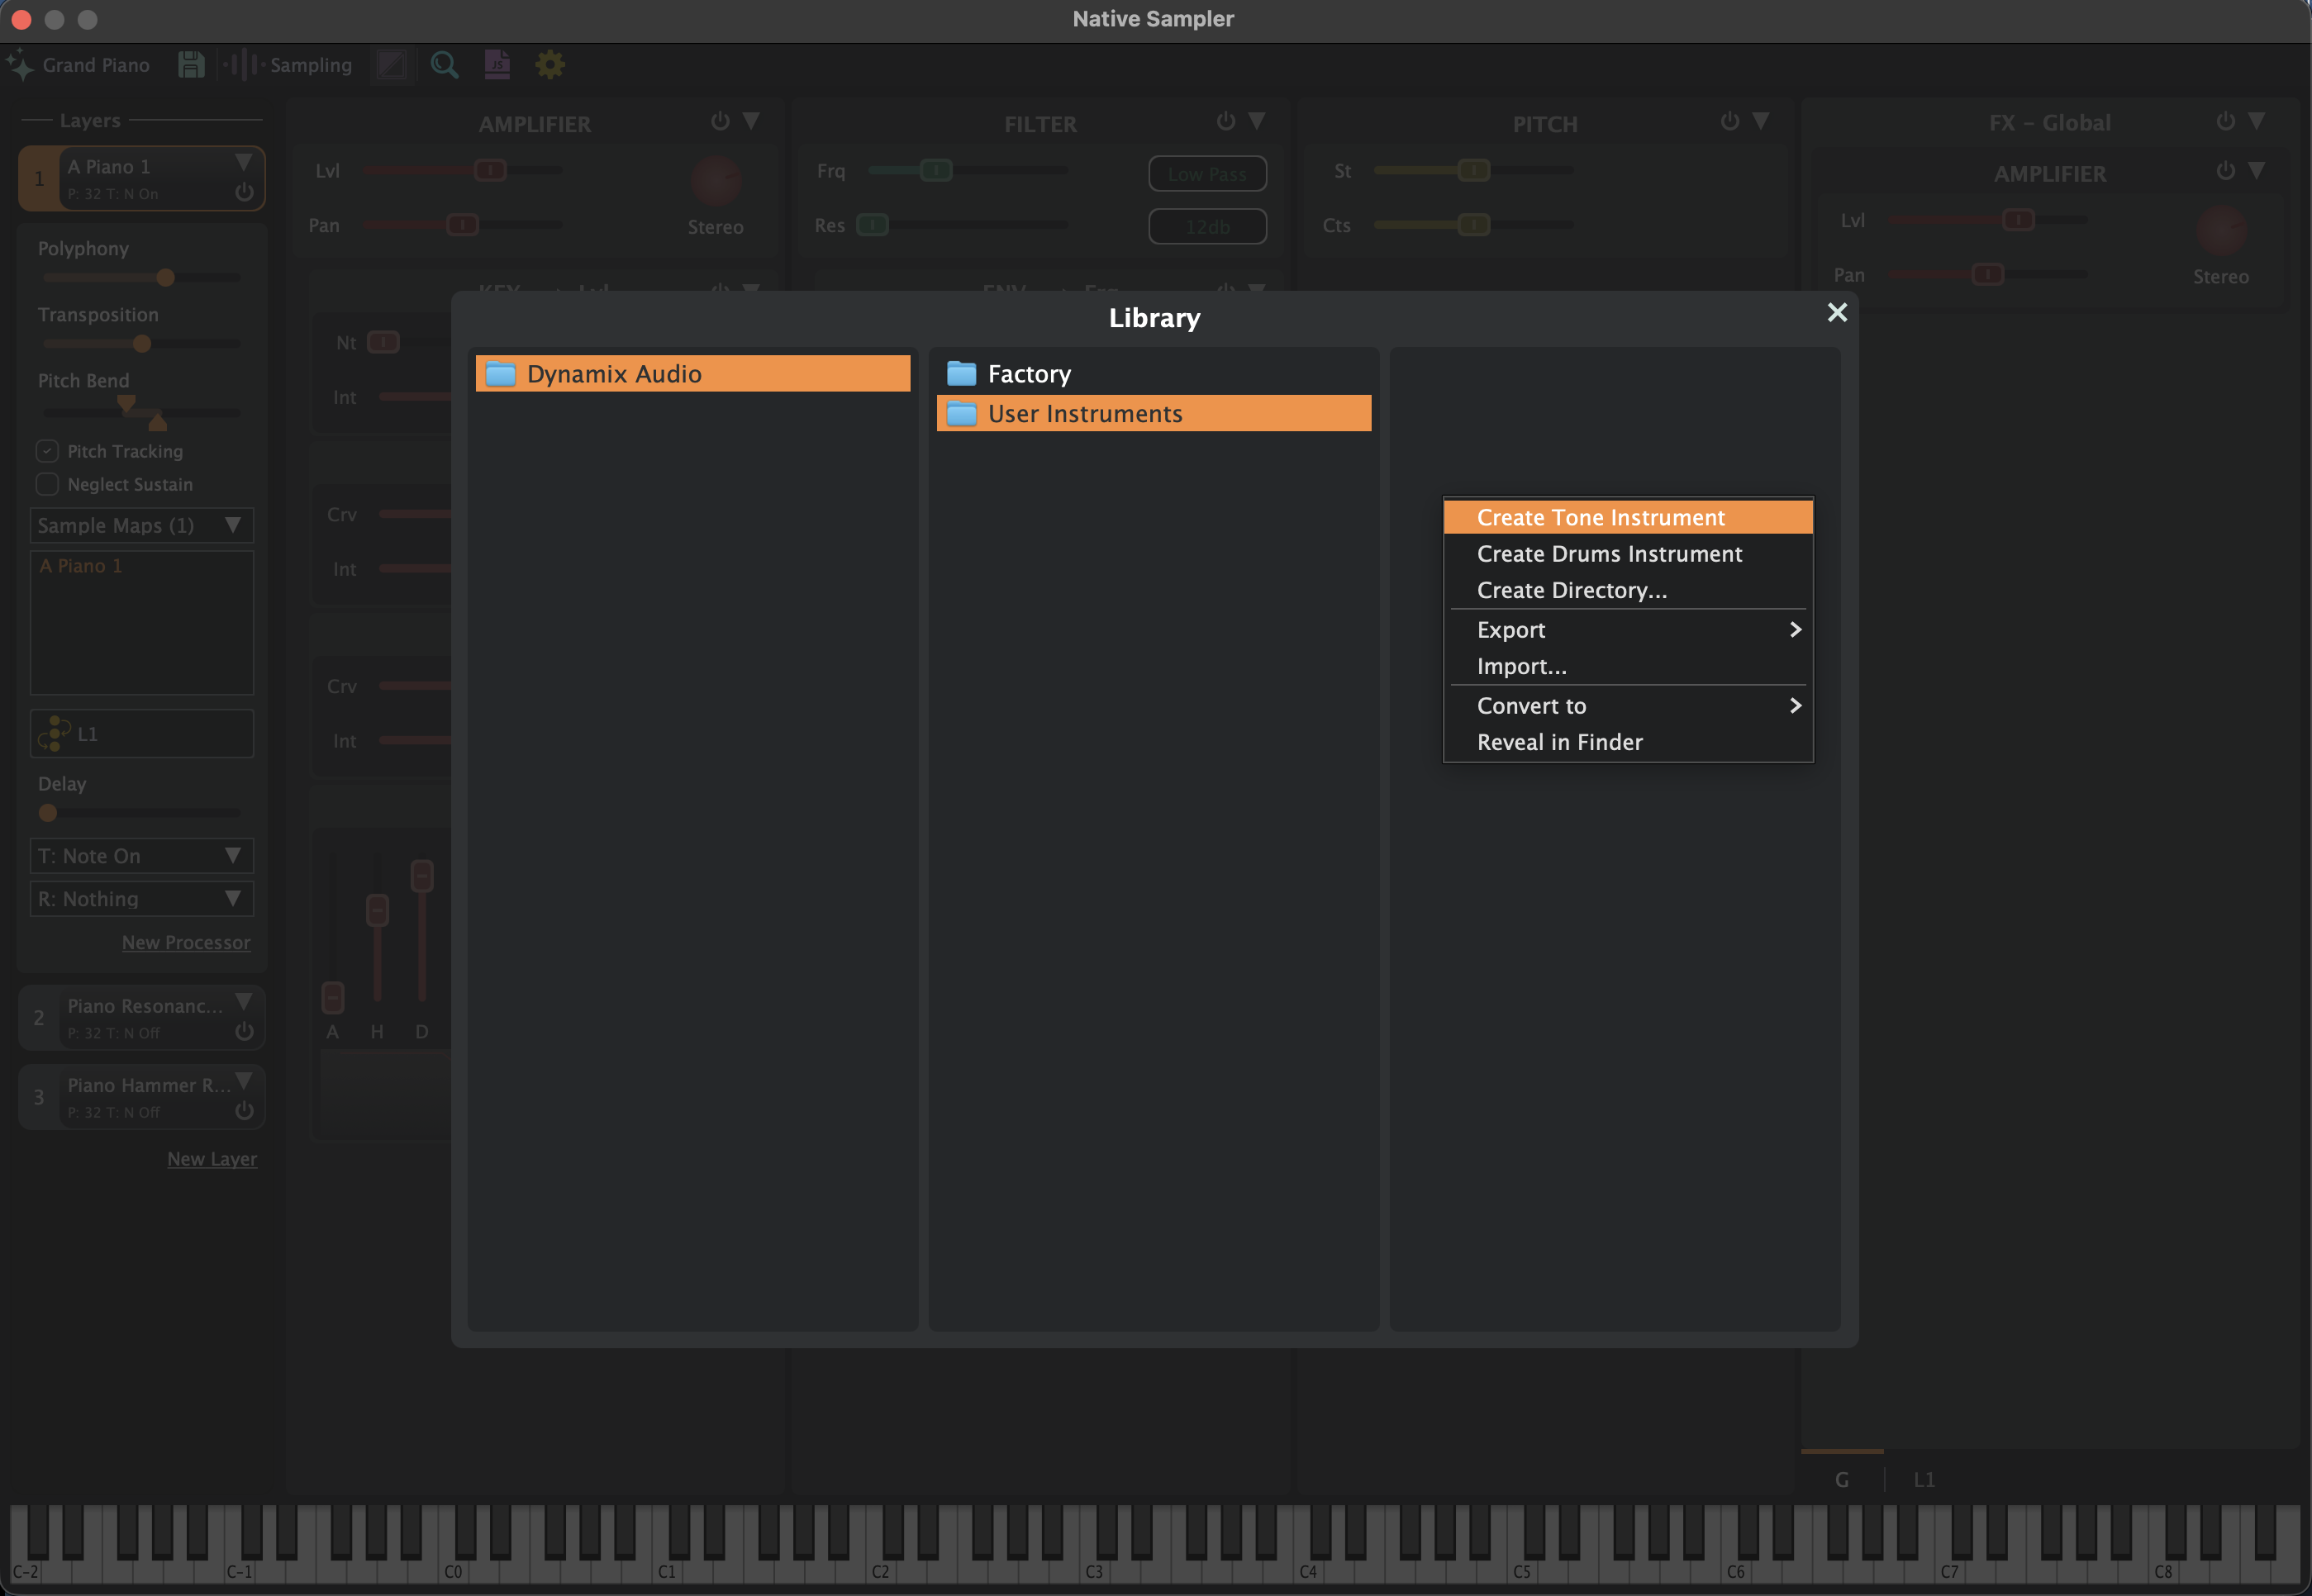

The Sampler works with two file formats: Instruments and Sample Maps. Instruments use the .minst extension, while Sample Maps use the .msamp extension. An instrument is a complete, ready-to-play patch, while a sample map is its foundation: a collection of samples mapped across the keyboard in a specific way. A sample map contains all settings for each mapped sample, including volume, pan, attack and release with their curves, as well as decay and sustain values. The sample map serves as the base that is further shaped by the processor chain.
The instrument is built with the Sample Map as its foundation, with the processing chain layered on top of it. We decided to keep Sample Maps as a separate entity which can be saved and loaded independently of the instrument. This maintains the ability to use the same Sample Map across multiple instruments. For example, if you have one acoustic piano Sample Map consisting of 300 samples and want to use it with many different instrument settings and processing chains, it is preferable to re-use the same Sample Map rather than creating it from scratch every time.
The Sample Map browser is accessed from the Layers panel by clicking the Sample Maps field.
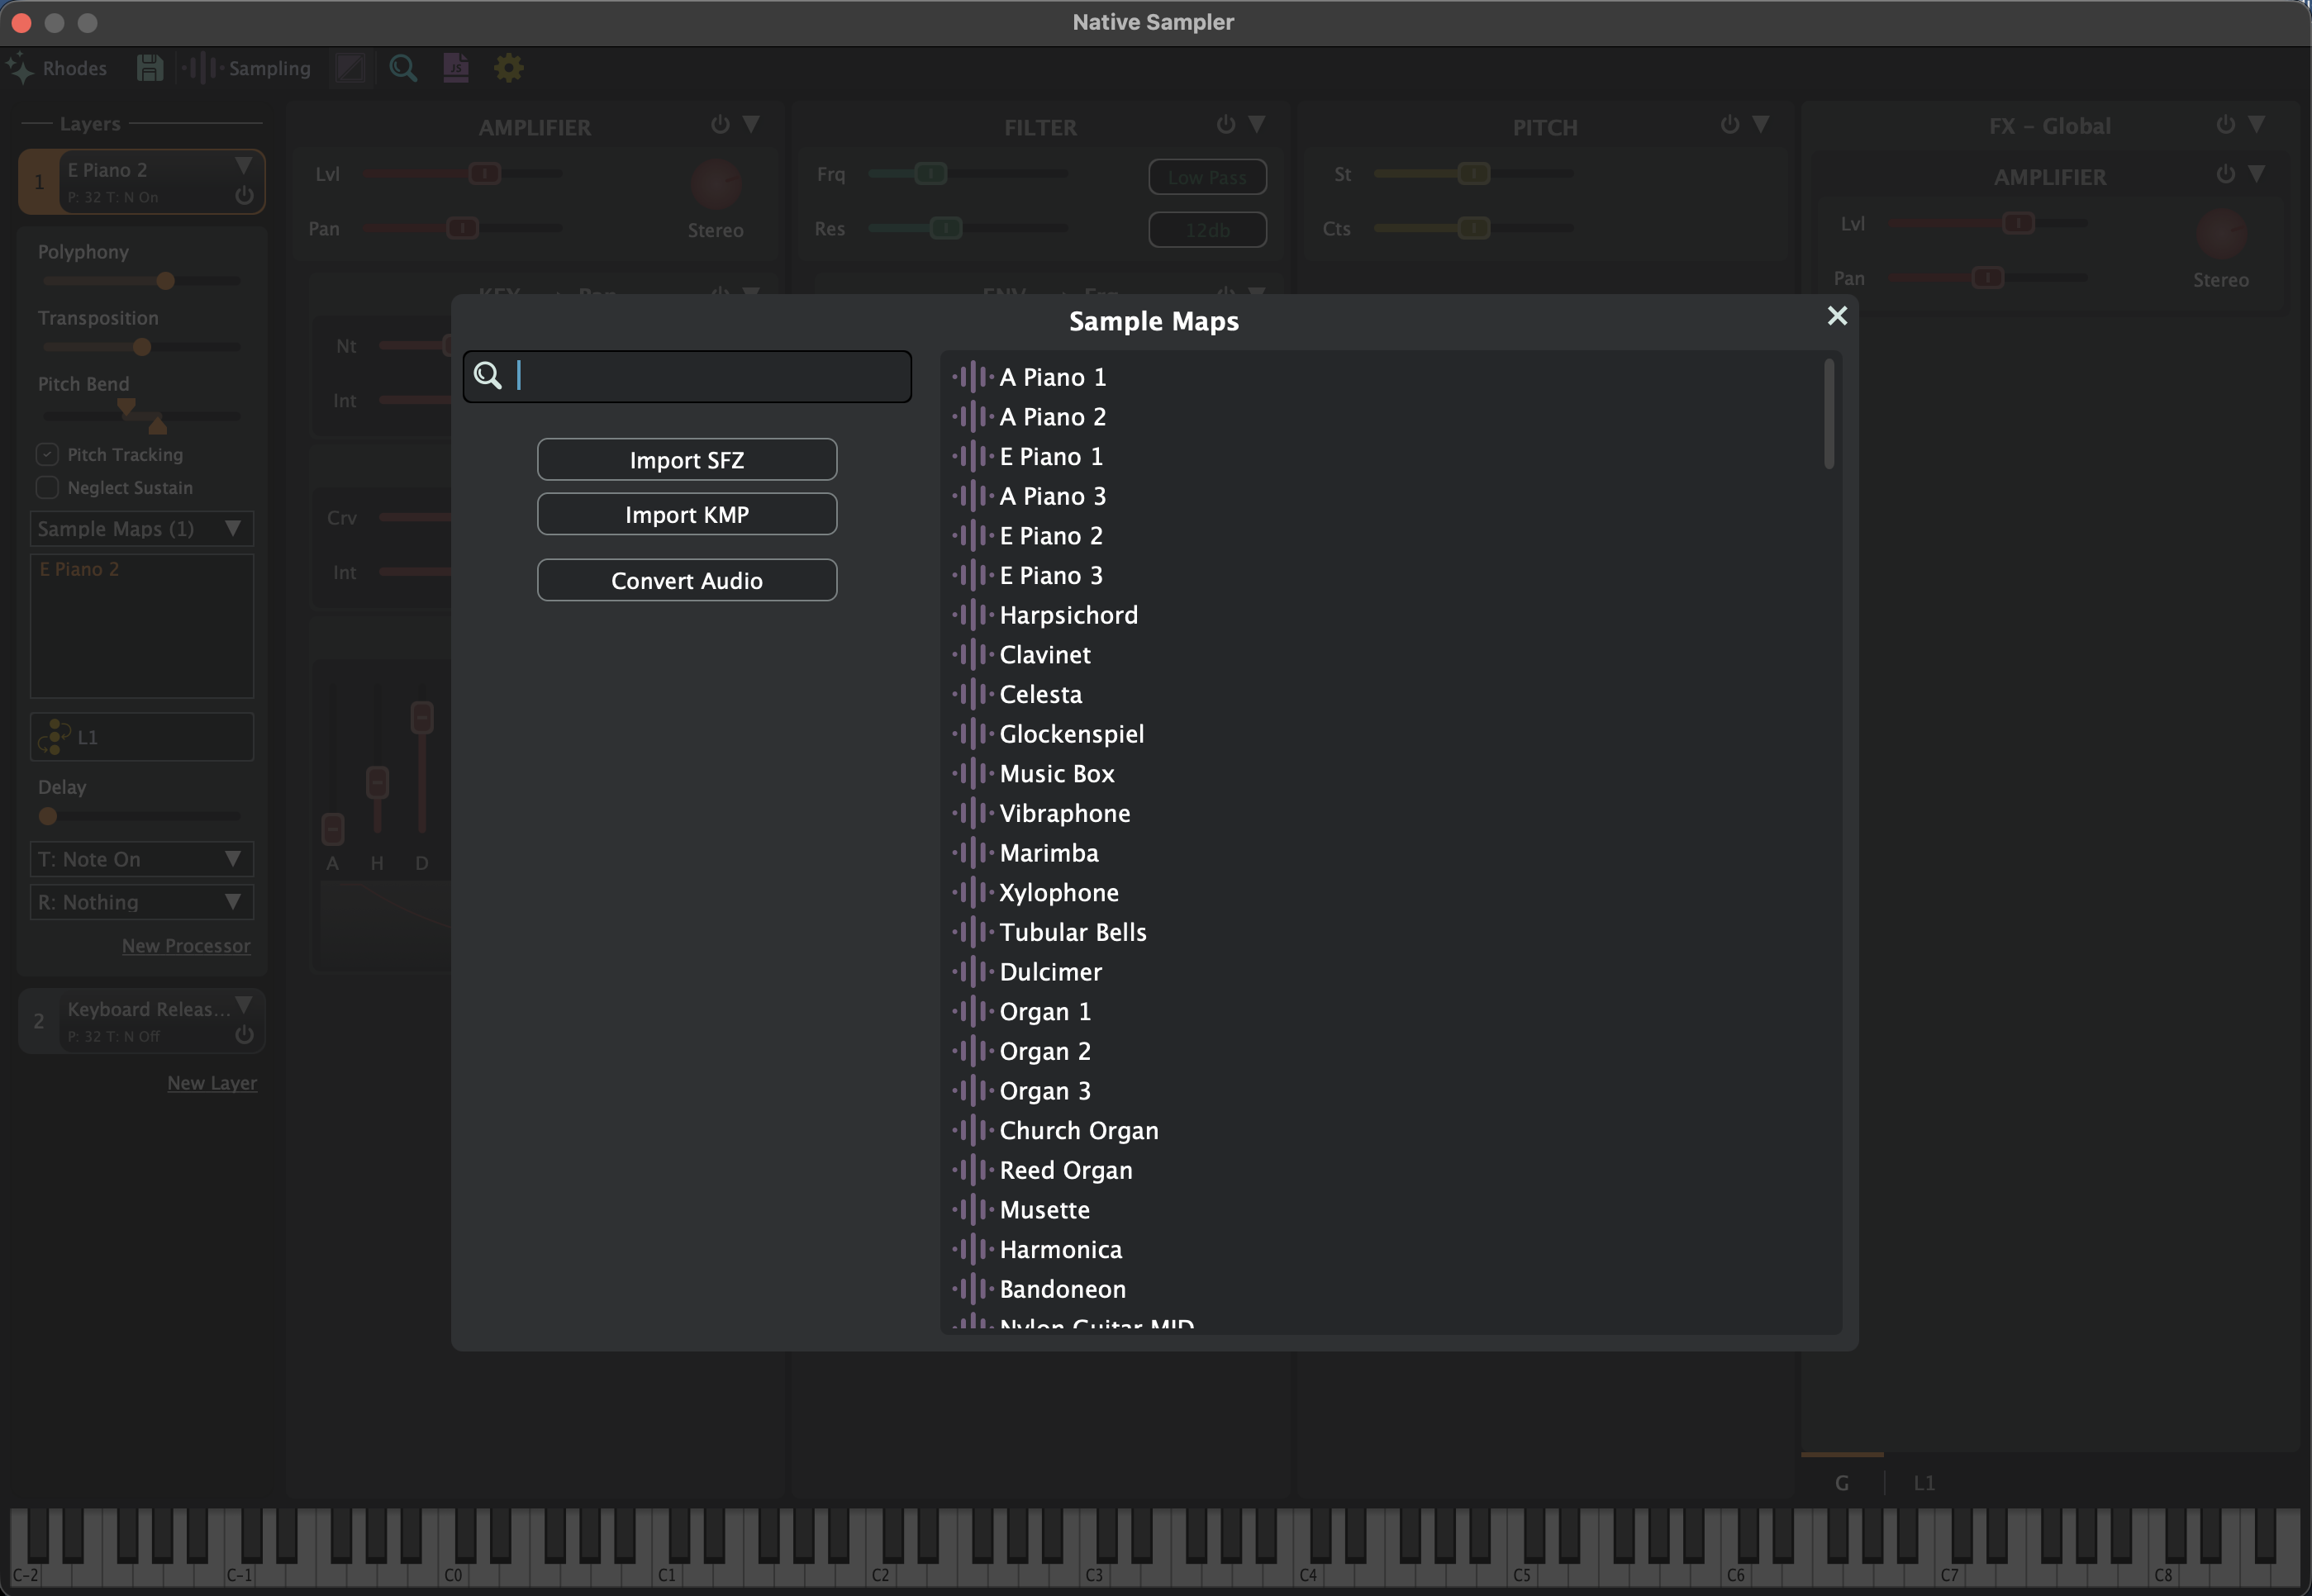 Instruments are accessible by pressing the instrument name button on the plugin menu bar.
The browser displays Miller columns, showing multiple folder levels at once for easier navigation.
Instruments are accessible by pressing the instrument name button on the plugin menu bar.
The browser displays Miller columns, showing multiple folder levels at once for easier navigation.
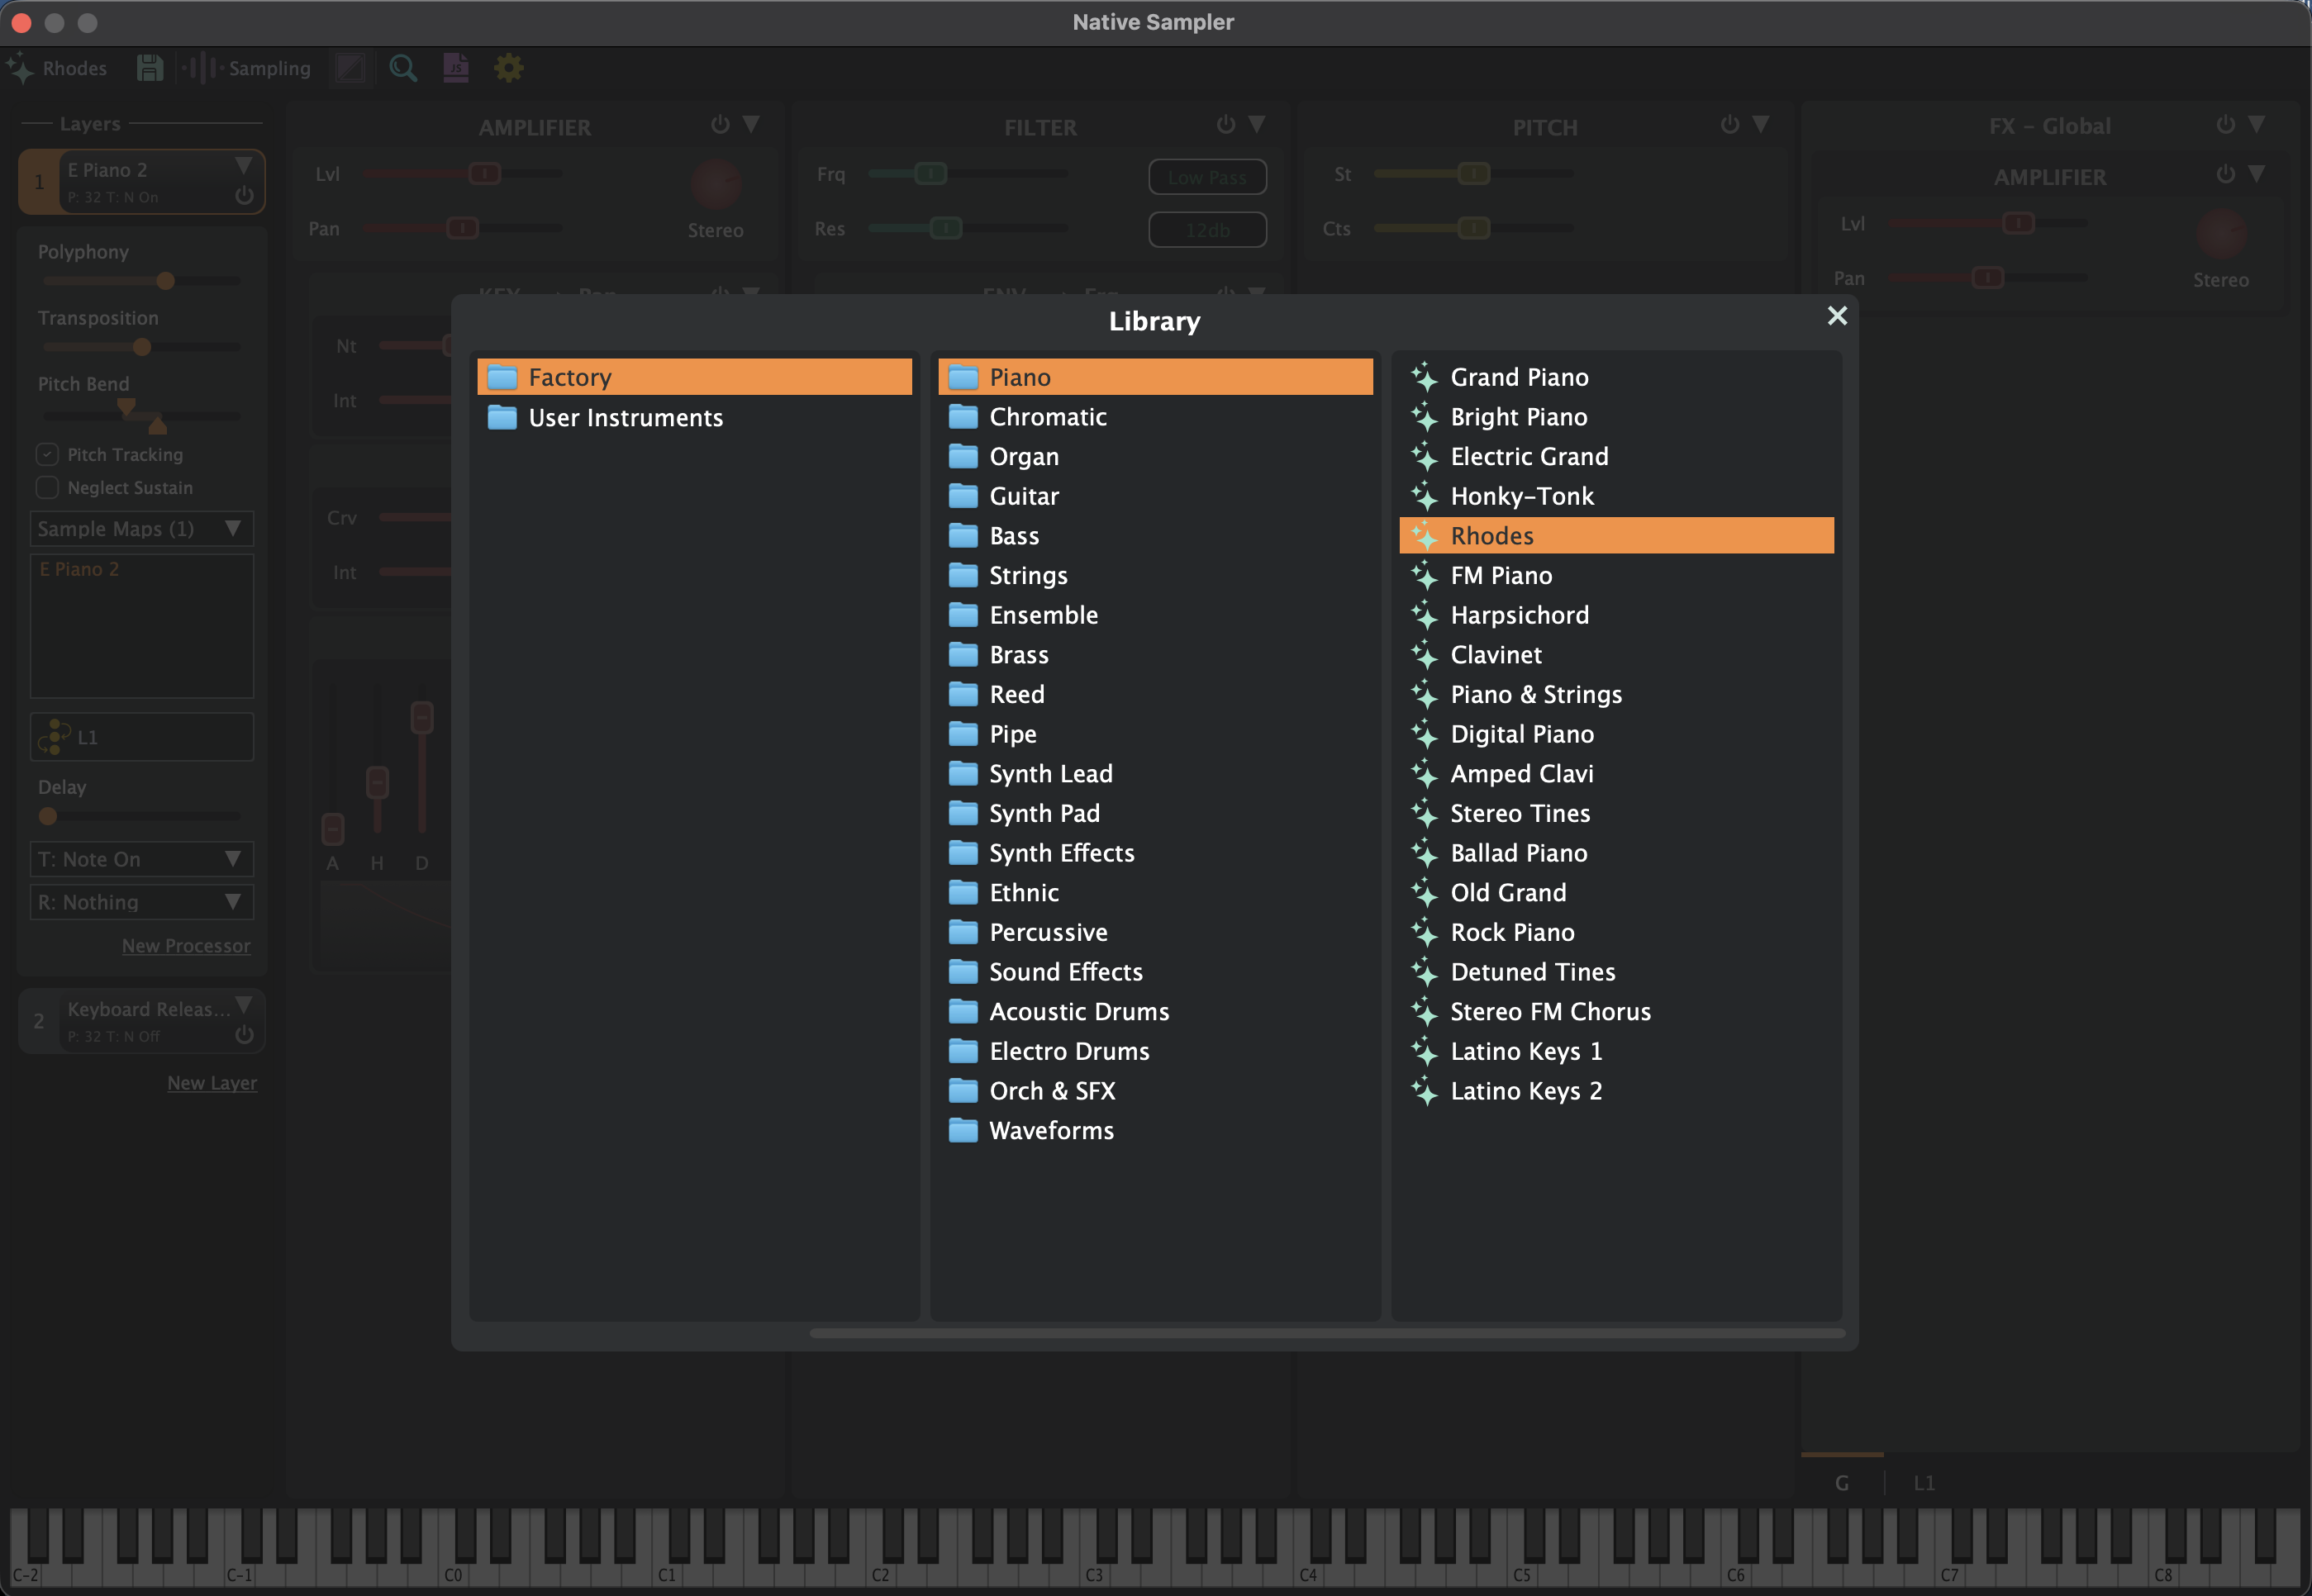 At the root level, the first folder is usually the creator’s name or branding. For example, Giglad’s Factory folder contains the included sound library made
by Dynamix Audio is located here.
New folders can be created by right-clicking on empty space.
Keep in mind that the folder is created at the level where the right click occurs.
Right-click options include creating a new directory, creating a new Tone or Drums Instrument, importing or exporting an instrument, converting audio to another format,
or opening the location in Finder or Explorer.
At the root level, the first folder is usually the creator’s name or branding. For example, Giglad’s Factory folder contains the included sound library made
by Dynamix Audio is located here.
New folders can be created by right-clicking on empty space.
Keep in mind that the folder is created at the level where the right click occurs.
Right-click options include creating a new directory, creating a new Tone or Drums Instrument, importing or exporting an instrument, converting audio to another format,
or opening the location in Finder or Explorer.
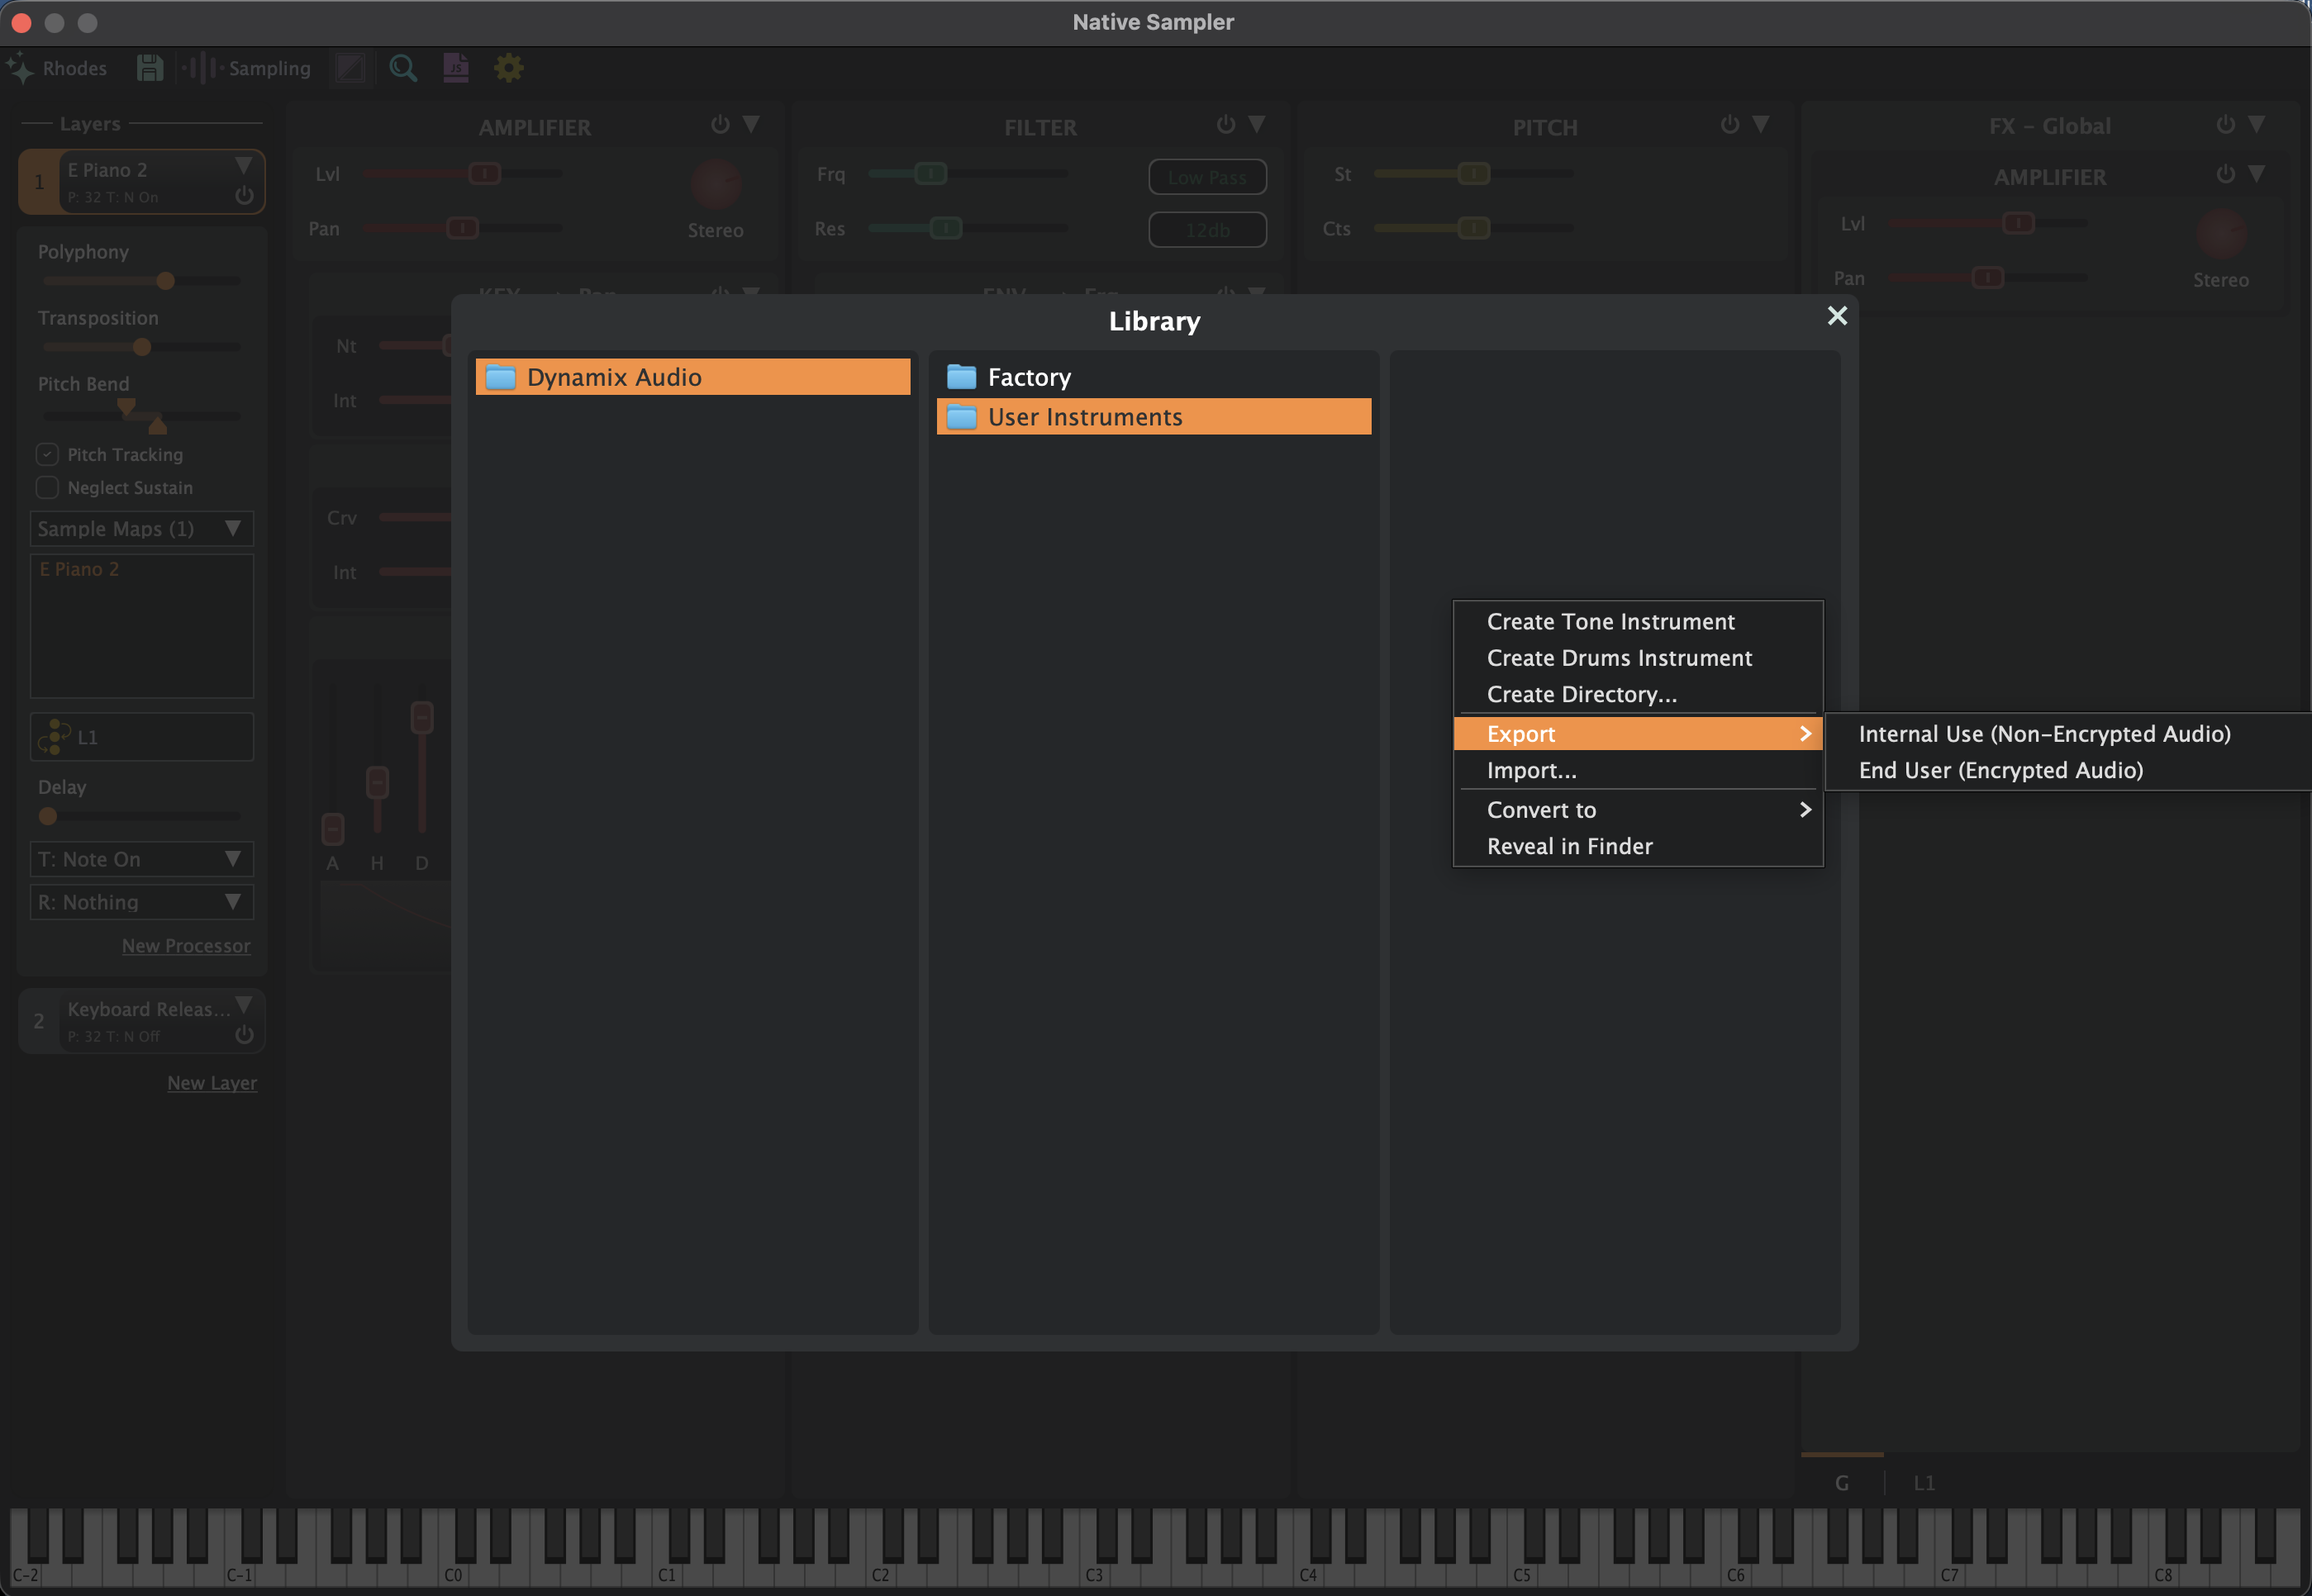 The instrument can be exported and imported back into the Sampler library. Exporting an instrument is useful for sharing with friends and colleagues or for creating a backup.
There are two export options: unencrypted and encrypted. The unencrypted option is preferred for internal use or when the instrument should remain fully editable after being imported again.
The encrypted option is recommended when sharing a finalized instrument for sale or when the instrument is intended to remain unchanged.
As mentioned before, a sample map can be reused multiple times across multiple instruments. However, if a sample map is modified in one instrument, the Sampler will ask during the saving process whether you want to overwrite the sample map, save it as a new one, embed it into the instrument, or ignore the changes.
If overwritten, the edits will be applied to the sample map itself, which means the changes will affect not only the current instrument but also any others that use the same map.
The instrument can be exported and imported back into the Sampler library. Exporting an instrument is useful for sharing with friends and colleagues or for creating a backup.
There are two export options: unencrypted and encrypted. The unencrypted option is preferred for internal use or when the instrument should remain fully editable after being imported again.
The encrypted option is recommended when sharing a finalized instrument for sale or when the instrument is intended to remain unchanged.
As mentioned before, a sample map can be reused multiple times across multiple instruments. However, if a sample map is modified in one instrument, the Sampler will ask during the saving process whether you want to overwrite the sample map, save it as a new one, embed it into the instrument, or ignore the changes.
If overwritten, the edits will be applied to the sample map itself, which means the changes will affect not only the current instrument but also any others that use the same map.
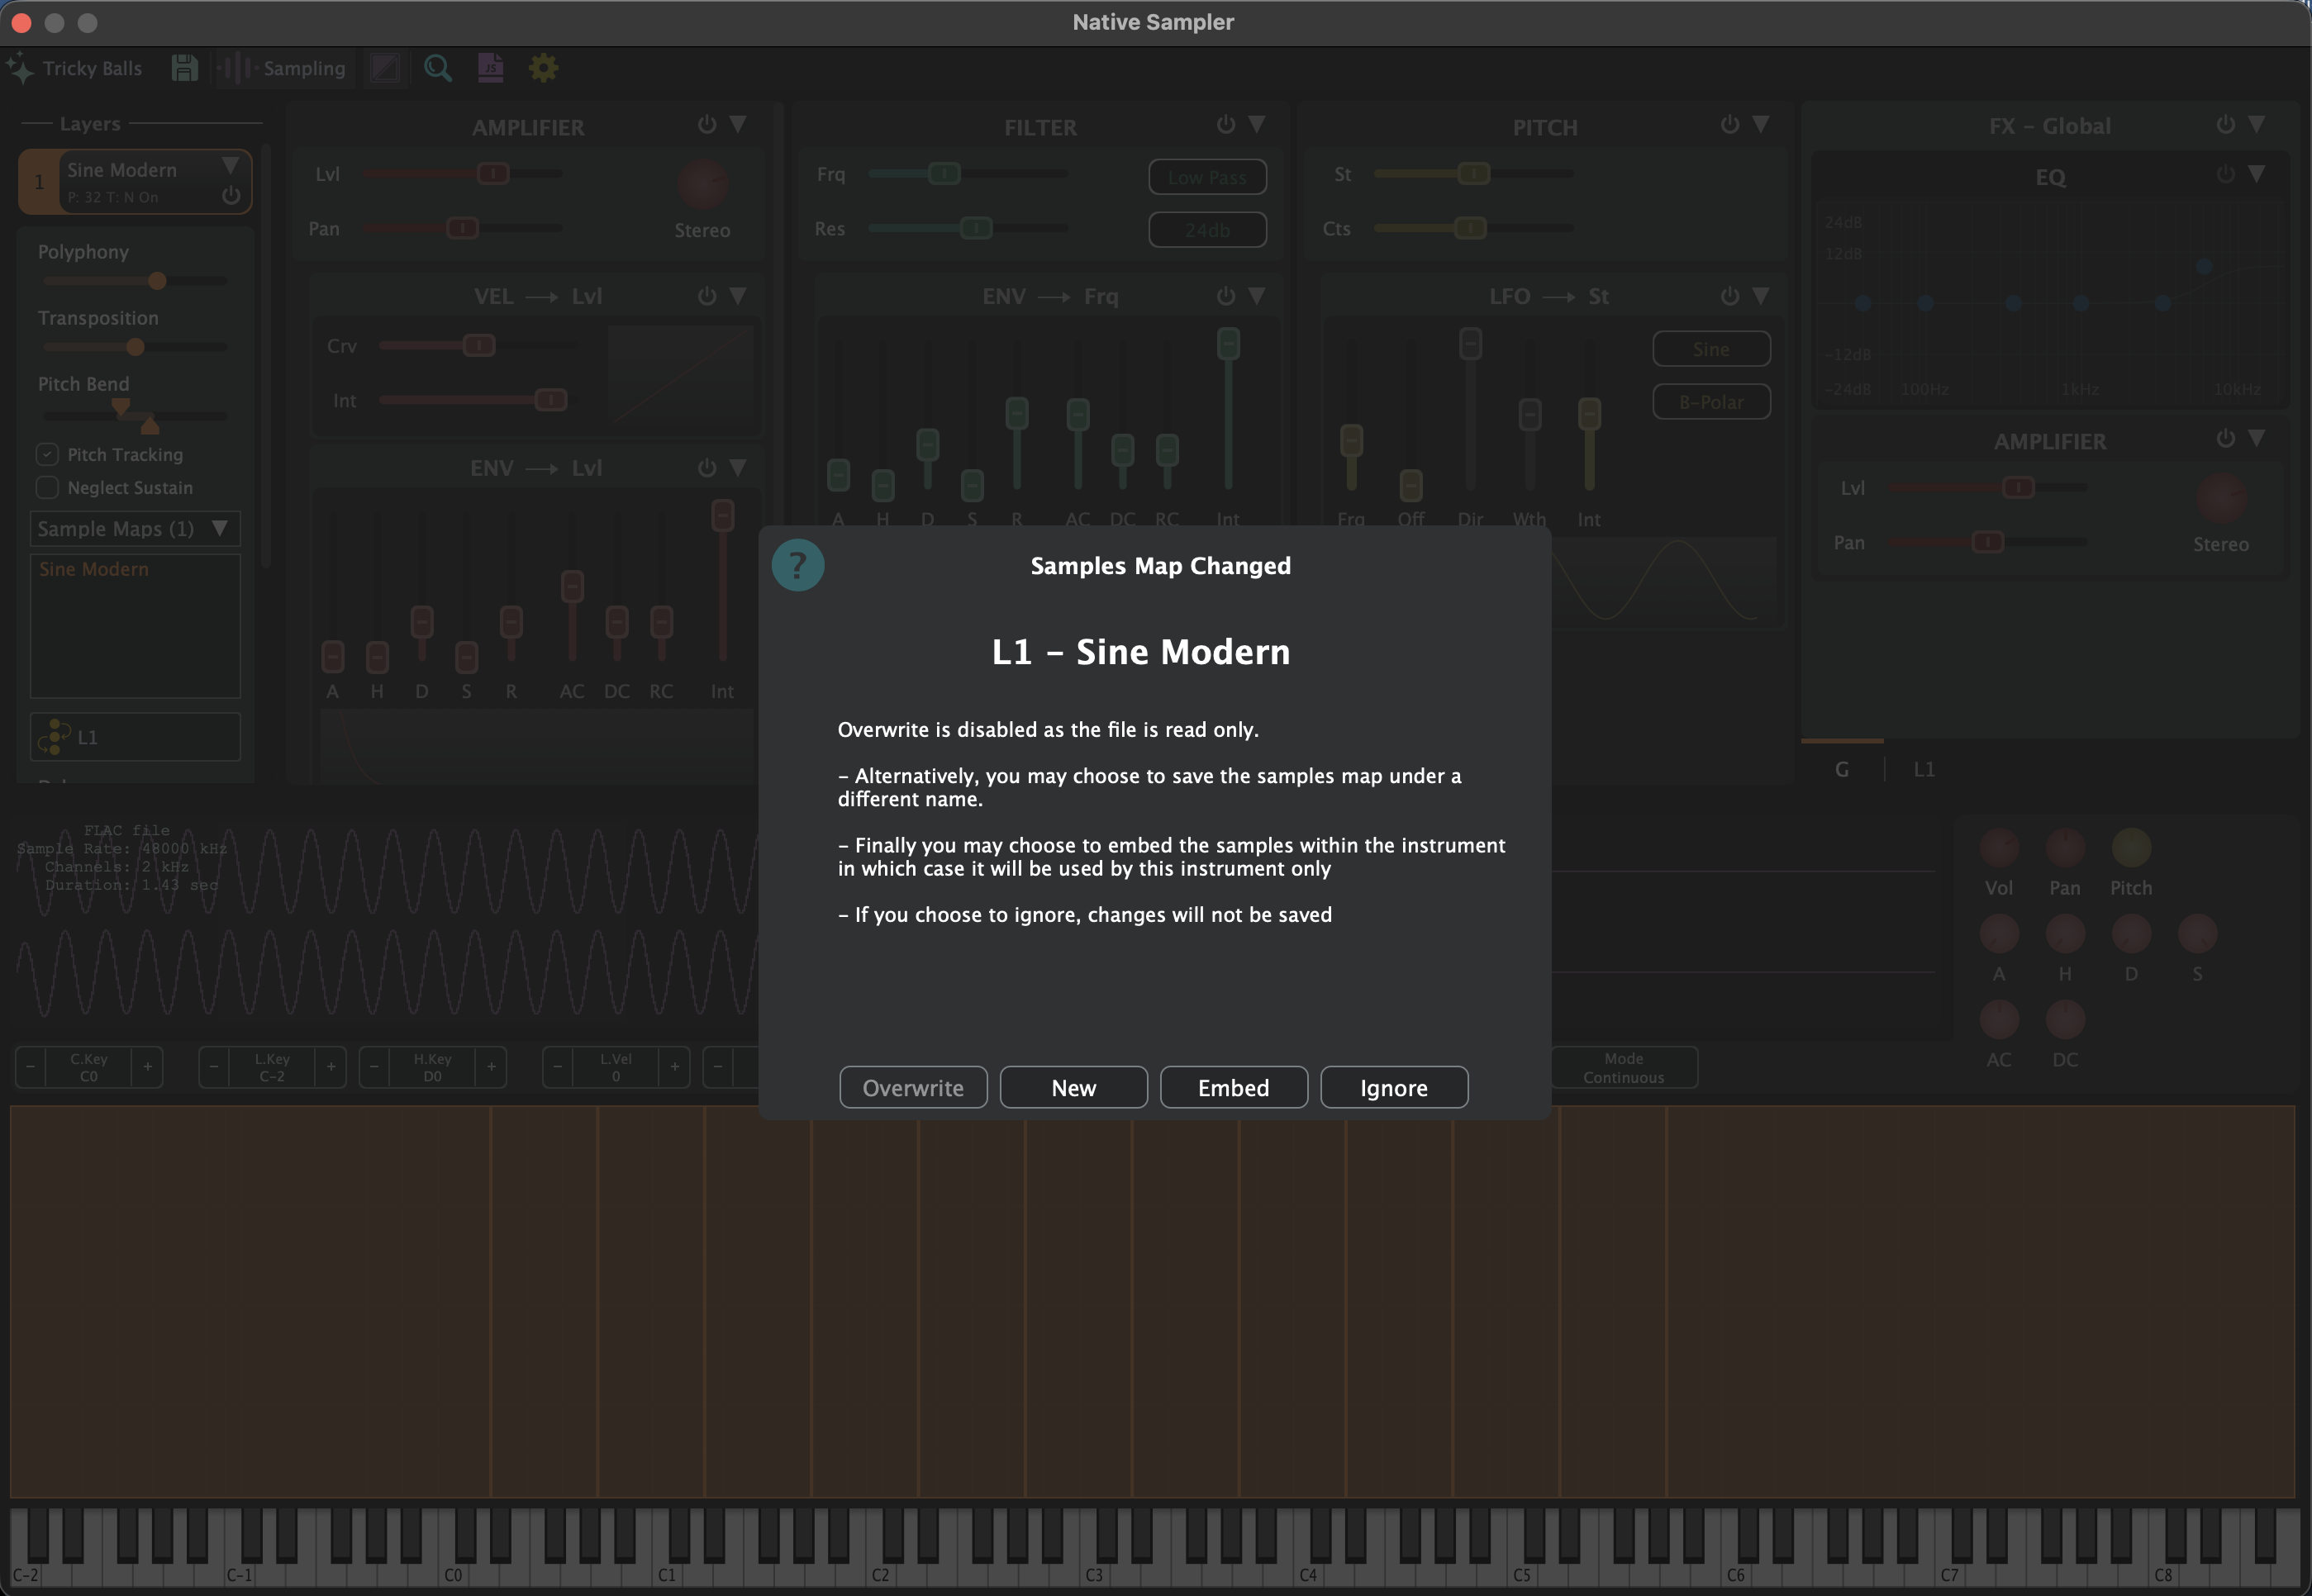 If you want to keep the original sample map intact while preserving the edits for this instrument, you can either create a new sample map or embed it.
Saving a new sample map allows you to reuse it later just like any other sample map.
If your edits apply only to this particular instrument, embedding is the simpler option. This means the edited sample map becomes part of the instrument file itself.
Keep in mind that future changes made to the original sample map will not affect this instrument once the map has been embedded.
Encrypted instruments do not allow overwriting the sample map.
The files are sorted alphabetically. If you want a custom order for your instruments or sample maps, this must be done externally in Explorer or Finder.
The naming convention requires the files to have a number in brackets at the beginning of the file name, for example: (001) Grand Piano.
Without numbers in brackets, the files will be sorted alphabetically.
If you want to keep the original sample map intact while preserving the edits for this instrument, you can either create a new sample map or embed it.
Saving a new sample map allows you to reuse it later just like any other sample map.
If your edits apply only to this particular instrument, embedding is the simpler option. This means the edited sample map becomes part of the instrument file itself.
Keep in mind that future changes made to the original sample map will not affect this instrument once the map has been embedded.
Encrypted instruments do not allow overwriting the sample map.
The files are sorted alphabetically. If you want a custom order for your instruments or sample maps, this must be done externally in Explorer or Finder.
The naming convention requires the files to have a number in brackets at the beginning of the file name, for example: (001) Grand Piano.
Without numbers in brackets, the files will be sorted alphabetically.
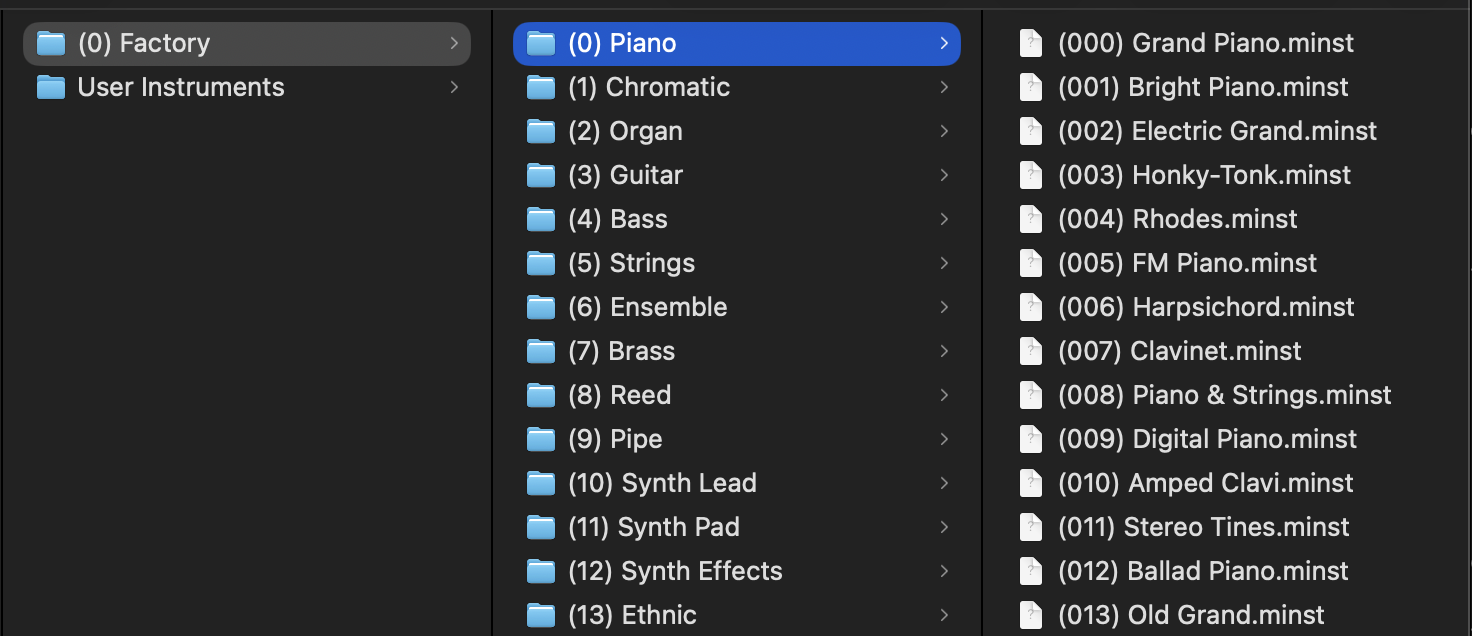
Processor chain
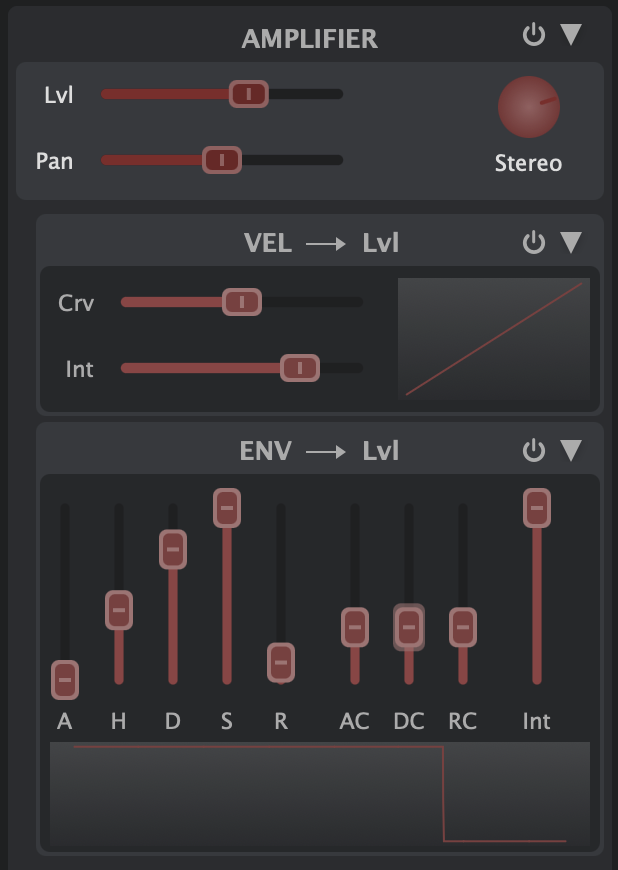 These defaults are provided as a simple starting point. Many instruments will already sound good with this setup; however, for the best results,
it is recommended to tweak the processors and modulators.
New modulators can be added, and existing ones can be removed if needed. When a modulator is added to a processor, it appears with a clear indentation in the interface tree,
and its name indicates what it modulates, making it easy to understand and operate.
For example, in this image, you can see that the AMP level is modulated by both Velocity and Envelope. This is clearly shown in the modulator
names: VEL > LVL and ENV > LVL. In practice, this means that your playing style will affect the volume of each note, and if the note is held,
the envelope will continue to shape the level according to its settings.
These defaults are provided as a simple starting point. Many instruments will already sound good with this setup; however, for the best results,
it is recommended to tweak the processors and modulators.
New modulators can be added, and existing ones can be removed if needed. When a modulator is added to a processor, it appears with a clear indentation in the interface tree,
and its name indicates what it modulates, making it easy to understand and operate.
For example, in this image, you can see that the AMP level is modulated by both Velocity and Envelope. This is clearly shown in the modulator
names: VEL > LVL and ENV > LVL. In practice, this means that your playing style will affect the volume of each note, and if the note is held,
the envelope will continue to shape the level according to its settings.
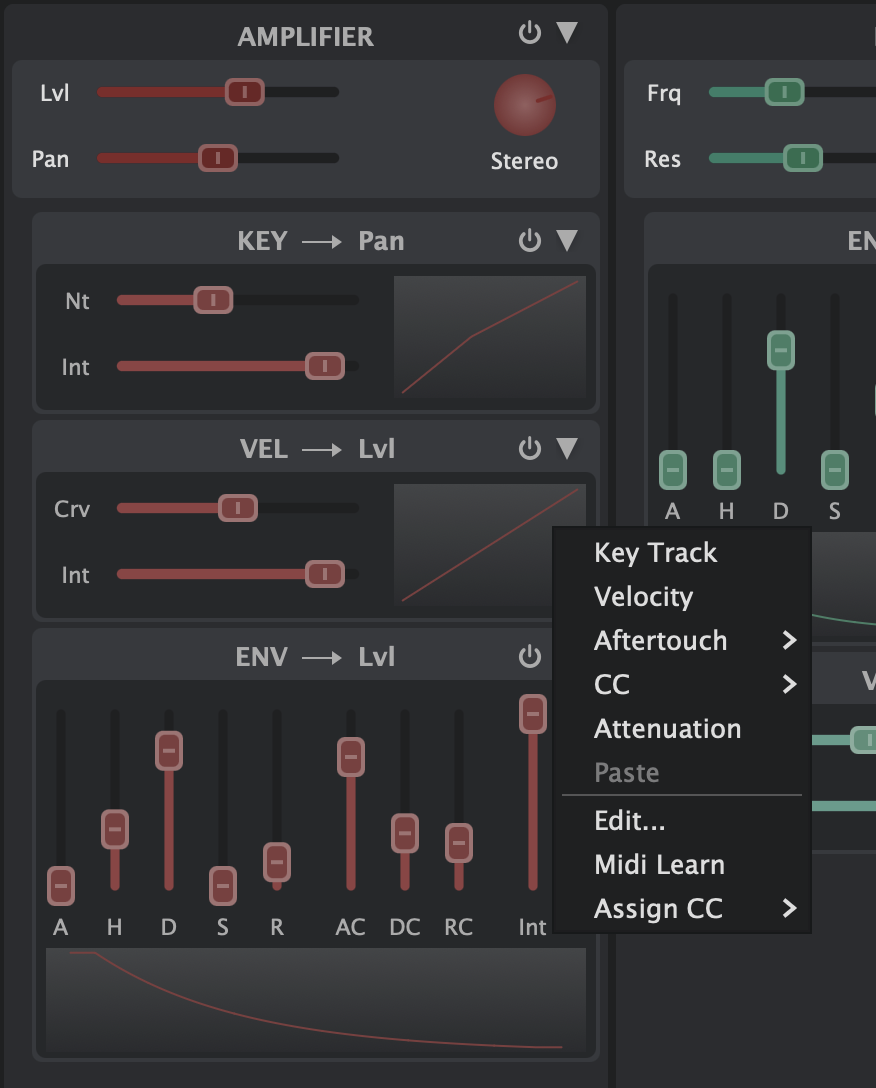 Modulators do not only affect processors; they can also modulate other modulators. To add a modulator to any source, click on its name and choose the desired modulator.
In this image, you can see that we clicked on the Intensity of the Envelope and a list of available modulators appeared.
In practice, this means we can control how much the envelope affects the volume using another modulator, such as a CC message or aftertouch.
The possibilities are virtually limitless.
To change the value of any slider, simply move it, or right-click on the slider to enter the desired value.
Modulators do not only affect processors; they can also modulate other modulators. To add a modulator to any source, click on its name and choose the desired modulator.
In this image, you can see that we clicked on the Intensity of the Envelope and a list of available modulators appeared.
In practice, this means we can control how much the envelope affects the volume using another modulator, such as a CC message or aftertouch.
The possibilities are virtually limitless.
To change the value of any slider, simply move it, or right-click on the slider to enter the desired value.
Sampler settings
Press the cog wheel button of the plugin menu to enter Sampler's global settings.
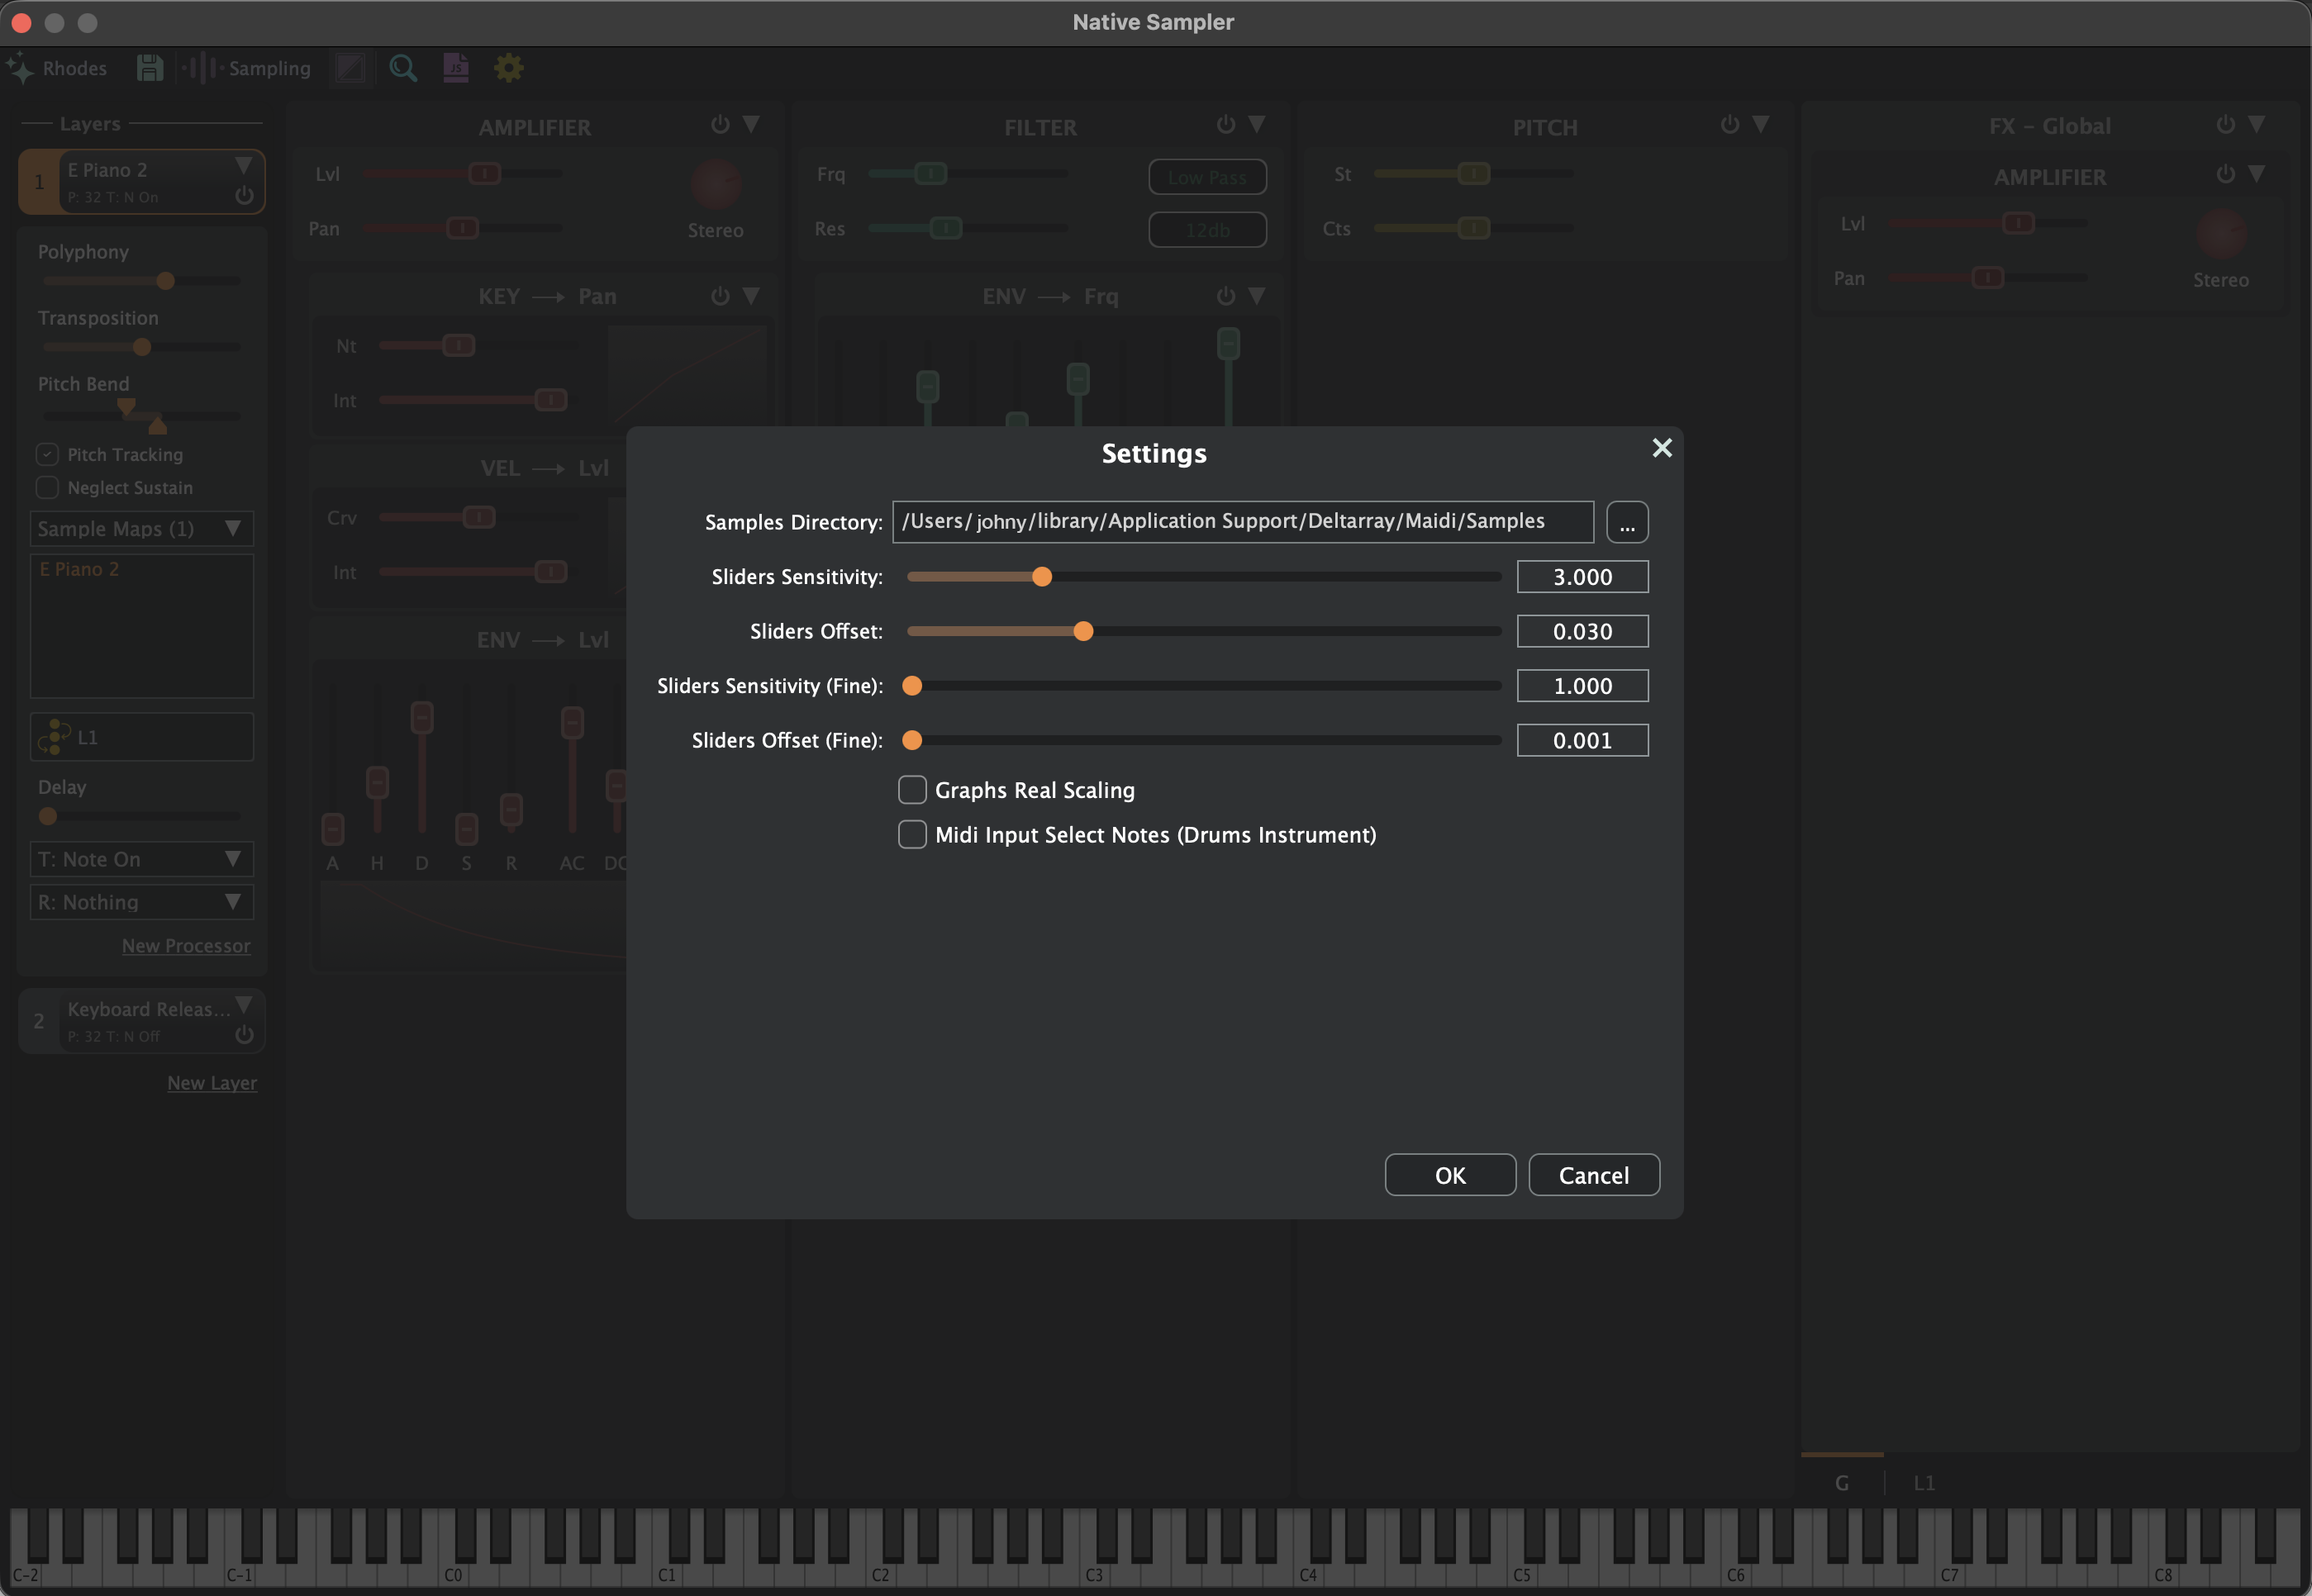 Here you can change the directory of the Sampler’s audio files, for example if you want to place them on another physical drive.
These are also the settings for slider speed and acceleration.
Graph real scaling displays the exact values of the modulated sources instead of normalized values.
The MIDI input “Select Notes” allows you to select the drum kit note using your MIDI controller.
Here you can change the directory of the Sampler’s audio files, for example if you want to place them on another physical drive.
These are also the settings for slider speed and acceleration.
Graph real scaling displays the exact values of the modulated sources instead of normalized values.
The MIDI input “Select Notes” allows you to select the drum kit note using your MIDI controller.
To change the size of the plugin interface press the magnifying glass button on the plugin's menu bar.
Bundles
Giglad users can share resources with each other using bundles. A bundle is a collection of resources which all exist in a single file. User "John" can create a bundle on his system and then send it to user "Tom". "Tom" can import it and play with "John" styles, programs, presets etc...It is also possible to encrypt your sensitive resources (styles, audio) in such a way that only a specific user of Giglad will be able to access them.
The bundles working directory contains 3 sub directories:
- imported: This is the directory where the bundles that you import are placed.
- library: This is the directory where the non encrypted bundles that you create are placed.
- encrypted: This is the directory where the encrypted bundles that you create are placed.
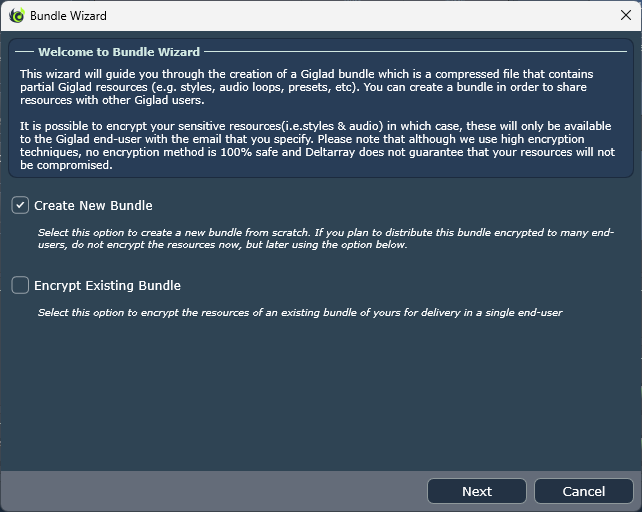
Creating a bundle is possible via the Bundles Wizard which can be accessed via the menu File☛Bundles☛Create... The wizard comes with detail help instructions on each step which can be viewed at the top of the window. In first page you select to create a new bundle which will be placed at your \bundles\library directory or to encrypt one of your existing bundles which should already exist in the \bundles\library directory and that will eventually end up at \bundles\encrypted directory.
If you choose to create a new bundle and press next you must then choose your resources you wish to include in your bundle. The left tree is populated with all your local resources and you can drag & drop or double click in order to add one of these resources to your bundle. For simplicity I have selected a single style and a single preset. The preset sets the melody only.
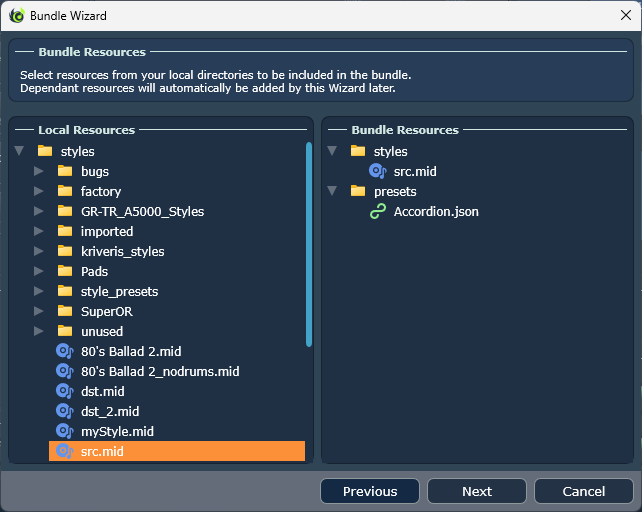
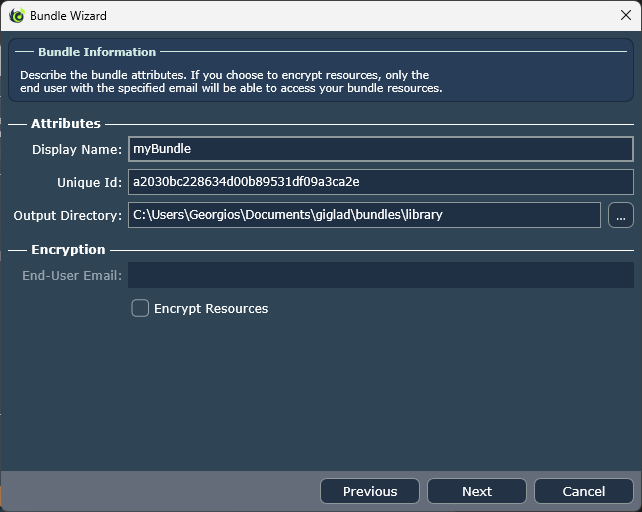
You must then give a name to your bundle which will be visible to the end user. The bundle wizard will also add a unique id to your bundle to ensure that every bundle in this word is unique. You may not change that and its only there for feedback info. You may also choose the output directory to where the bundle should be created. It is advised to leave the default directory because it is the directory that the wizard will later search for existing bundles that you wish to encrypt. If you do not care about any of this, you can choose a directory which will be easier for you to find the file once this has been created.
Finally you can choose to encrypt the bundle. Checking the "Encrypt Resources" option will enable the "End-User Email" where you can entry the email of a Giglad user. This user will be the only one able to access your sensitive resources. Again, if you plan to distribute your bundle to many users do not check this option. Instead, create the bundle and use the first page option to encrypt an existing bundle. You can repeat the process of encrypting an existing bundle as many times as the number of users you wish to distribute.
On the last page, it is advised to review the resources that will eventually be included in the bundle to ensure that no mistakes have been made. Although I only added one style and one preset, I now additionally see one audio loop and one more preset. This is because the wizard ensures that all dependencies will be included. My style contains an audio loop so this has been added automatically. My style also contains a style memory (grand_piano) which also has been added automatically.

The wizard also finds plug-ins dependencies for instruments and insert effects. If these are native (like the audio loops and the sampler) then the end user most likely will have them. Otherwise you may wish to let him know what plug-ins he needs.
Importing a bundle is pretty straight forward and can be done via File☛Bundles☛Import... After successfully importing a bundle you should be able to see the resources in each browser. If for example you import a bundle named "Progressive Rock" which contains styles and presets, in the styles browser you will see a directory "Progressive Rock" where inside this the styles of the bundle will exist and in the presets browser you will see again a directory "Progressive Rock" where inside this the presets of the bundle will exist.
Auxilary Window
The auxiliary window can be accessed via the main menu View→Auxiliary Window.. and implements tools which can be used as helpers or troubleshooting.
Log
The log window displays real time information as well as warnings and errors while the software is in use. Any toast message is also included in the log as in fact the toast message displays all warnings, errors and important info messages that end up in the log. If at any moment something does not work as you would expect, you can visit the log window to see if you can get any hint.
- Errors are displayed in red and require your immediate attention.
- Warnings are displayed in yellow and indicate that something goes wrong but you may continue.
- Info is displayed in white and does not require any action.
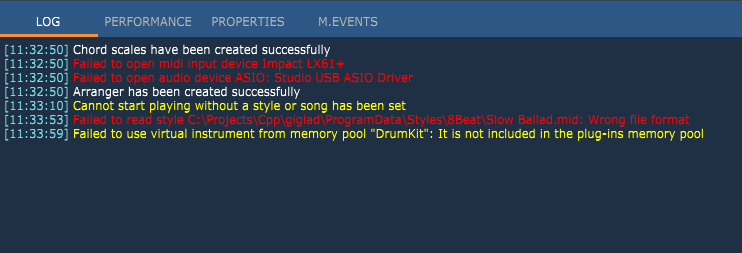 In the image above:
☛
The Failed to open audio device ASIO: Studio USB ASIO Driver clearly tells me that Giglad has failed to use the audio device which
I have selected from the settings. Without an audio device there will be no clock, there will be no sound coming out.
☛
The Cannot start playing without a style or song has been set was reported when I clicked on the Play button without
having set a style to the Arranger.
☛
The Failed to use virtual instrument from memory pool "DrumKit": It is not included in the plug-ins memory pool was reported when
I loaded a style. The style was loaded but I got a warning which simply tells me that I am using a virtual instrument in my style from the memory pool which cannot be found.
Right clicking on the output window will pop up a menu from where you can:
In the image above:
☛
The Failed to open audio device ASIO: Studio USB ASIO Driver clearly tells me that Giglad has failed to use the audio device which
I have selected from the settings. Without an audio device there will be no clock, there will be no sound coming out.
☛
The Cannot start playing without a style or song has been set was reported when I clicked on the Play button without
having set a style to the Arranger.
☛
The Failed to use virtual instrument from memory pool "DrumKit": It is not included in the plug-ins memory pool was reported when
I loaded a style. The style was loaded but I got a warning which simply tells me that I am using a virtual instrument in my style from the memory pool which cannot be found.
Right clicking on the output window will pop up a menu from where you can:
- Copy the whole or partial output
- Clear the output.
- Input Command: This will place an input text window at the bottom of this window where you can type commands similar to the command line of Windows or MAC terminal. The available commands are not documented and this feature is there for advanced users or to be used with our support team guidance
Performance
Giglad is using real time audio processing and as such, the audio engine is constantly processing audio even when you listen no sound.
The performance window provides information regarding the performance of the audio engine of Giglad and the plug-ins.
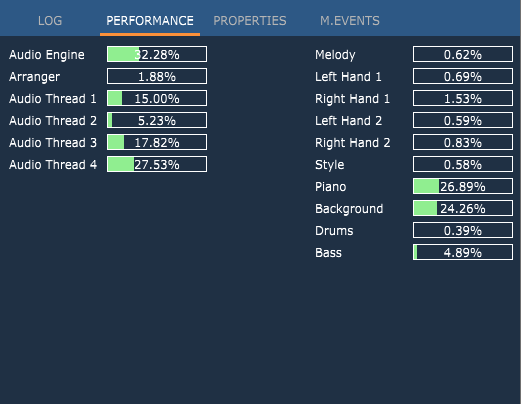 What you will be most interested, is to ensure that the indication of the Audio Engine is not anywhere near 100% (This is also displayed in the Arranger Console panel).If this indication
goes above 100% you will be listening sound glitches coming out from your speakers. When this happens you must release the load by trying the following
What you will be most interested, is to ensure that the indication of the Audio Engine is not anywhere near 100% (This is also displayed in the Arranger Console panel).If this indication
goes above 100% you will be listening sound glitches coming out from your speakers. When this happens you must release the load by trying the following
- Increasing the buffer size in Audio Settings.
- Reducing the sampling rate in Audio Settings.
- Increasing the number of threads in Audio Settings.
- Removing plug-ins (i.e. virtual instruments) from your style or melody tracks.
Properties
The properties window is meant to display information on a selected object. Currently this is only implemented for the Style Editor where you can select a track, a section or midi events to
see internal data.
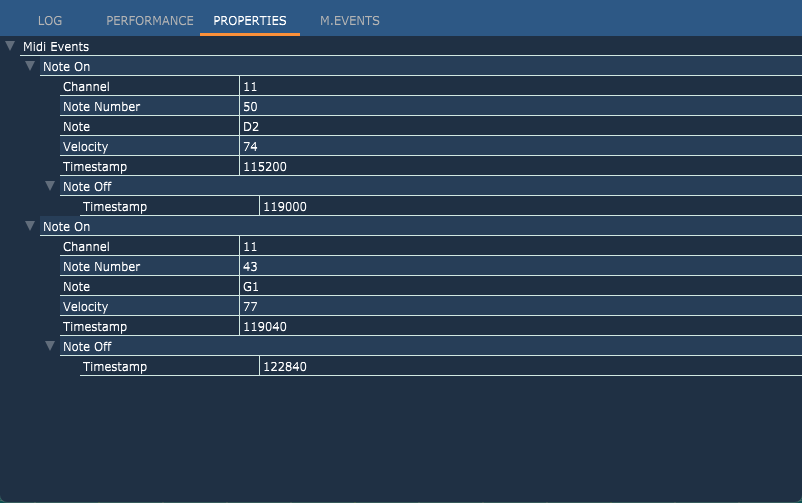
Midi Events
You may select a single track in your mixer and watch the midi events that this receives from its corresponding menu "Watch Midi Events". If a track is being watched you will then be able to see the messages in this window.
Notes will be shown in the virtual keyboard while any other controller messages will be displayed as text. This can be useful when creating a style and trying to understand what notes the arranger actually plays when
you play different chords.
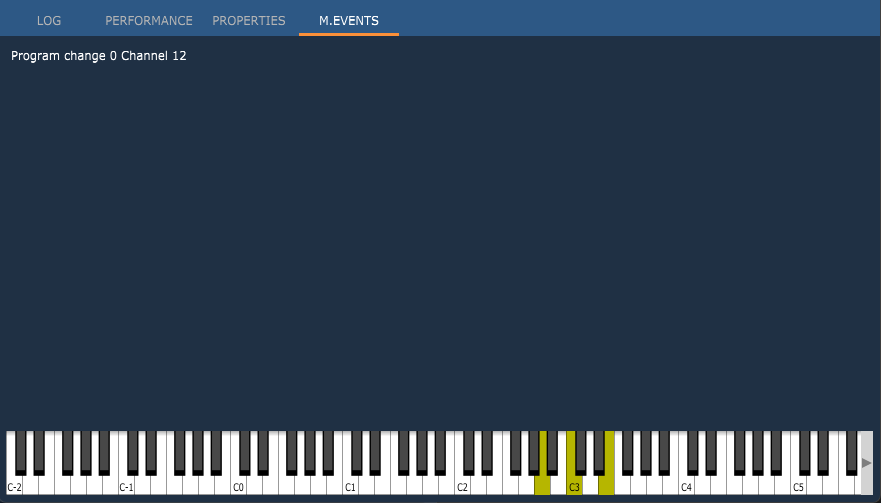
Third Party
Third Party Libs
- JUCE Framework
- ASIO Interface Technology by Steinberg Media Technologies GmbH
- VST Plugin Technology by Steinberg Media Technologies GmbH
- Dynamix Audio
- Bungee Audio Time Stretch and Pitch Shift Library by Parabola Research Limited
- FluidSynth
- yaml-cpp
- OpenSSL++ by OpenSSL Software Foundation Inc
Third Party Icons
- Style icon by Alice Design from the Noun Project
- Program icon by Paul Verhulst from the Noun Project
- Preset icon by Gregor Cresnar from the Noun Project
- Song icon by Roberto Chiaveri from the Noun Project
- Recording icon by angelina from the Noun Project
- Fade In/Out by Arena from the Noun Project
- Reset by Rainbow Designs from the Noun Project
- Lock/Unlock by Julynn B. from the Noun Project
- Zero by Rflor from the Noun Project
- Undo-Redo icons by Freepik from www.flaticon.com
- Metronome icon by Freepik from www.flaticon.com
- Settings icon by Freepik from www.flaticon.com
- Note icon by Freepik from www.flaticon.com
- Zoom icon by Freepik from www.flaticon.com
- Record icon by Google from www.flaticon.com
- Snap icon by Google from www.flaticon.com
- Validation icon by SKETCH ICON from the Noun Project